NIMMSTA App
NIMMSTA App for Android
System requirements
The NIMMSTA App for Android is compatible with Android mobile devices running Android version 10.0 or newer. To ensure the intended functionality, the NIMMSTA Smart Watch is continuously tested together with the NIMMSTA App on various Android devices for consumer and industrial use, including mobile handhelds, tablets and smartphones. If you notice unusual behavior or suspect an error, report it directly here by submitting a Service Ticket.
Installing the NIMMSTA App for Android
The NIMMSTA App can be downloaded from the NIMMSTA Productivity Cloud at the following link: NIMMSTA Productivity Cloud
When downloading from the Productivity Cloud, you will receive an .apk file.

|
The following descriptions refer to Android version 13. In other versions or versions from other manufacturers, texts and details may differ, but the basic steps are the same. |
Allow installation from external sources
To install an app using an APK file, installation from external sources must be allowed.
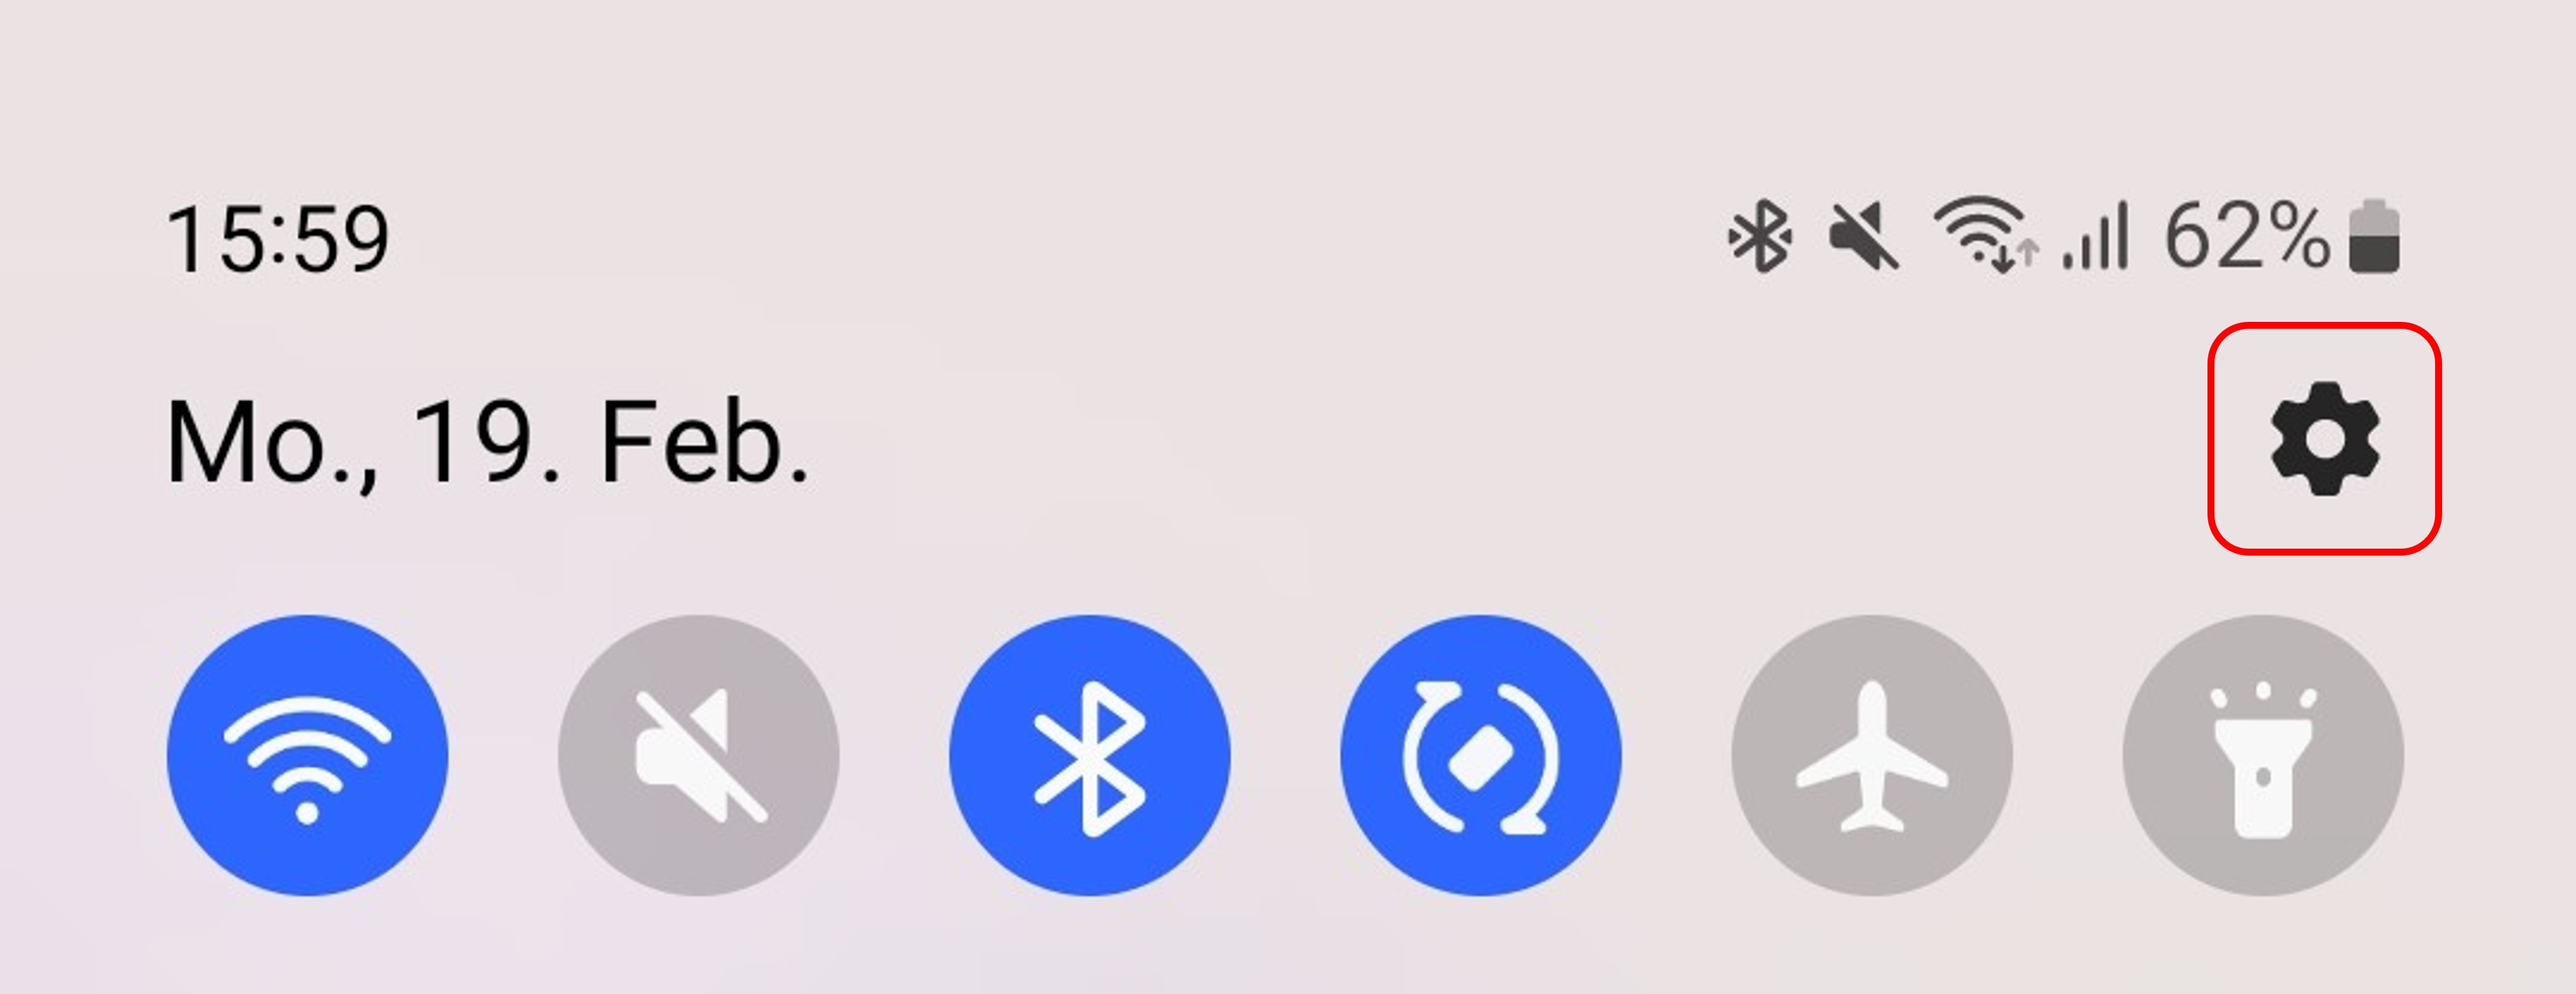
Open Settings by swiping down from the top of the Home screen and selecting the gear icon.
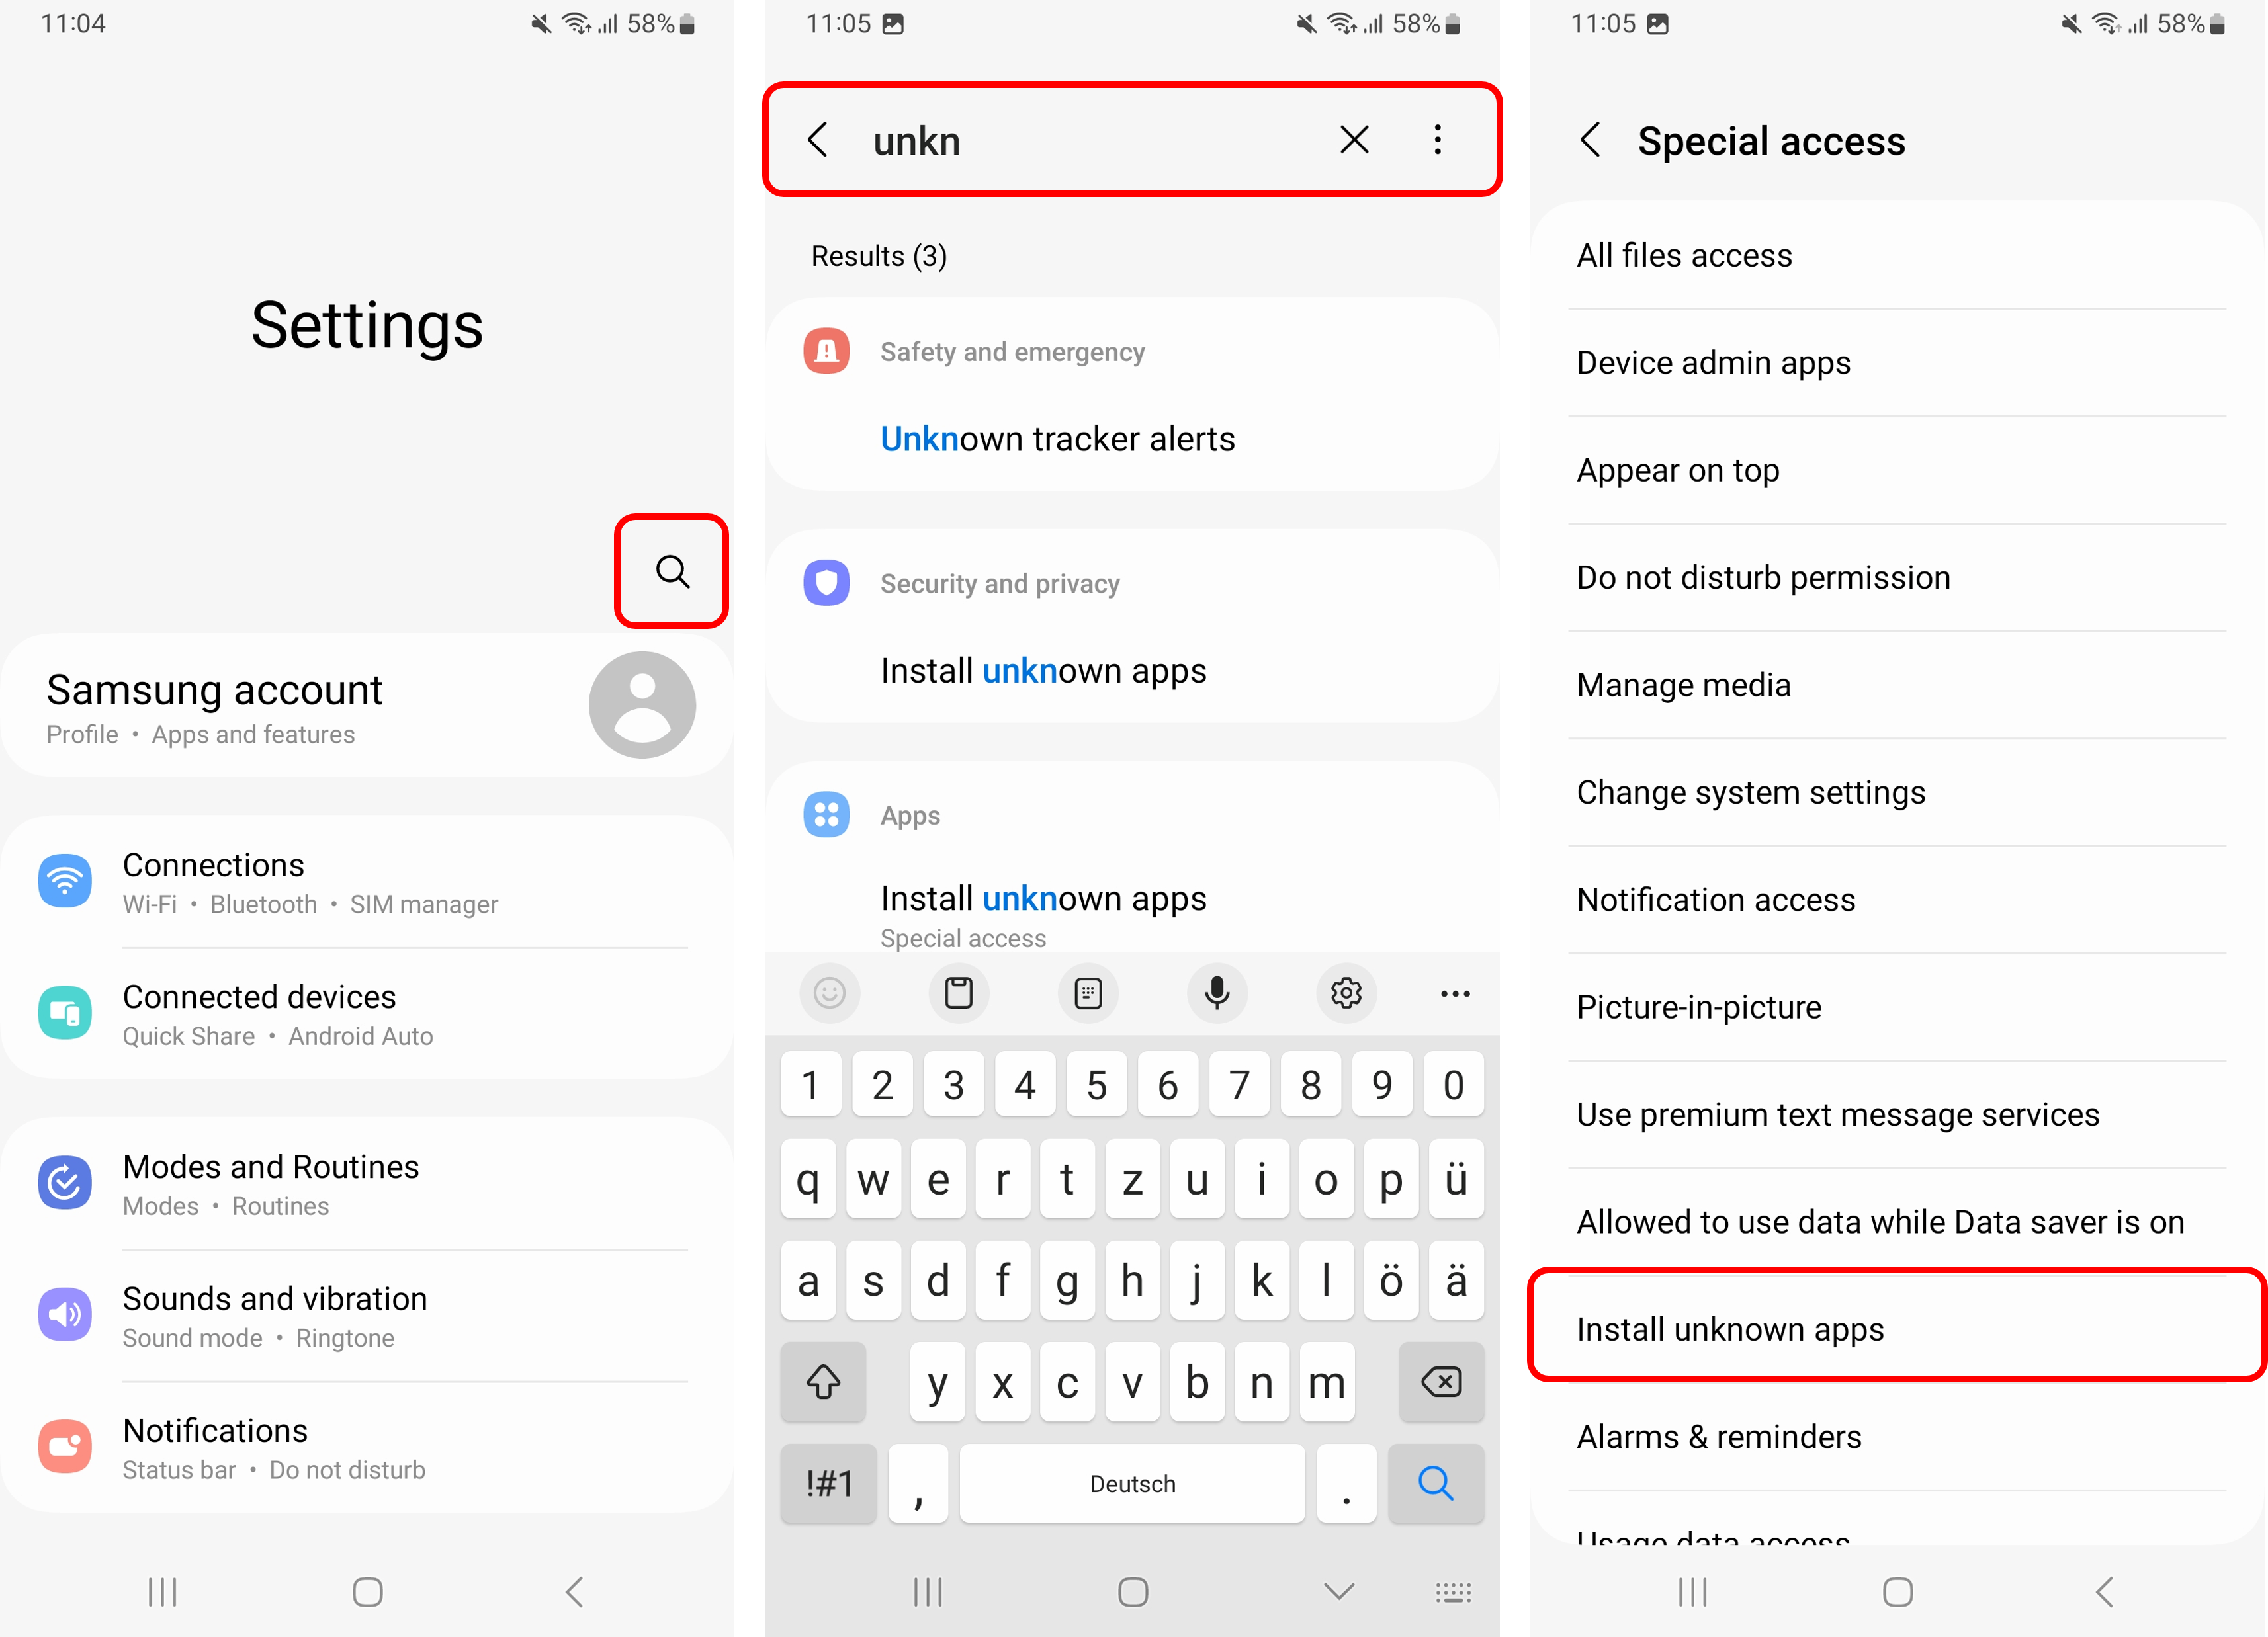
Select Search settings, search for "unkn" and select Install unknown apps from the search results. Then select the corresponding menu.
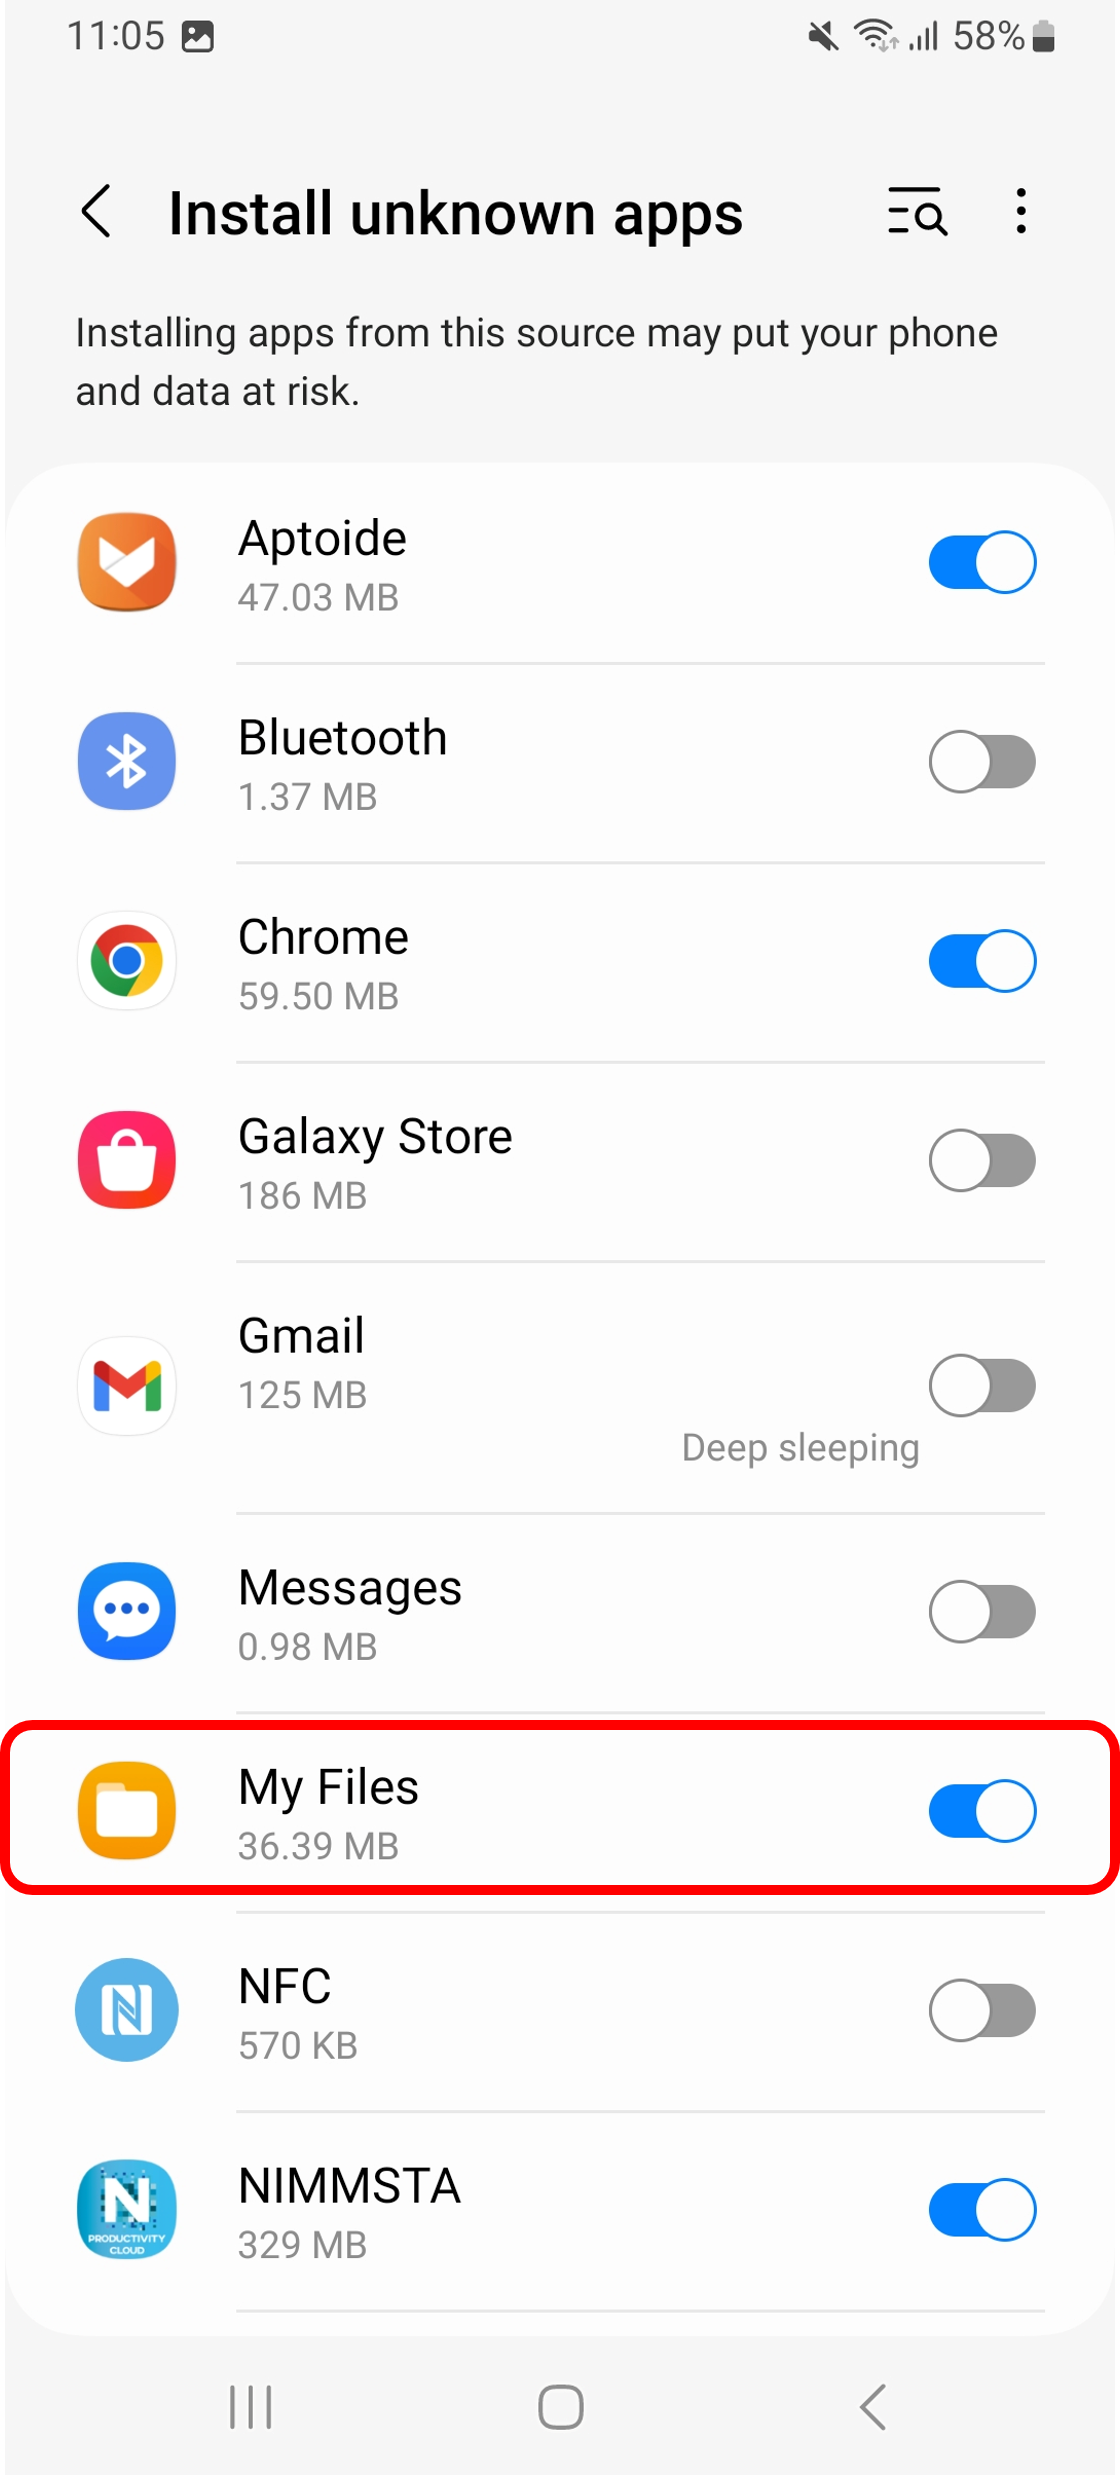
Make sure that the folder in which you want to save the APK file is enabled.
Transferring the APK file
After downloading the APK file from the B2B portal, connect your Android device to your computer using a USB cable.
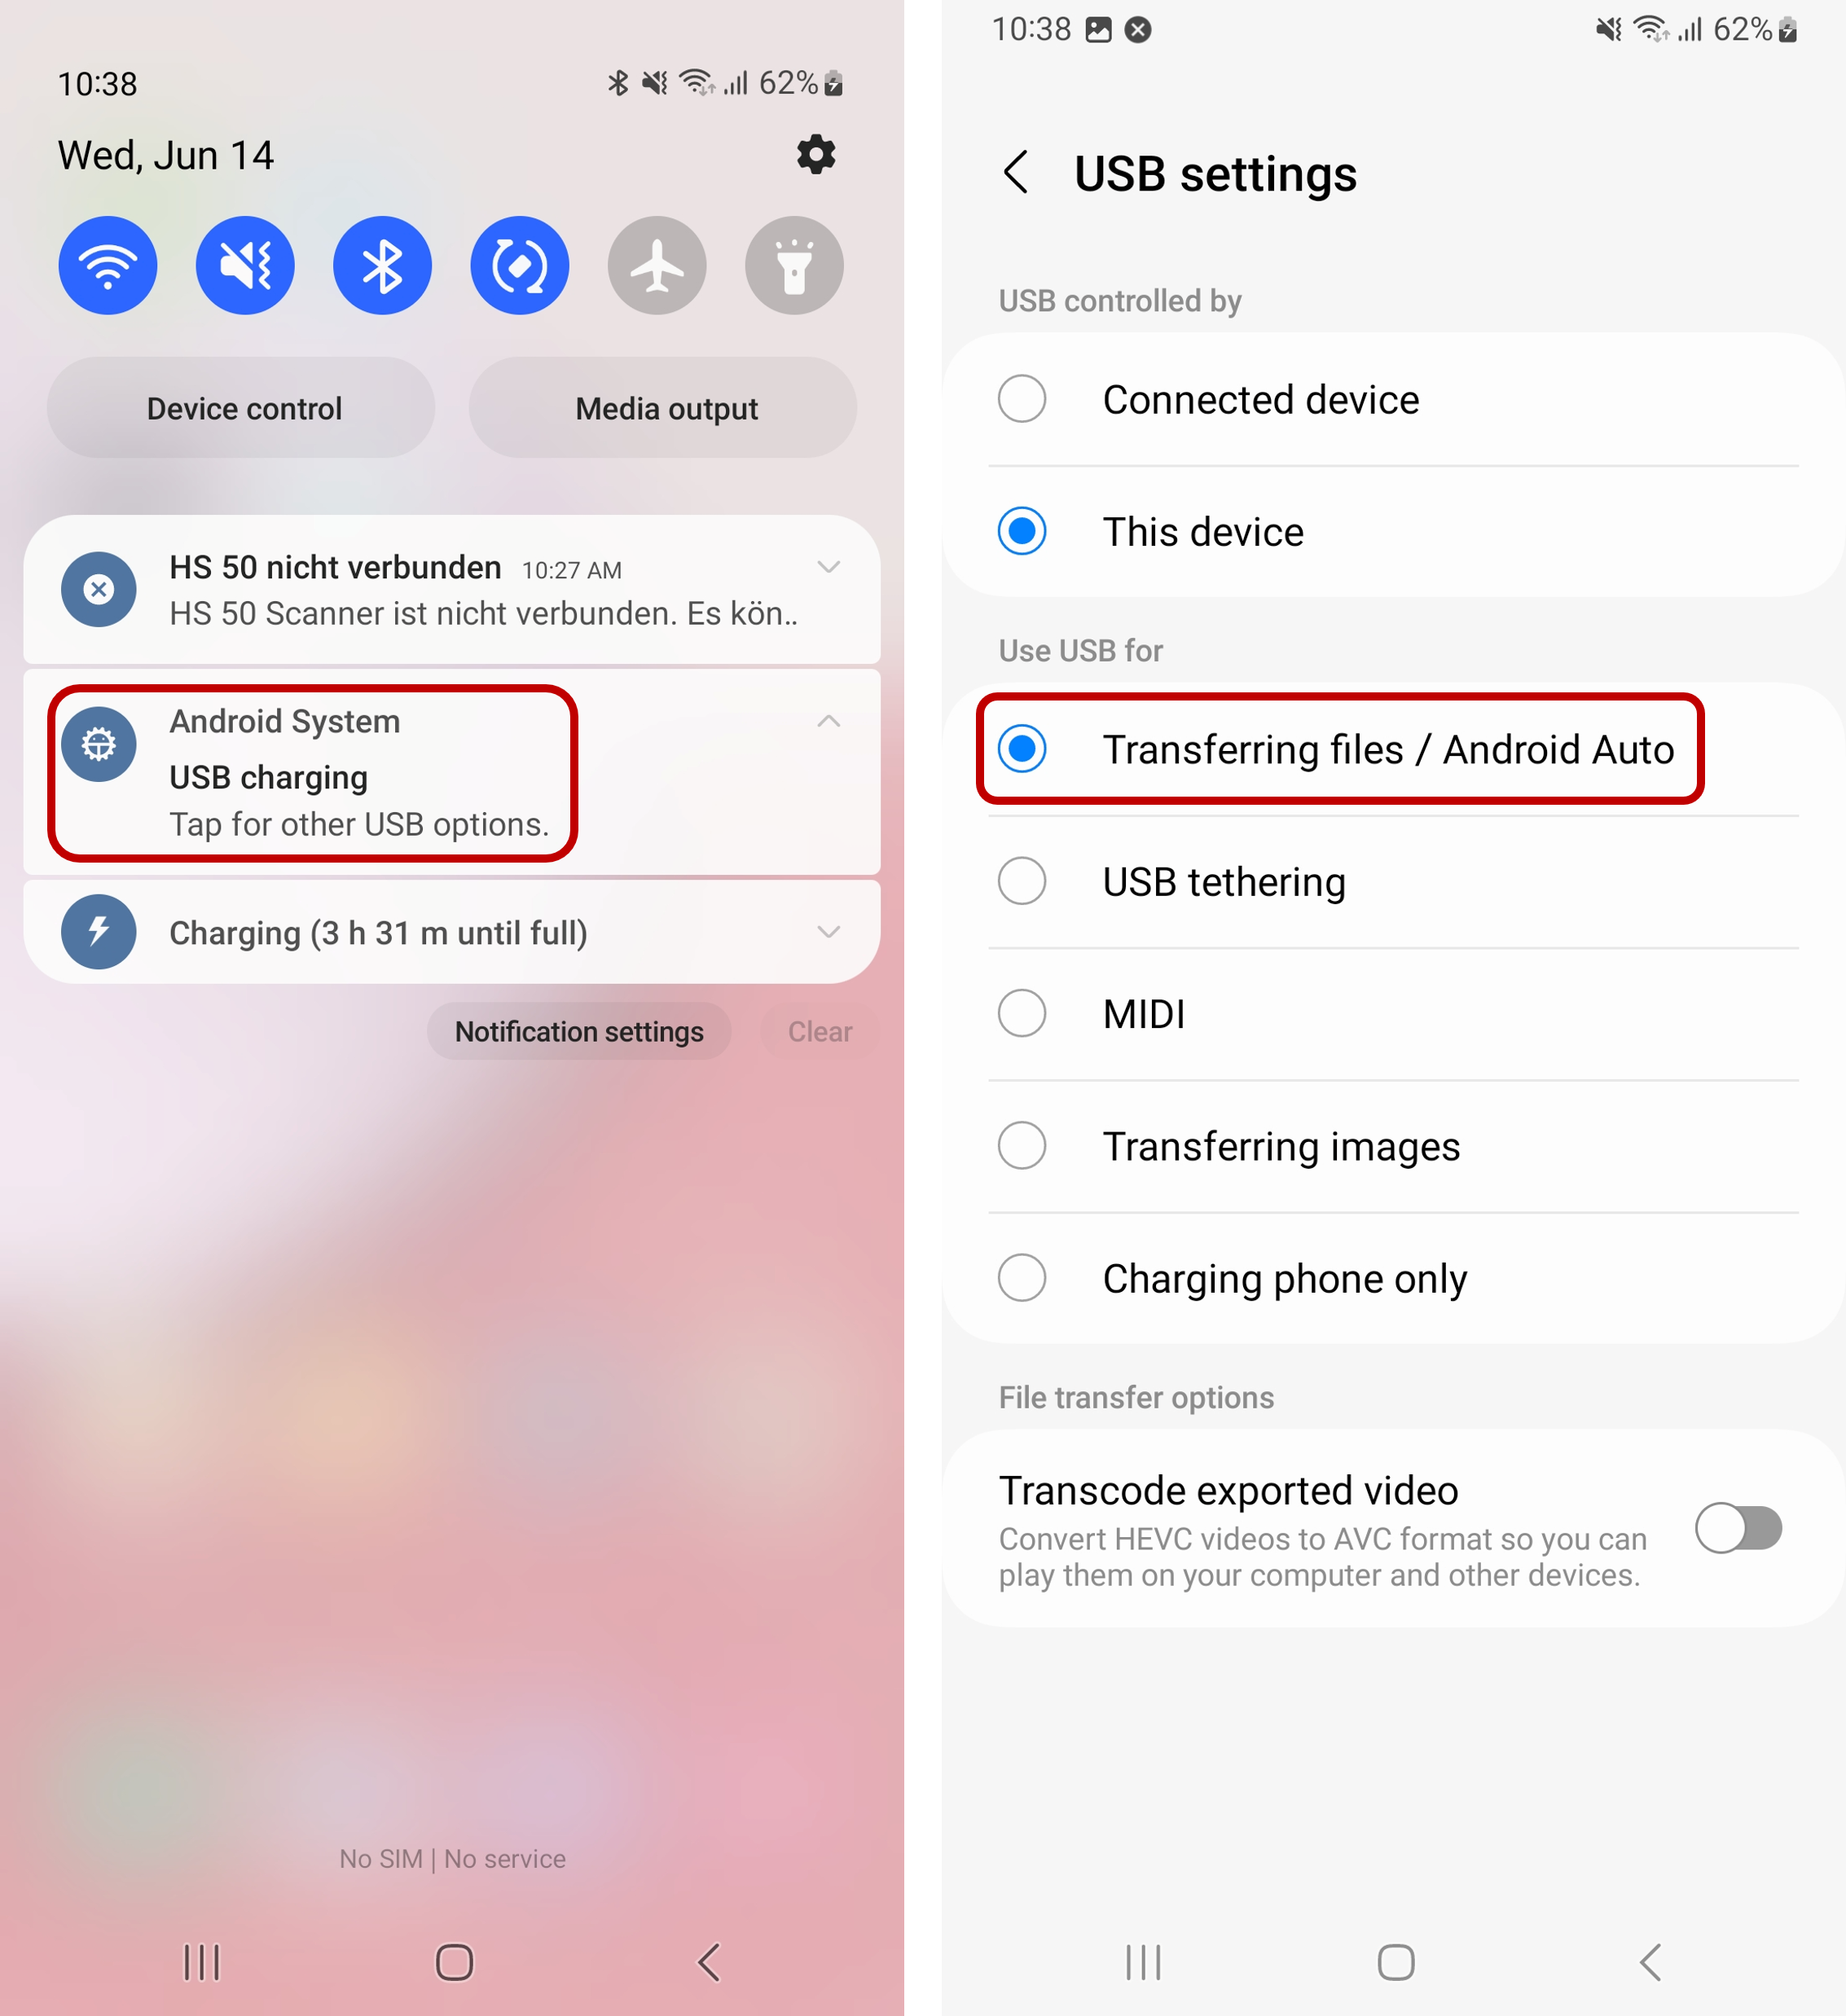
Make sure that the APK file can be transferred to the Android device. The procedure varies by model. On Android 8, select the required USB transfer mode by swiping down from the top of the Home screen and tapping Android System Charging this device via USB (you may then need to tap More options). Select File transfer from the menu.
You can now open the Android device in Explorer on the computer. Select the Internal shared storage or Internal storage folder. On some devices, this folder is called SD Card.
Select the Download folder and copy the downloaded APK file into it.
Installation of the NIMMSTA App
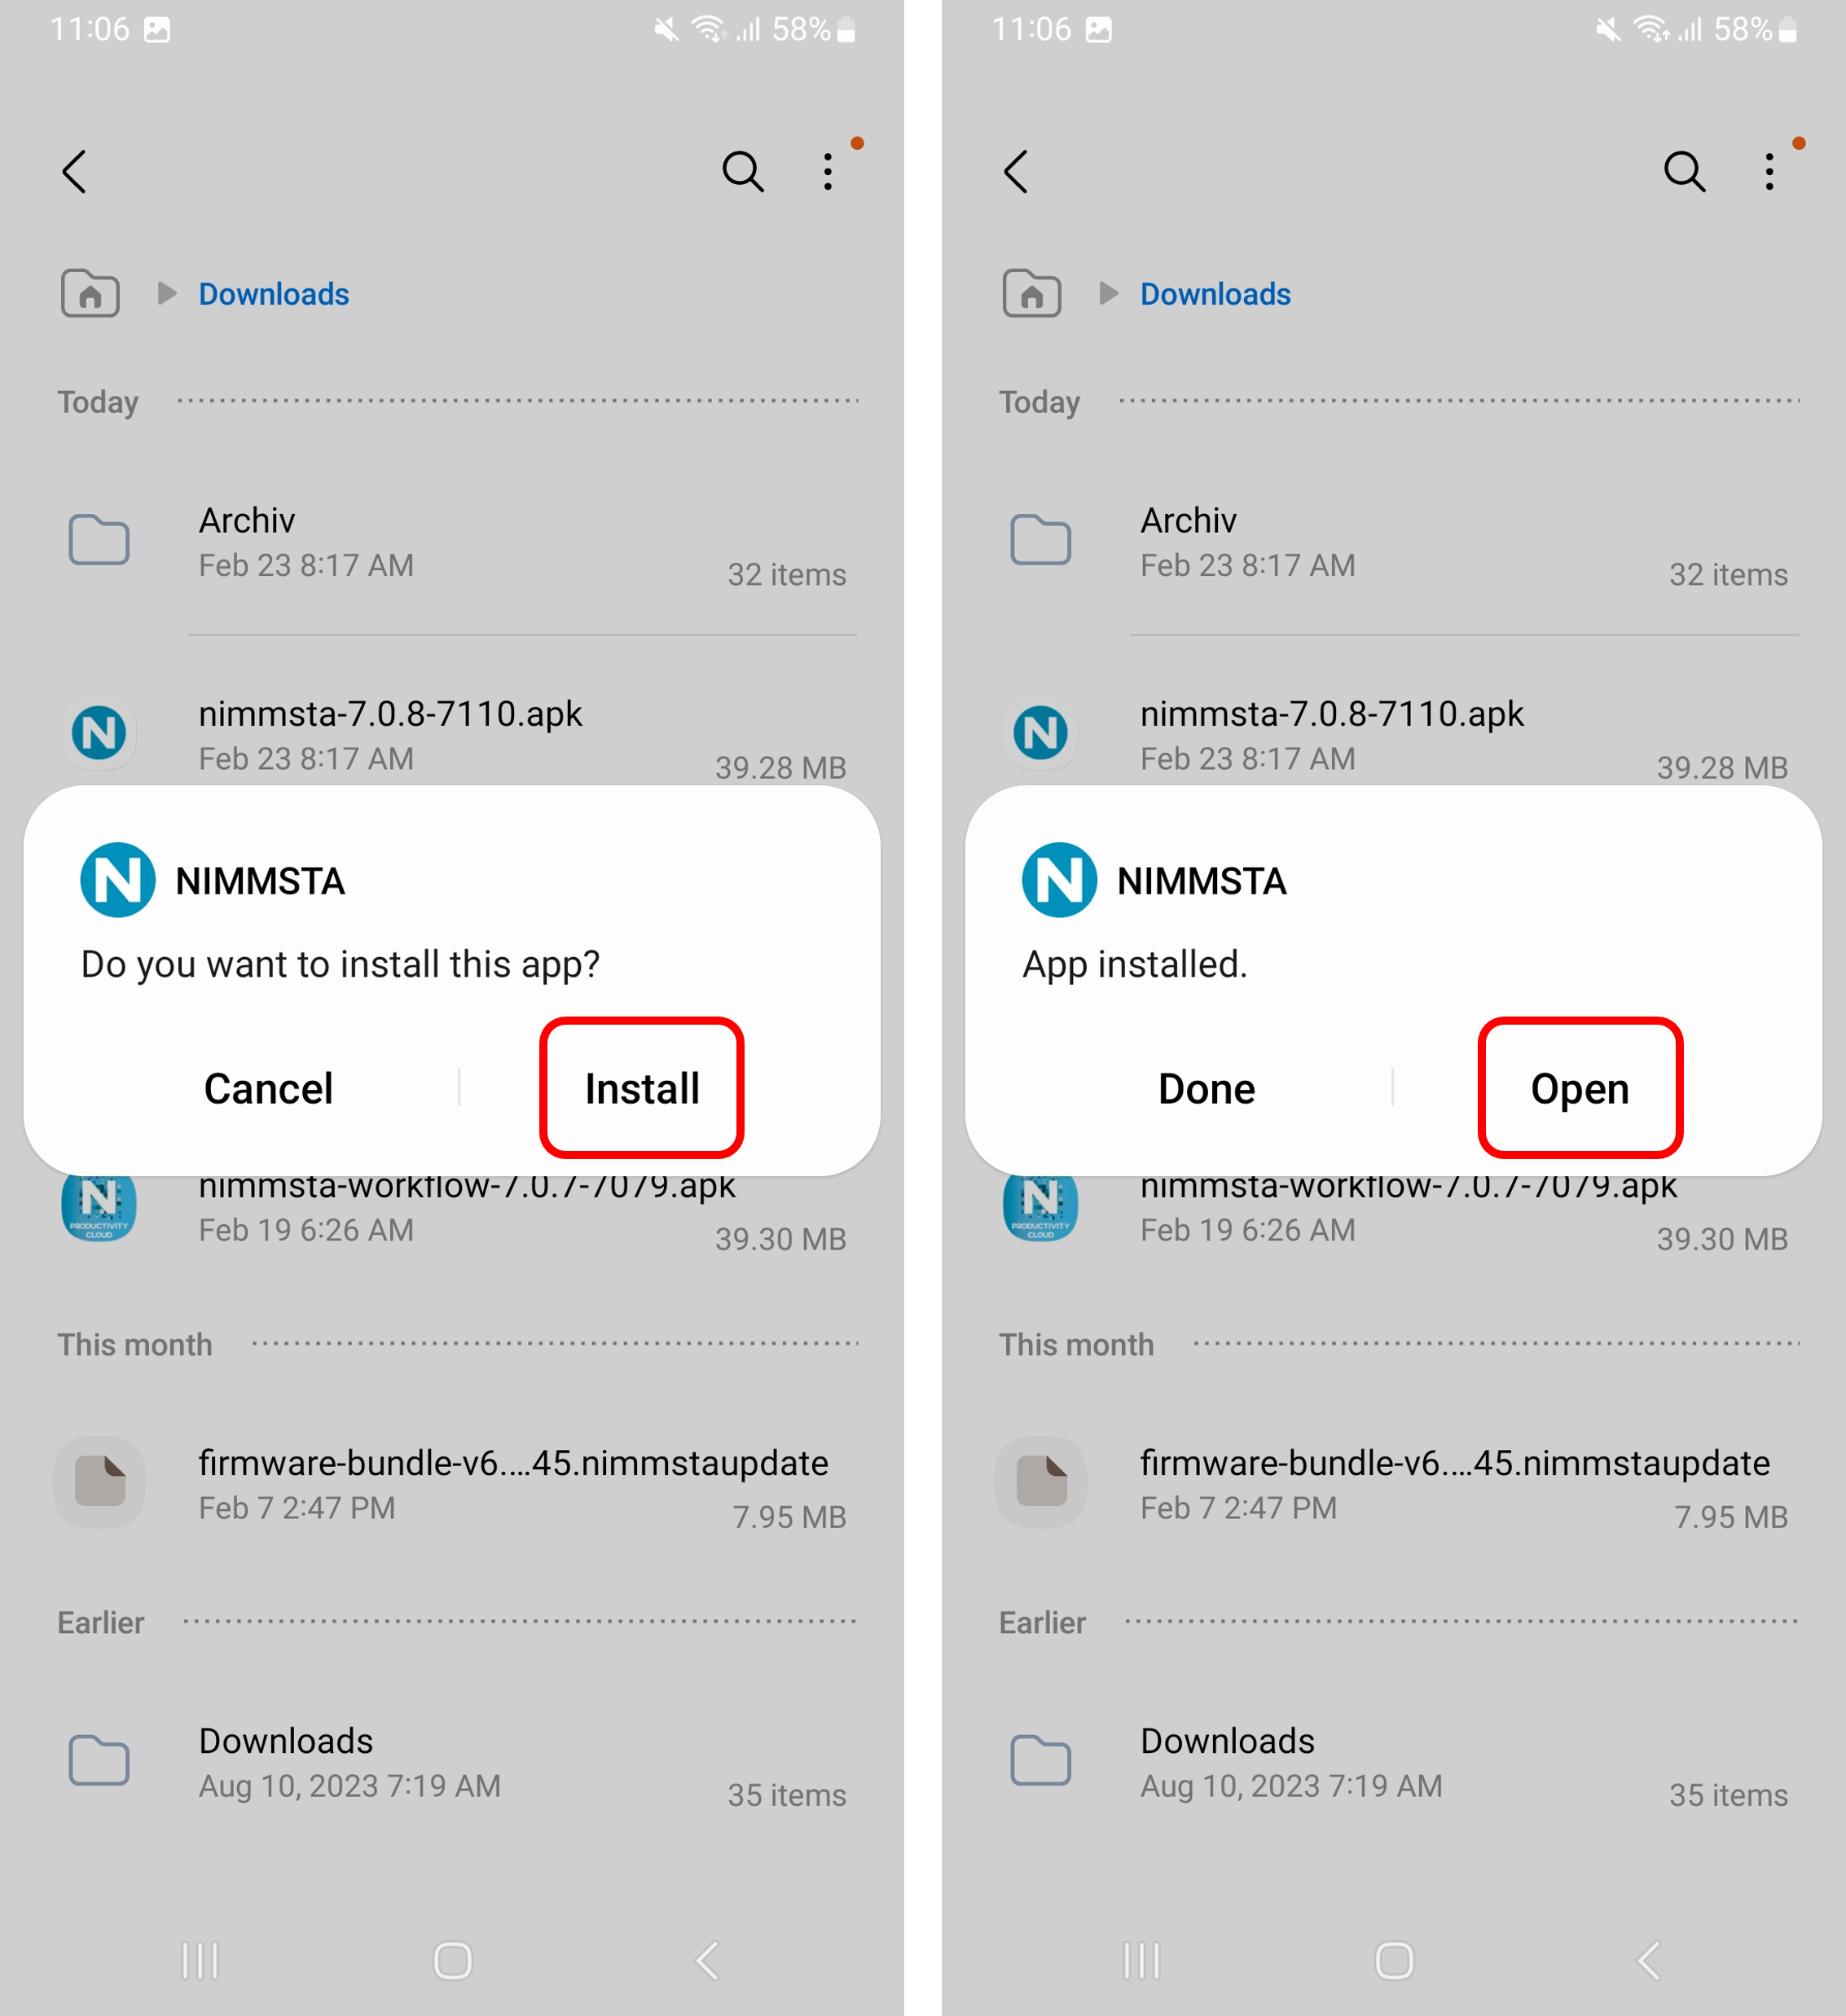
On your Android device, open the file manager and go to Internal shared storage/Download. Select the APK file you just transferred to install it.
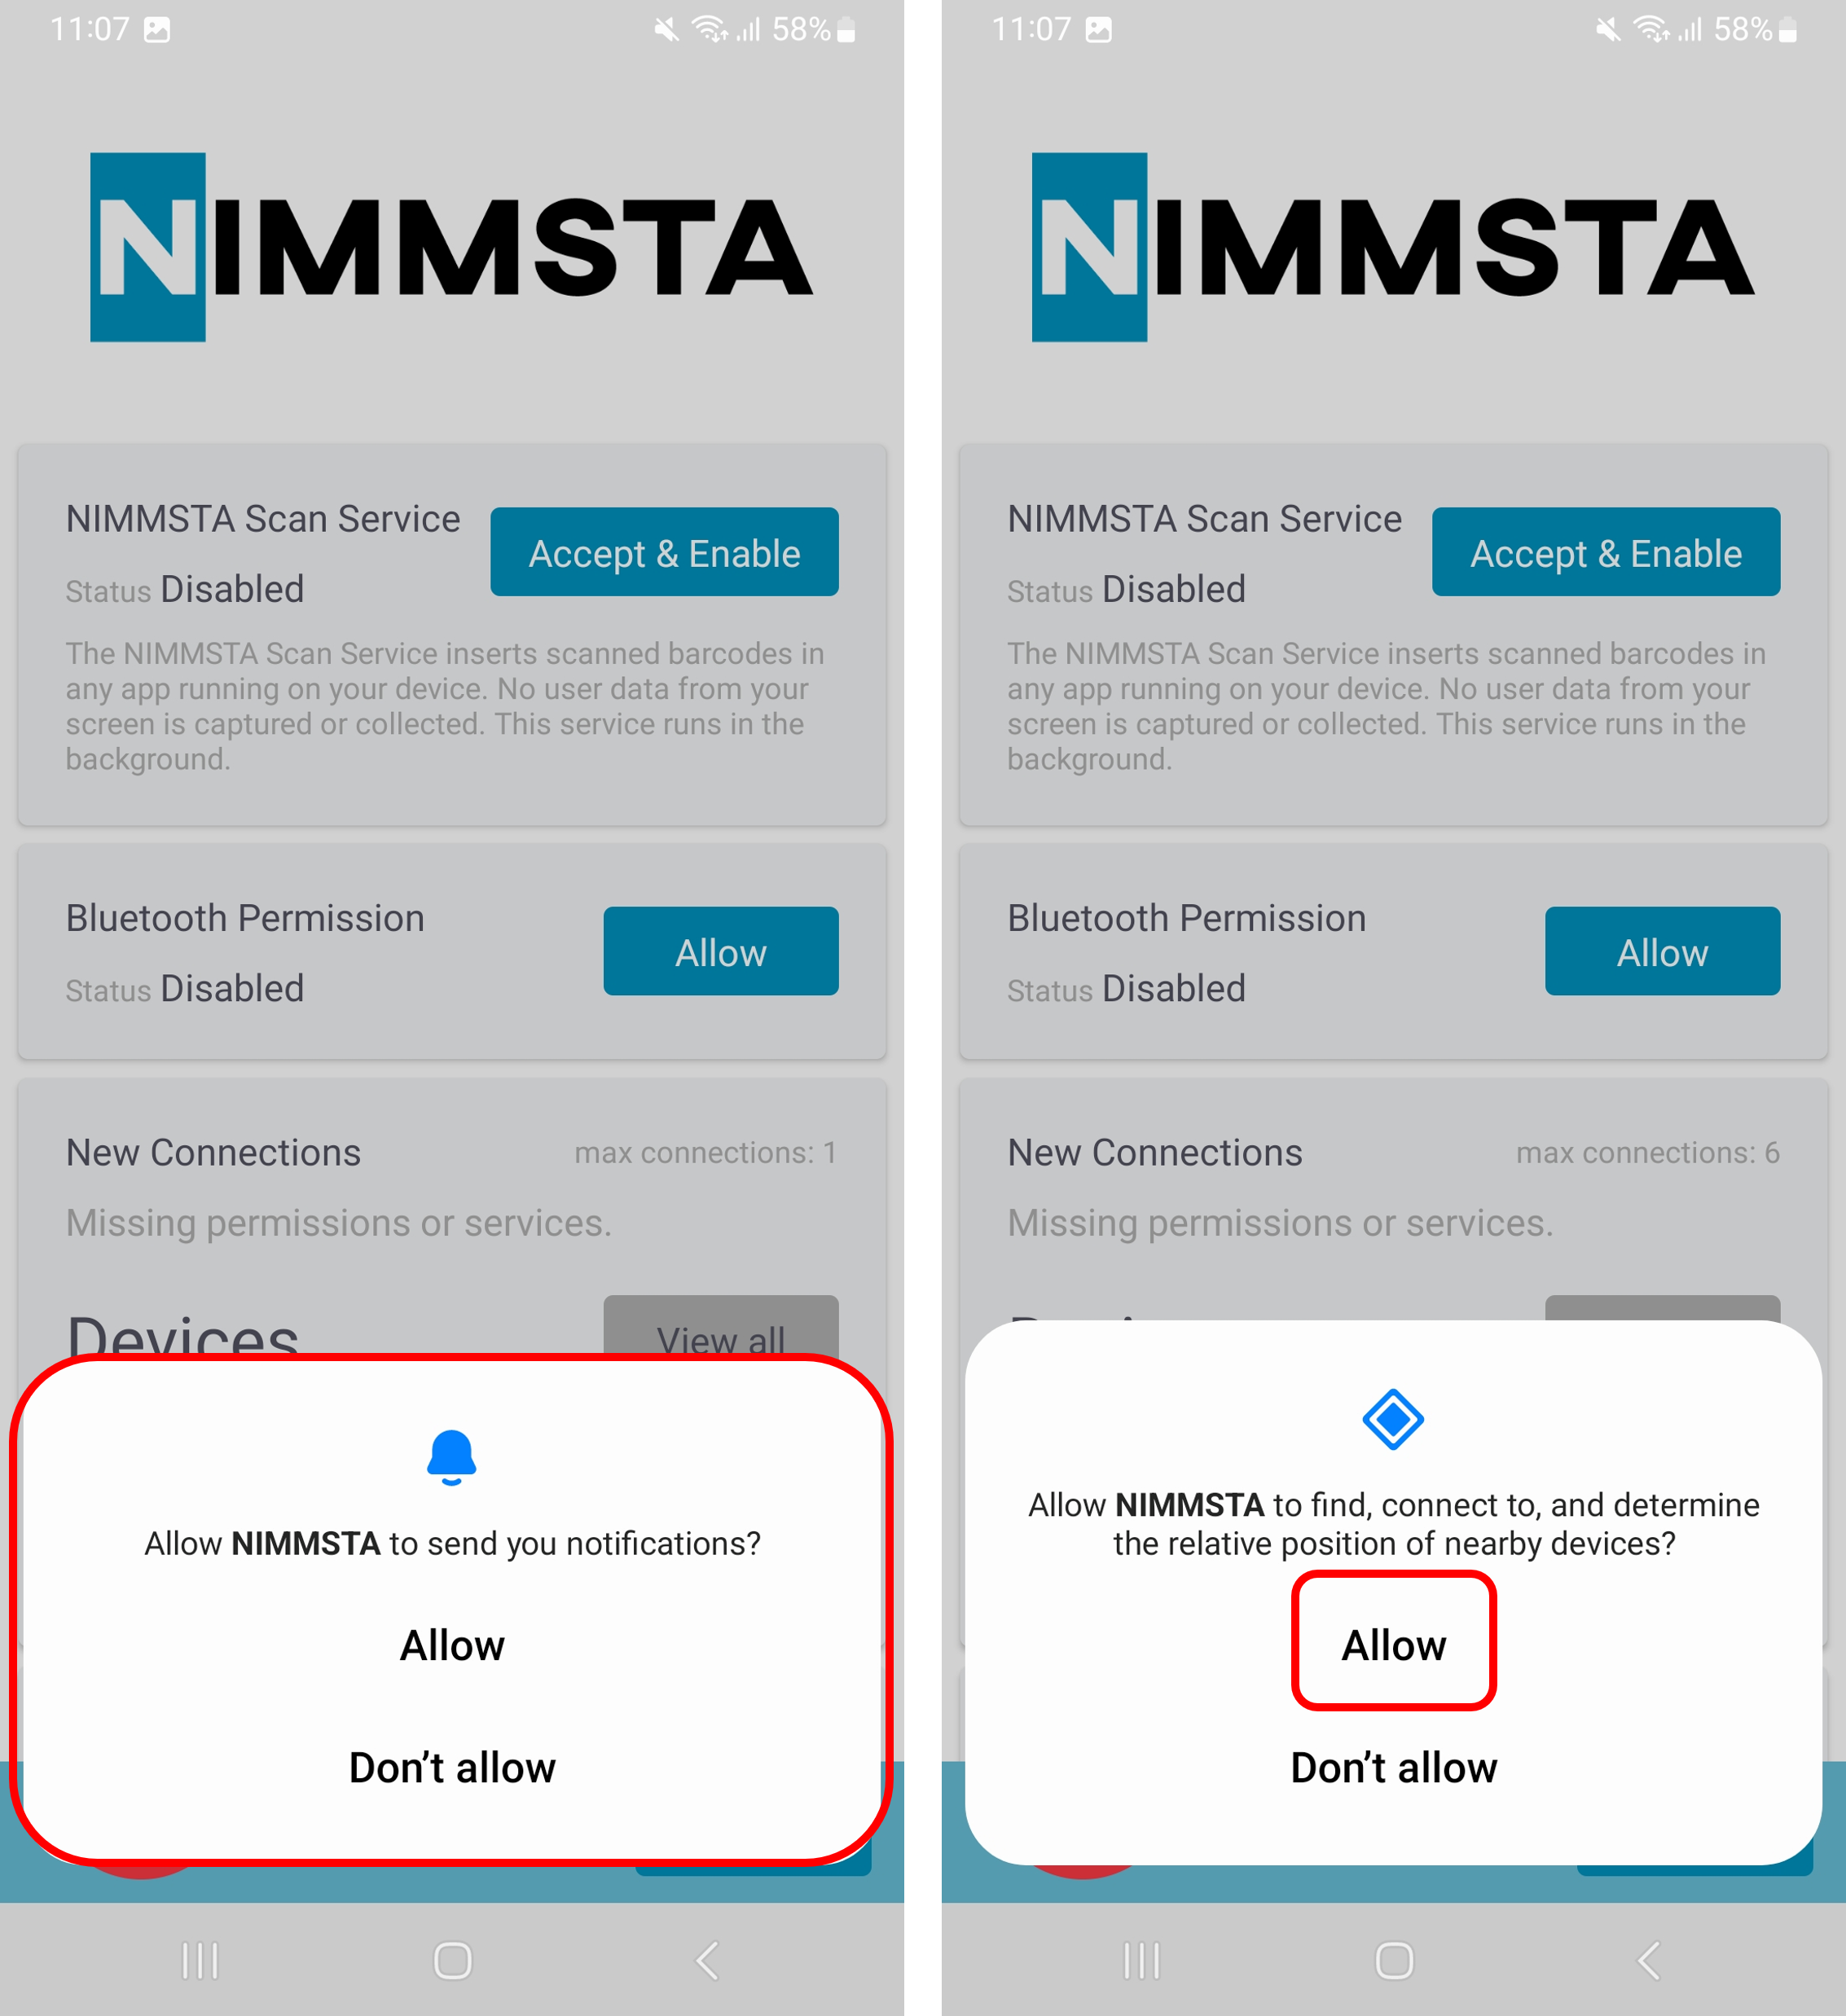
After opening the NIMMSTA App, two permissions are requested. The notification permission is optional but makes working easier. Always allow location access. This is required because the NIMMSTA App needs access to Bluetooth transmission.
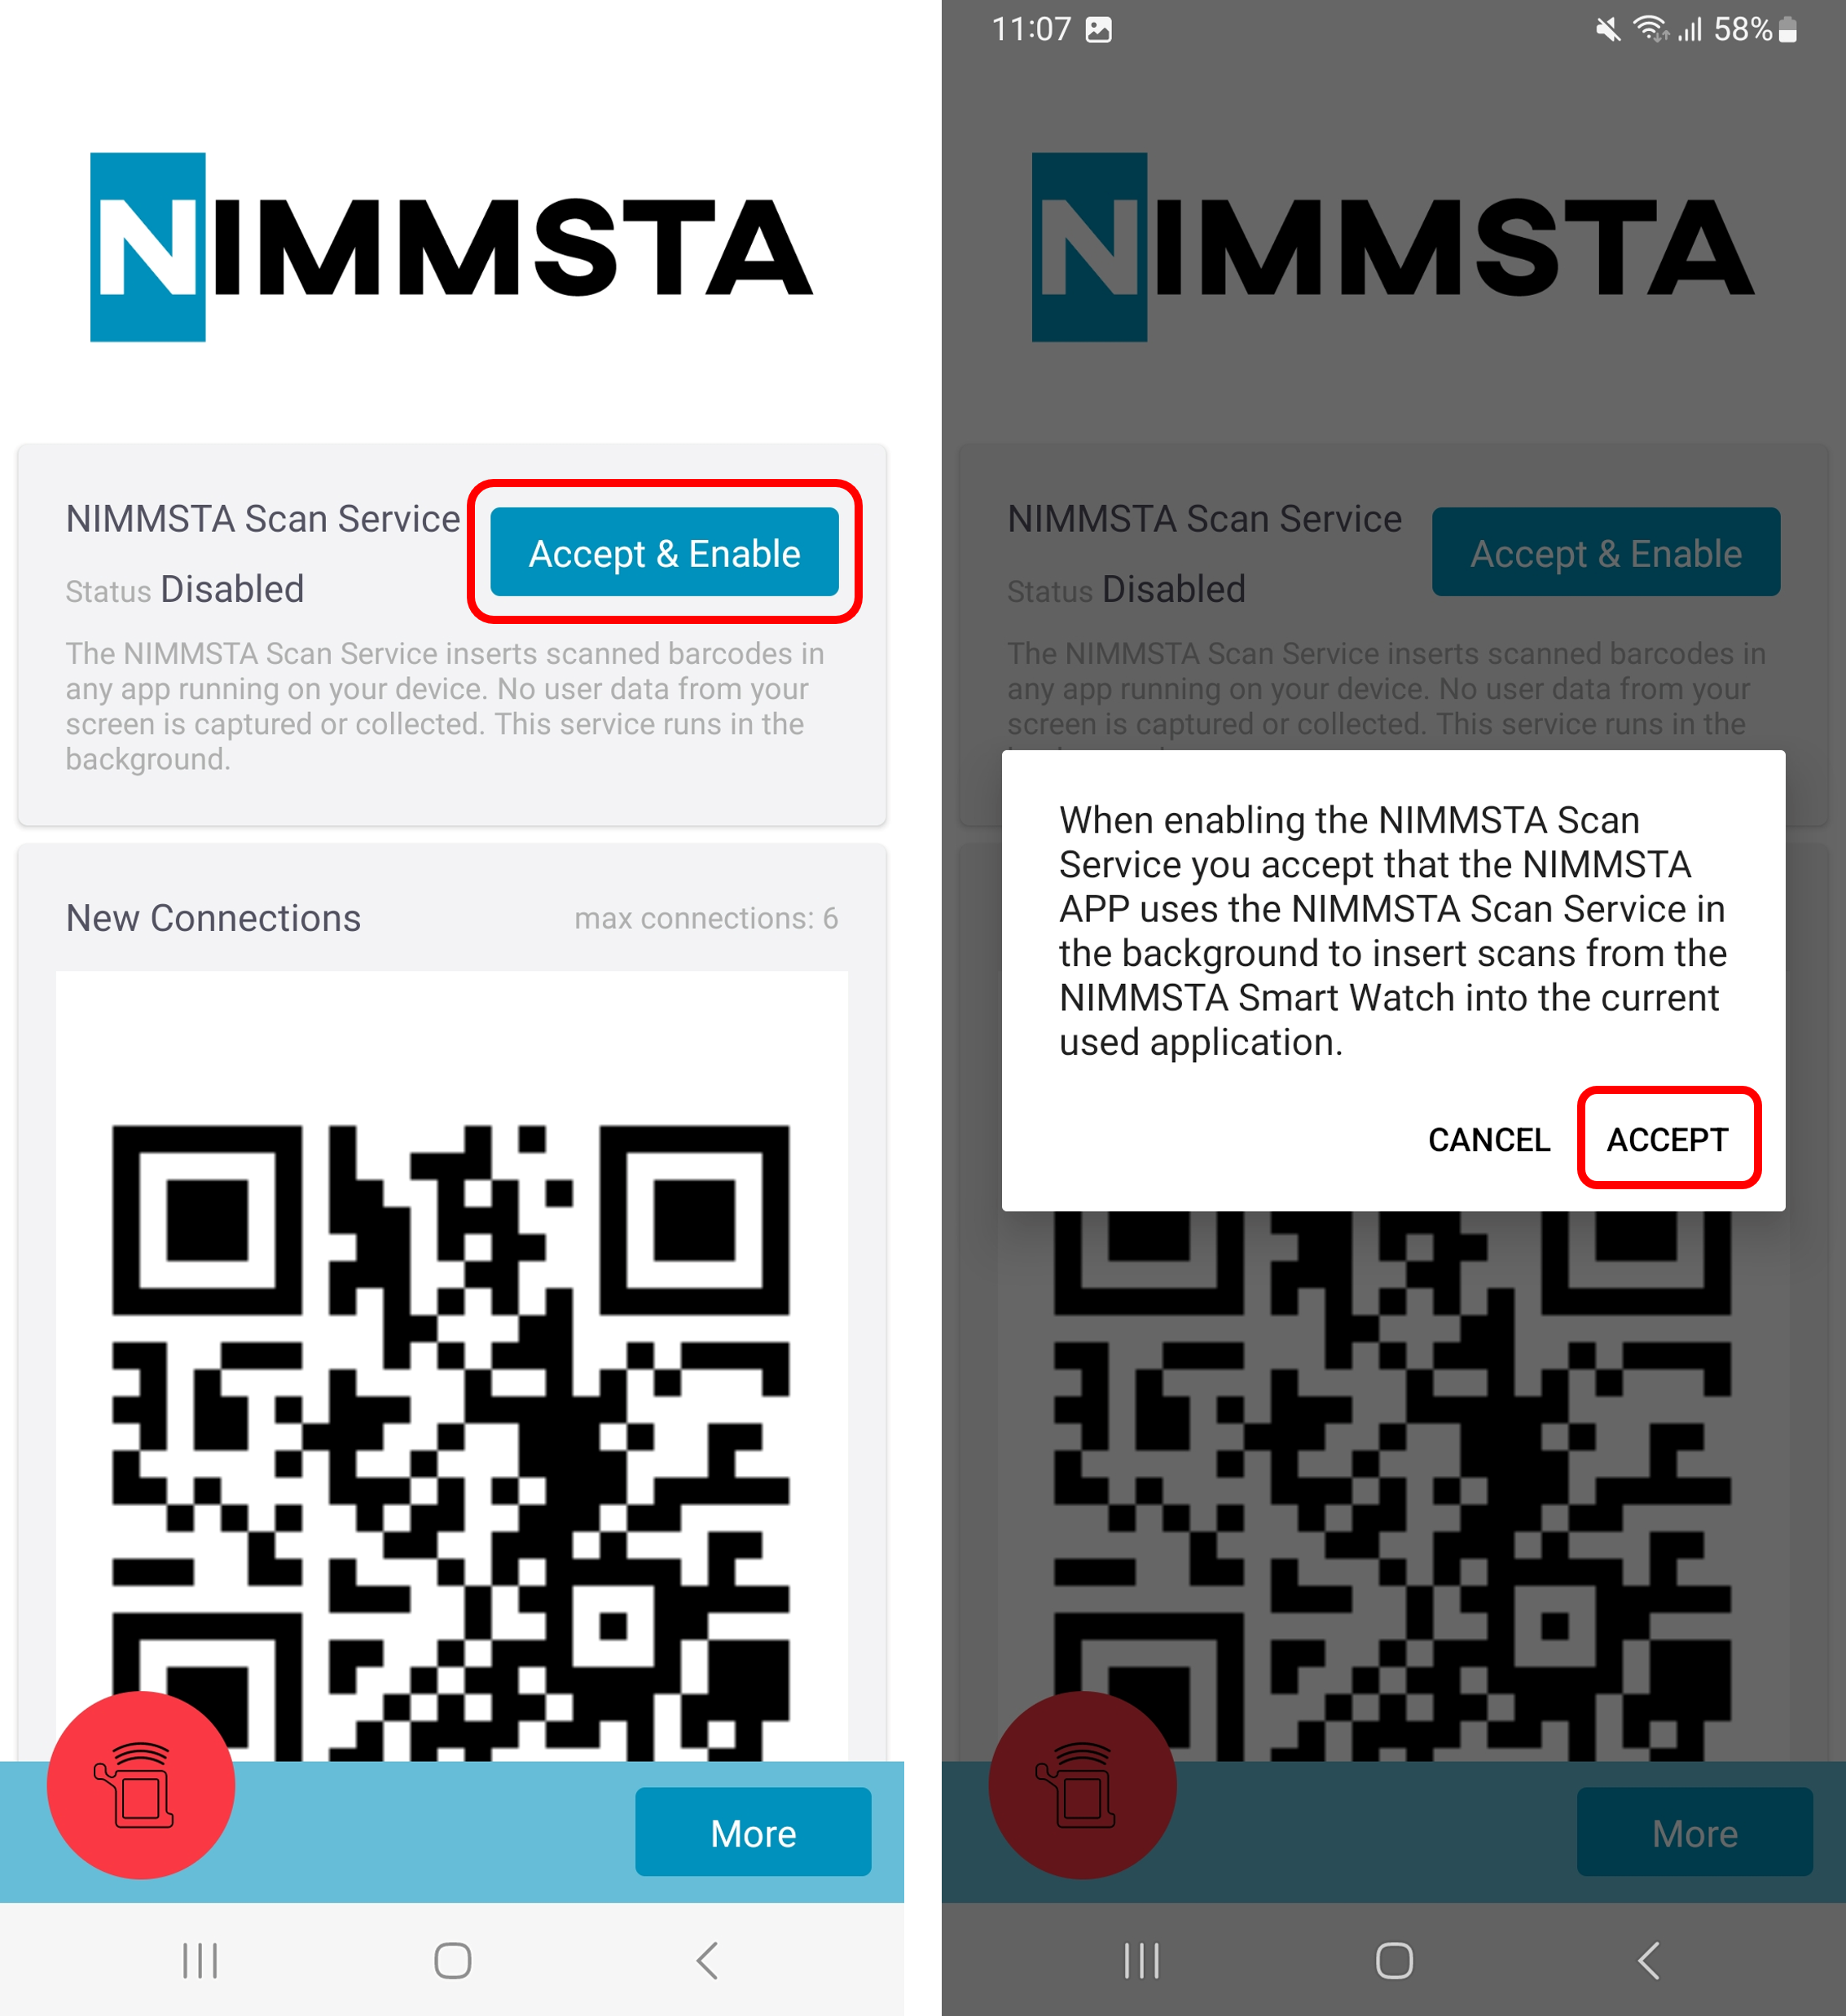
Press the "Go to Accessibility Preferences" button and confirm the next prompt.
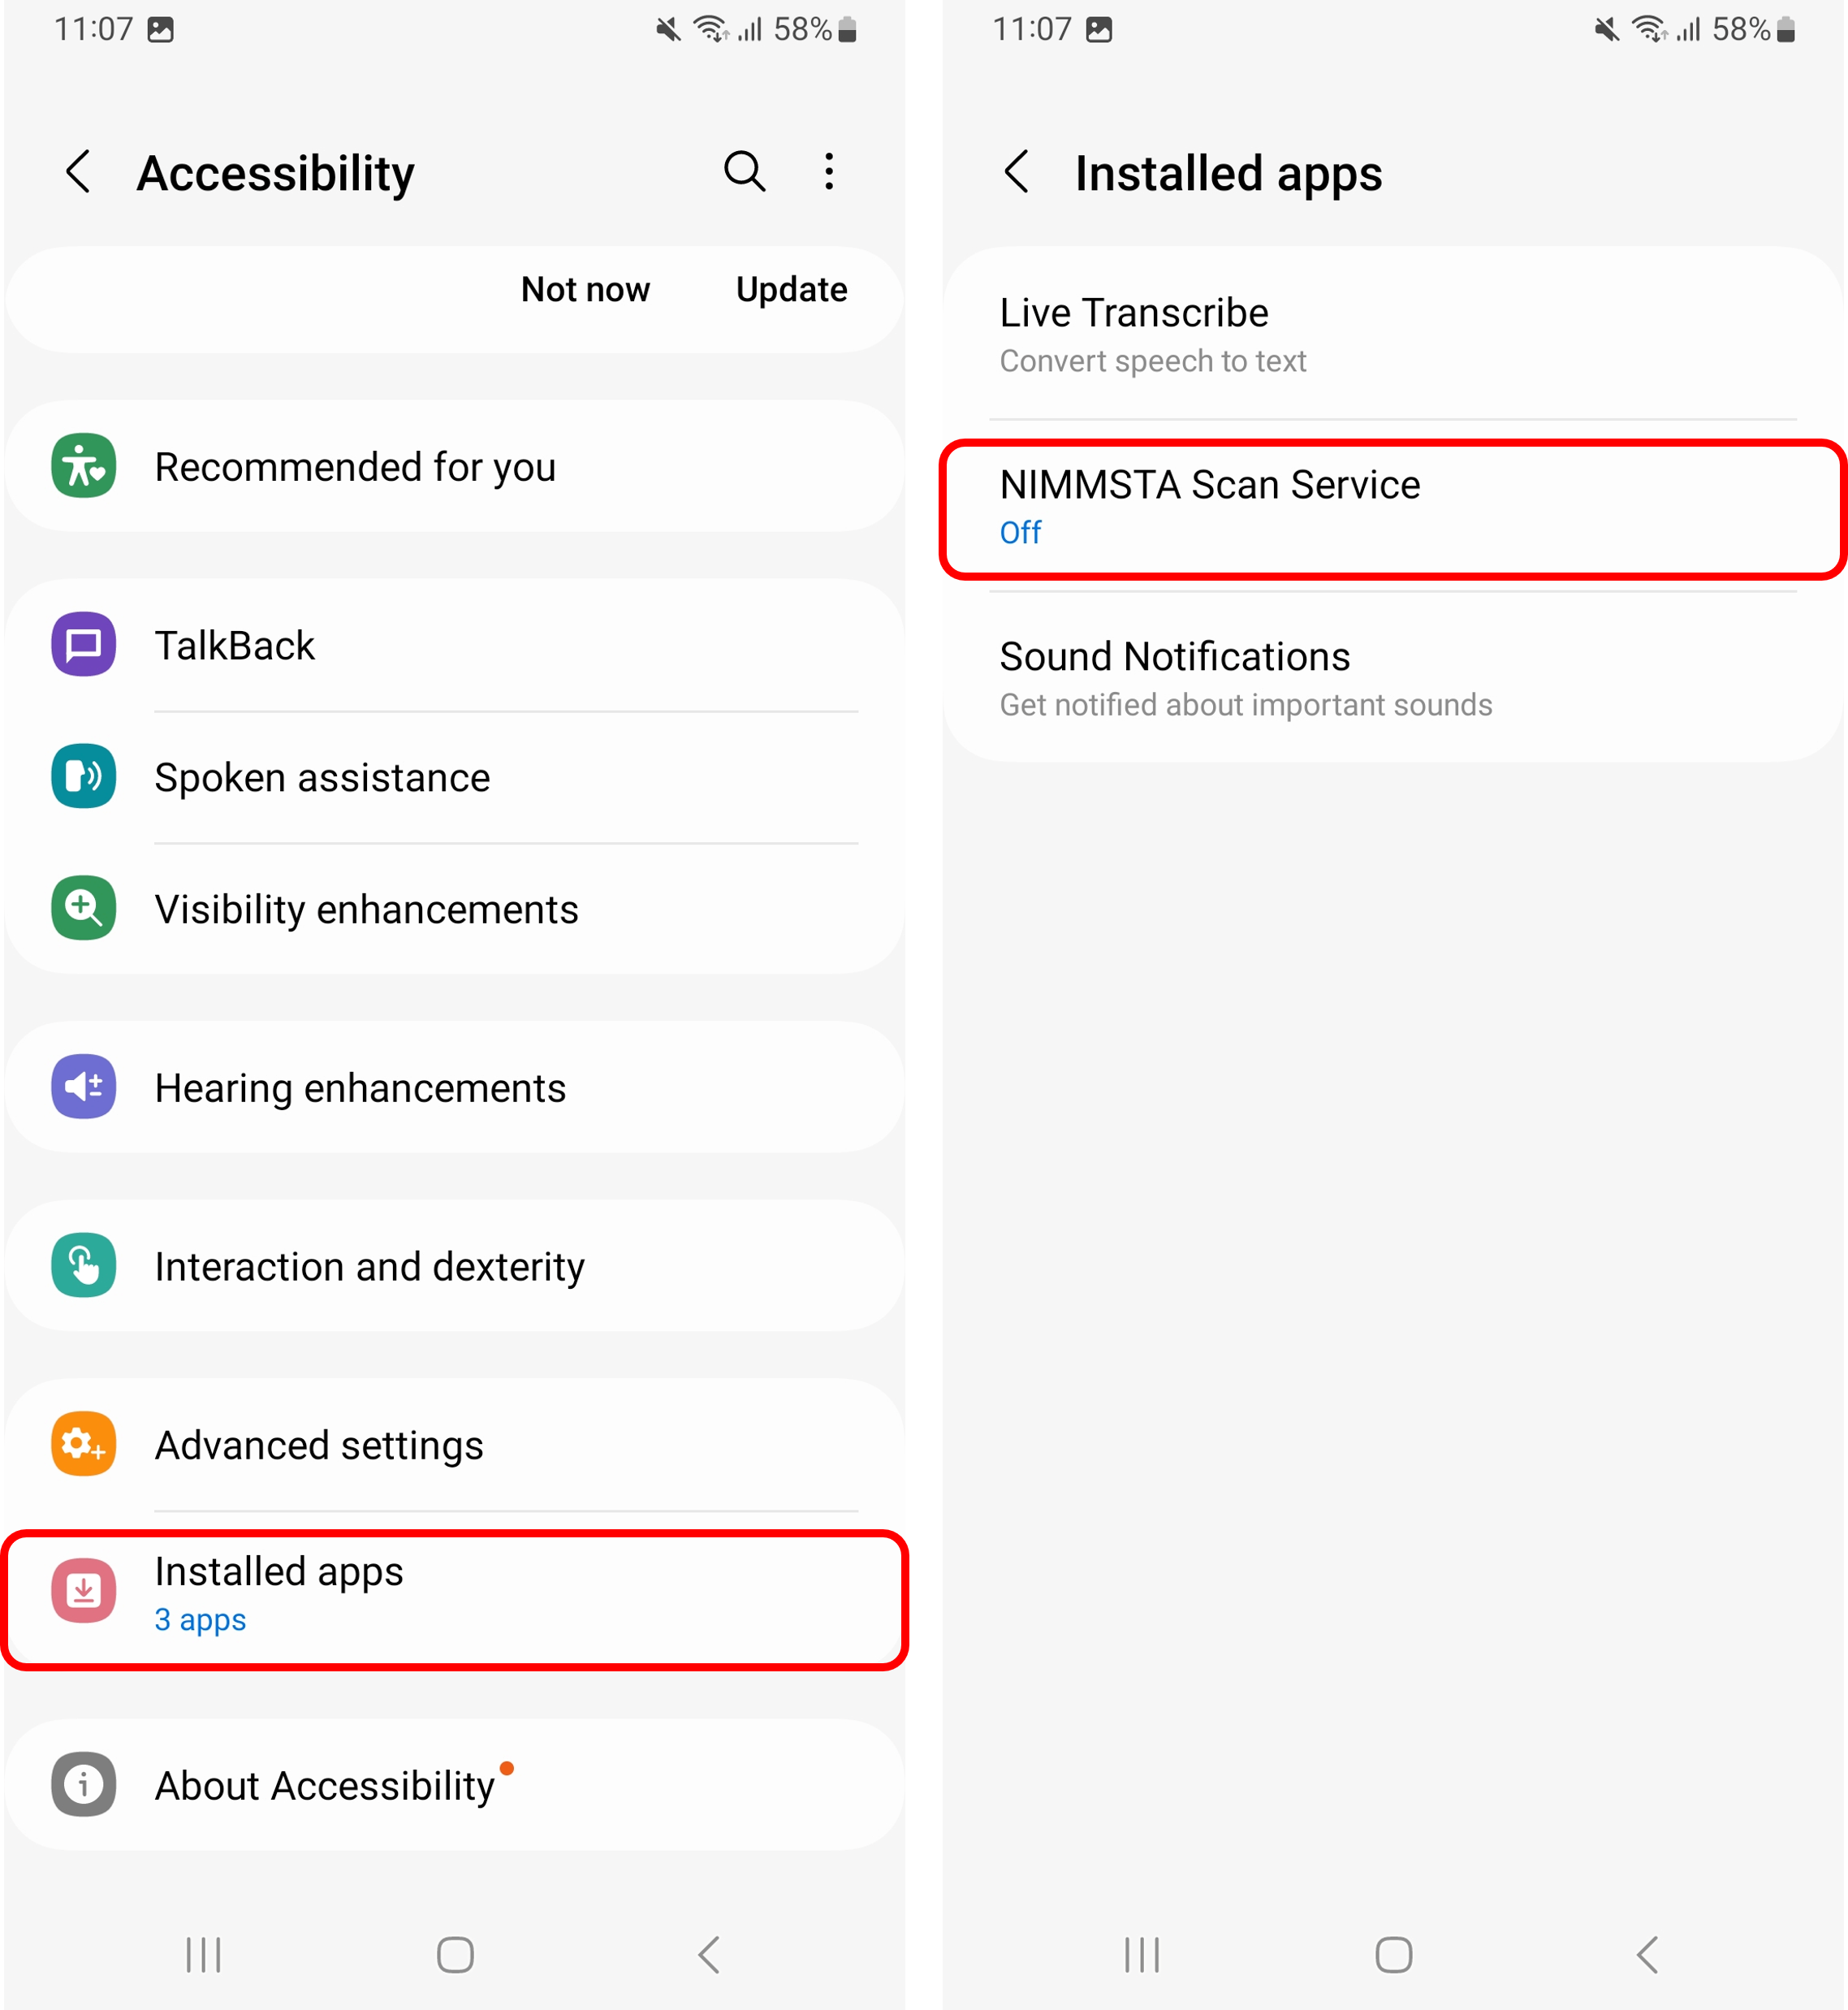
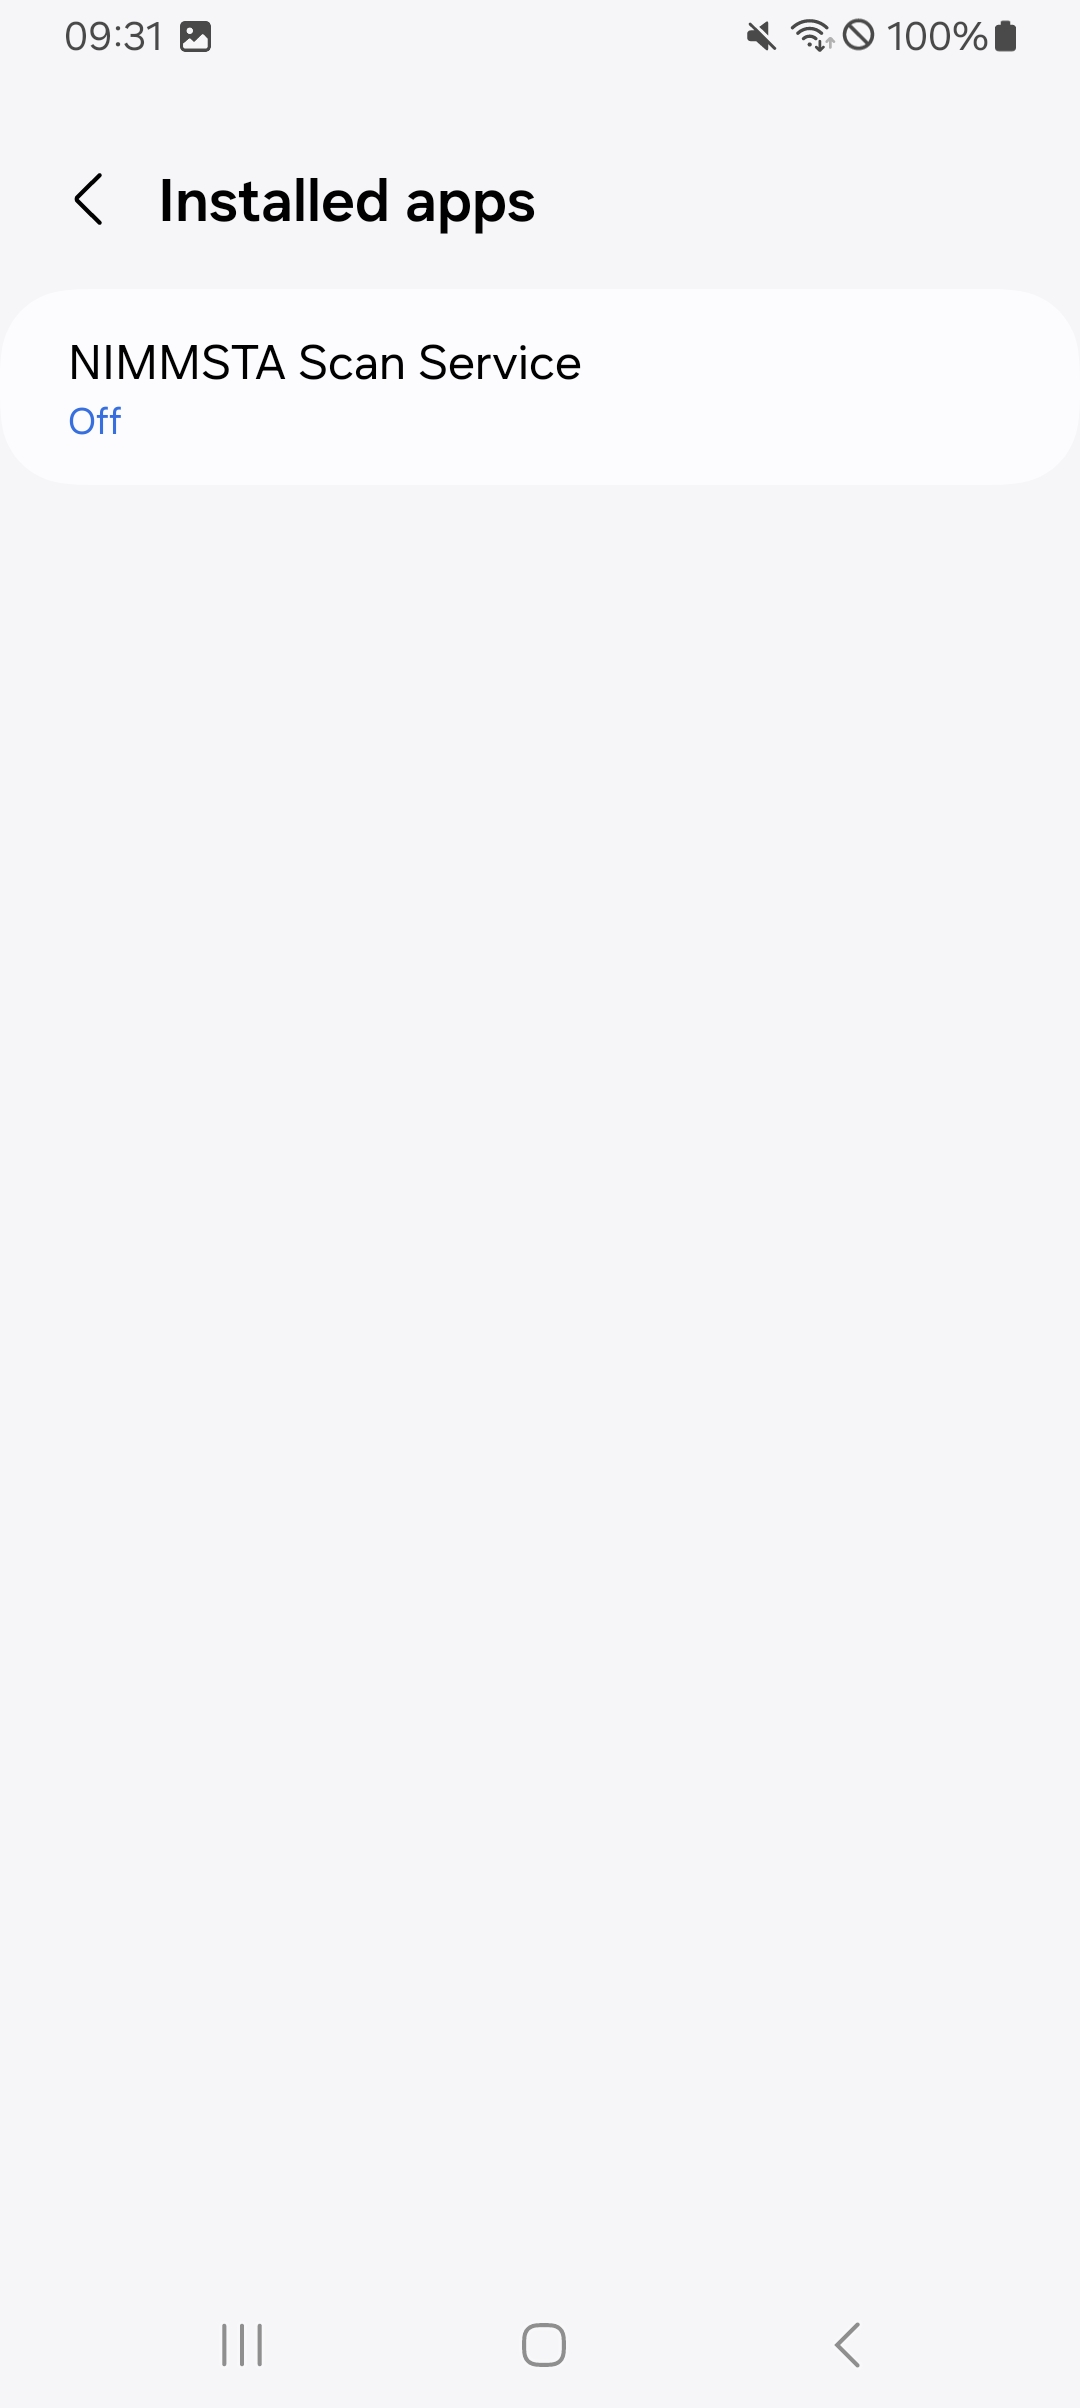
In the menu that opens, select the NIMMSTA Scan Service under "Installed apps".
Before the NIMMSTA Scan Service can be activated, you must approve the following prompt. The status should then change from "Off" to "On".
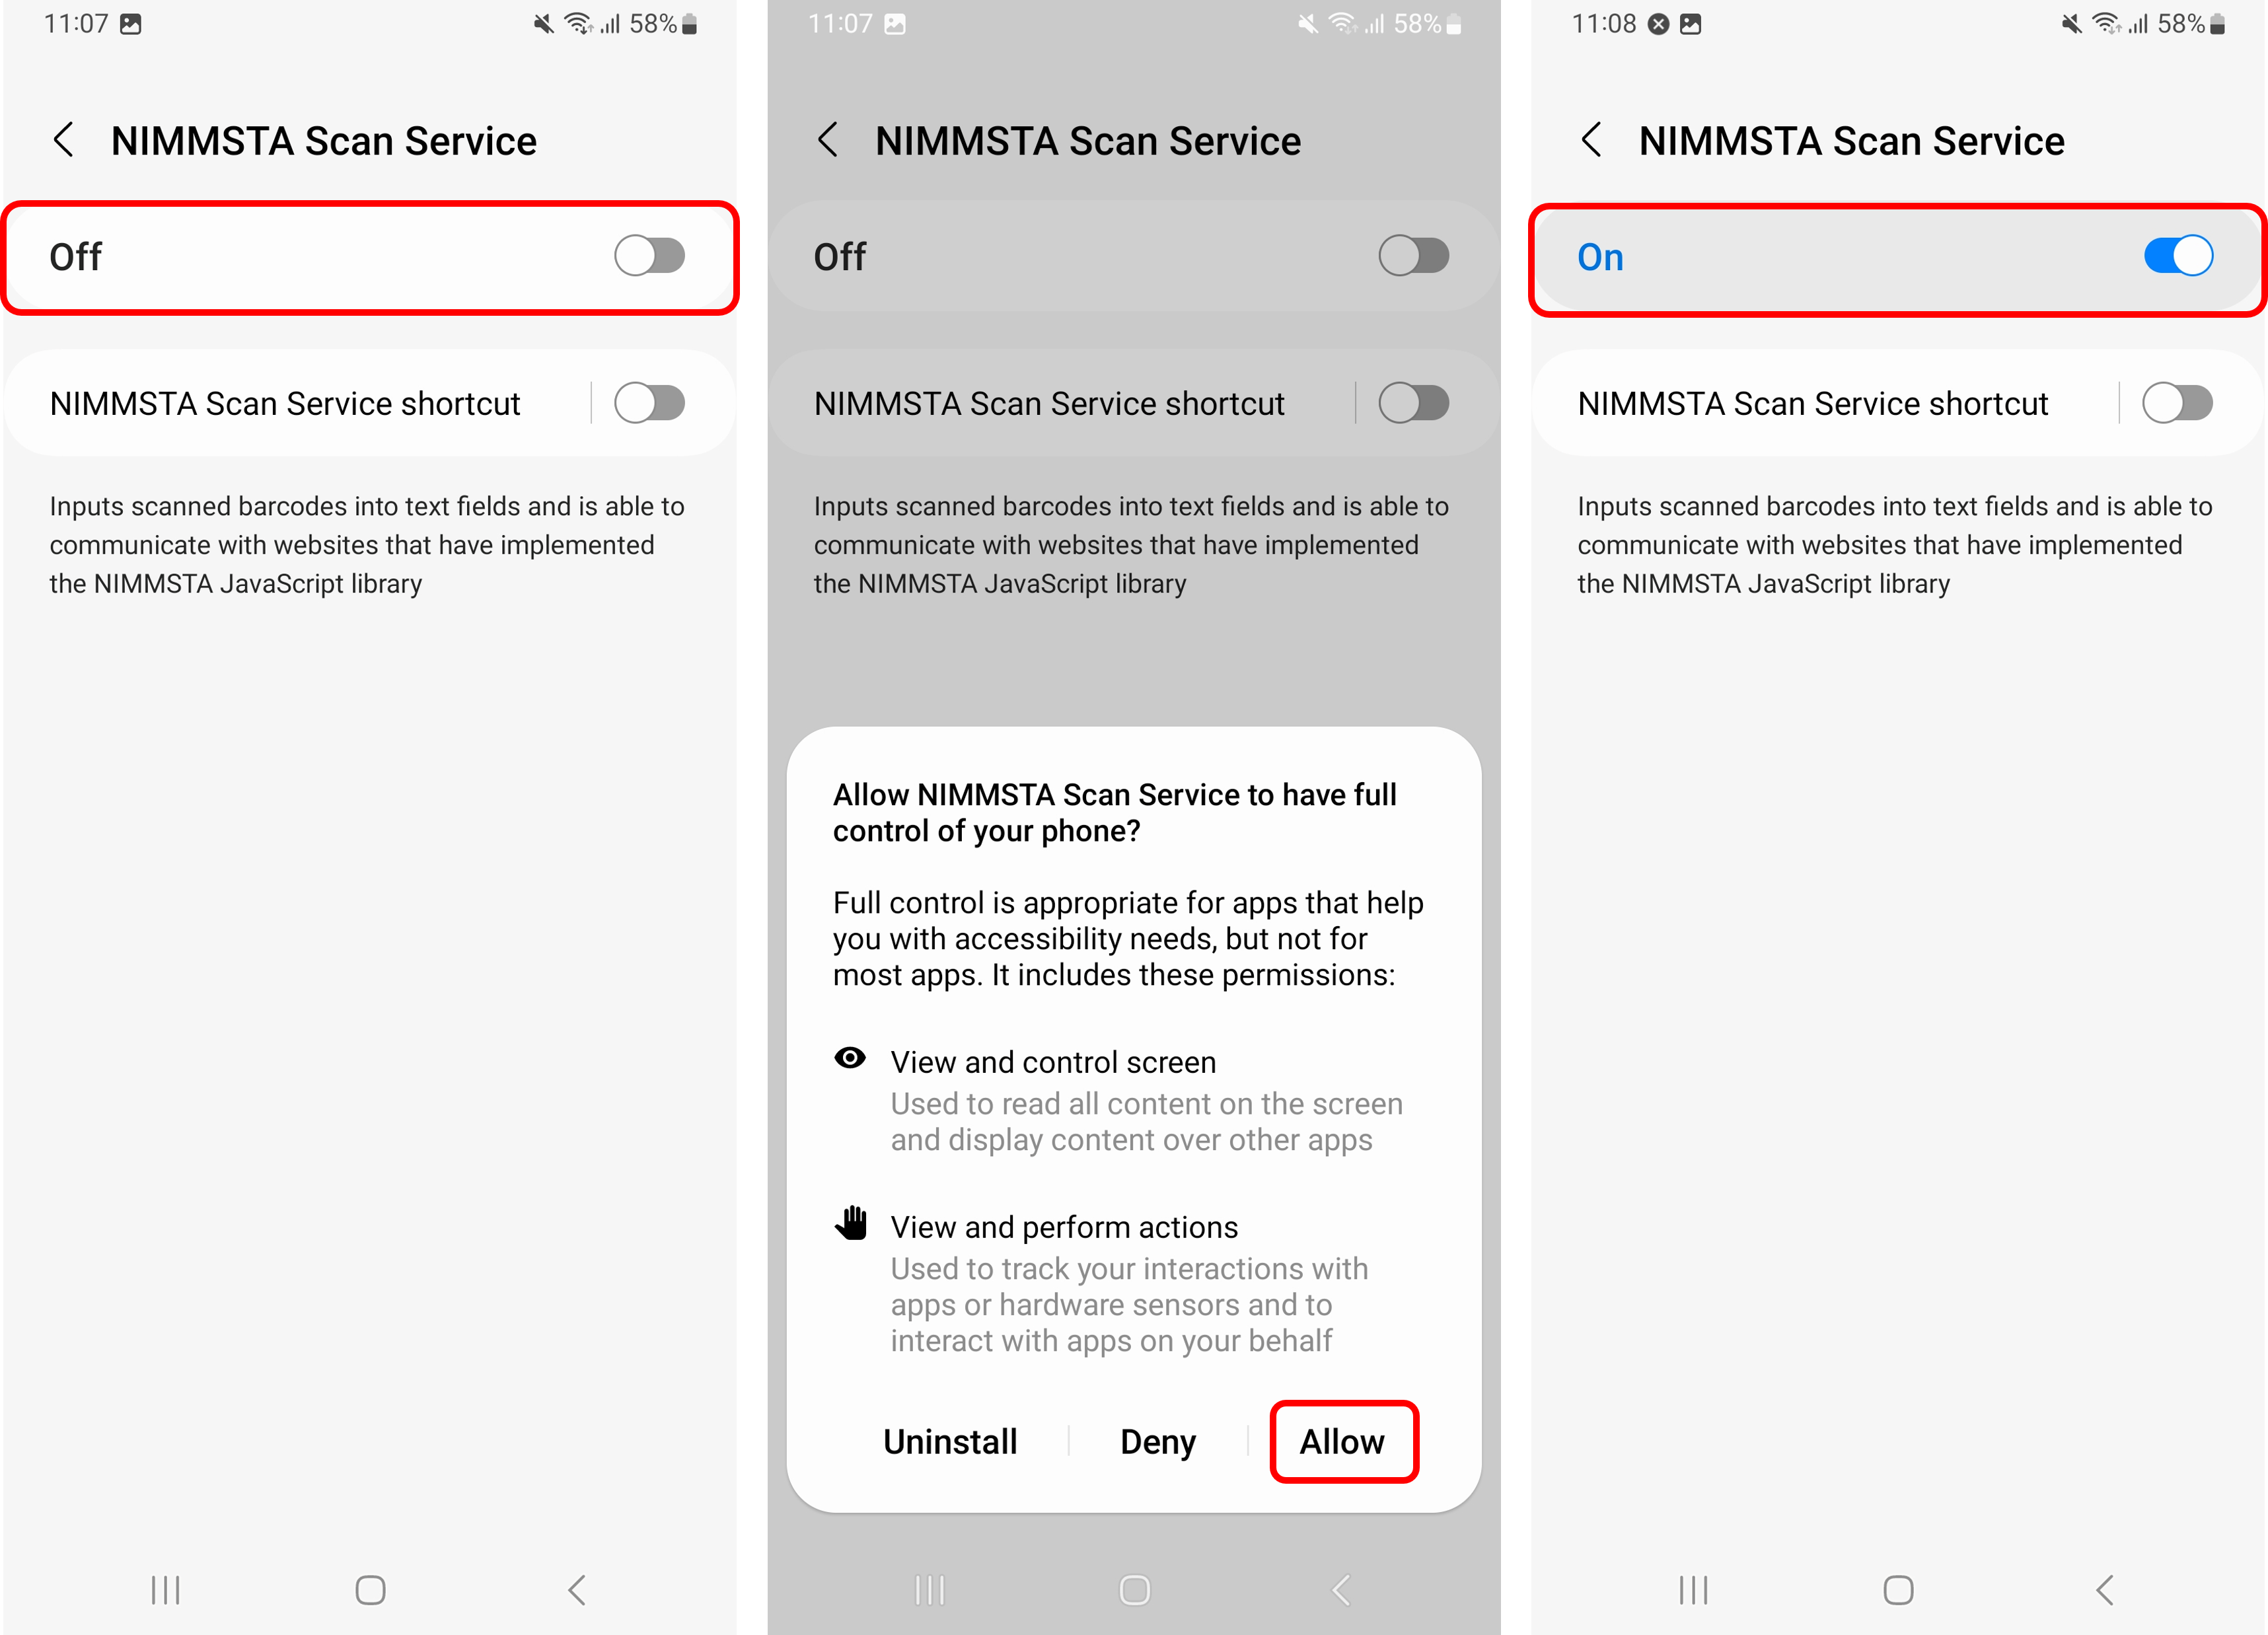
Depending on the Android version, the NIMMSTA Scan Service may not be directly available for activation.
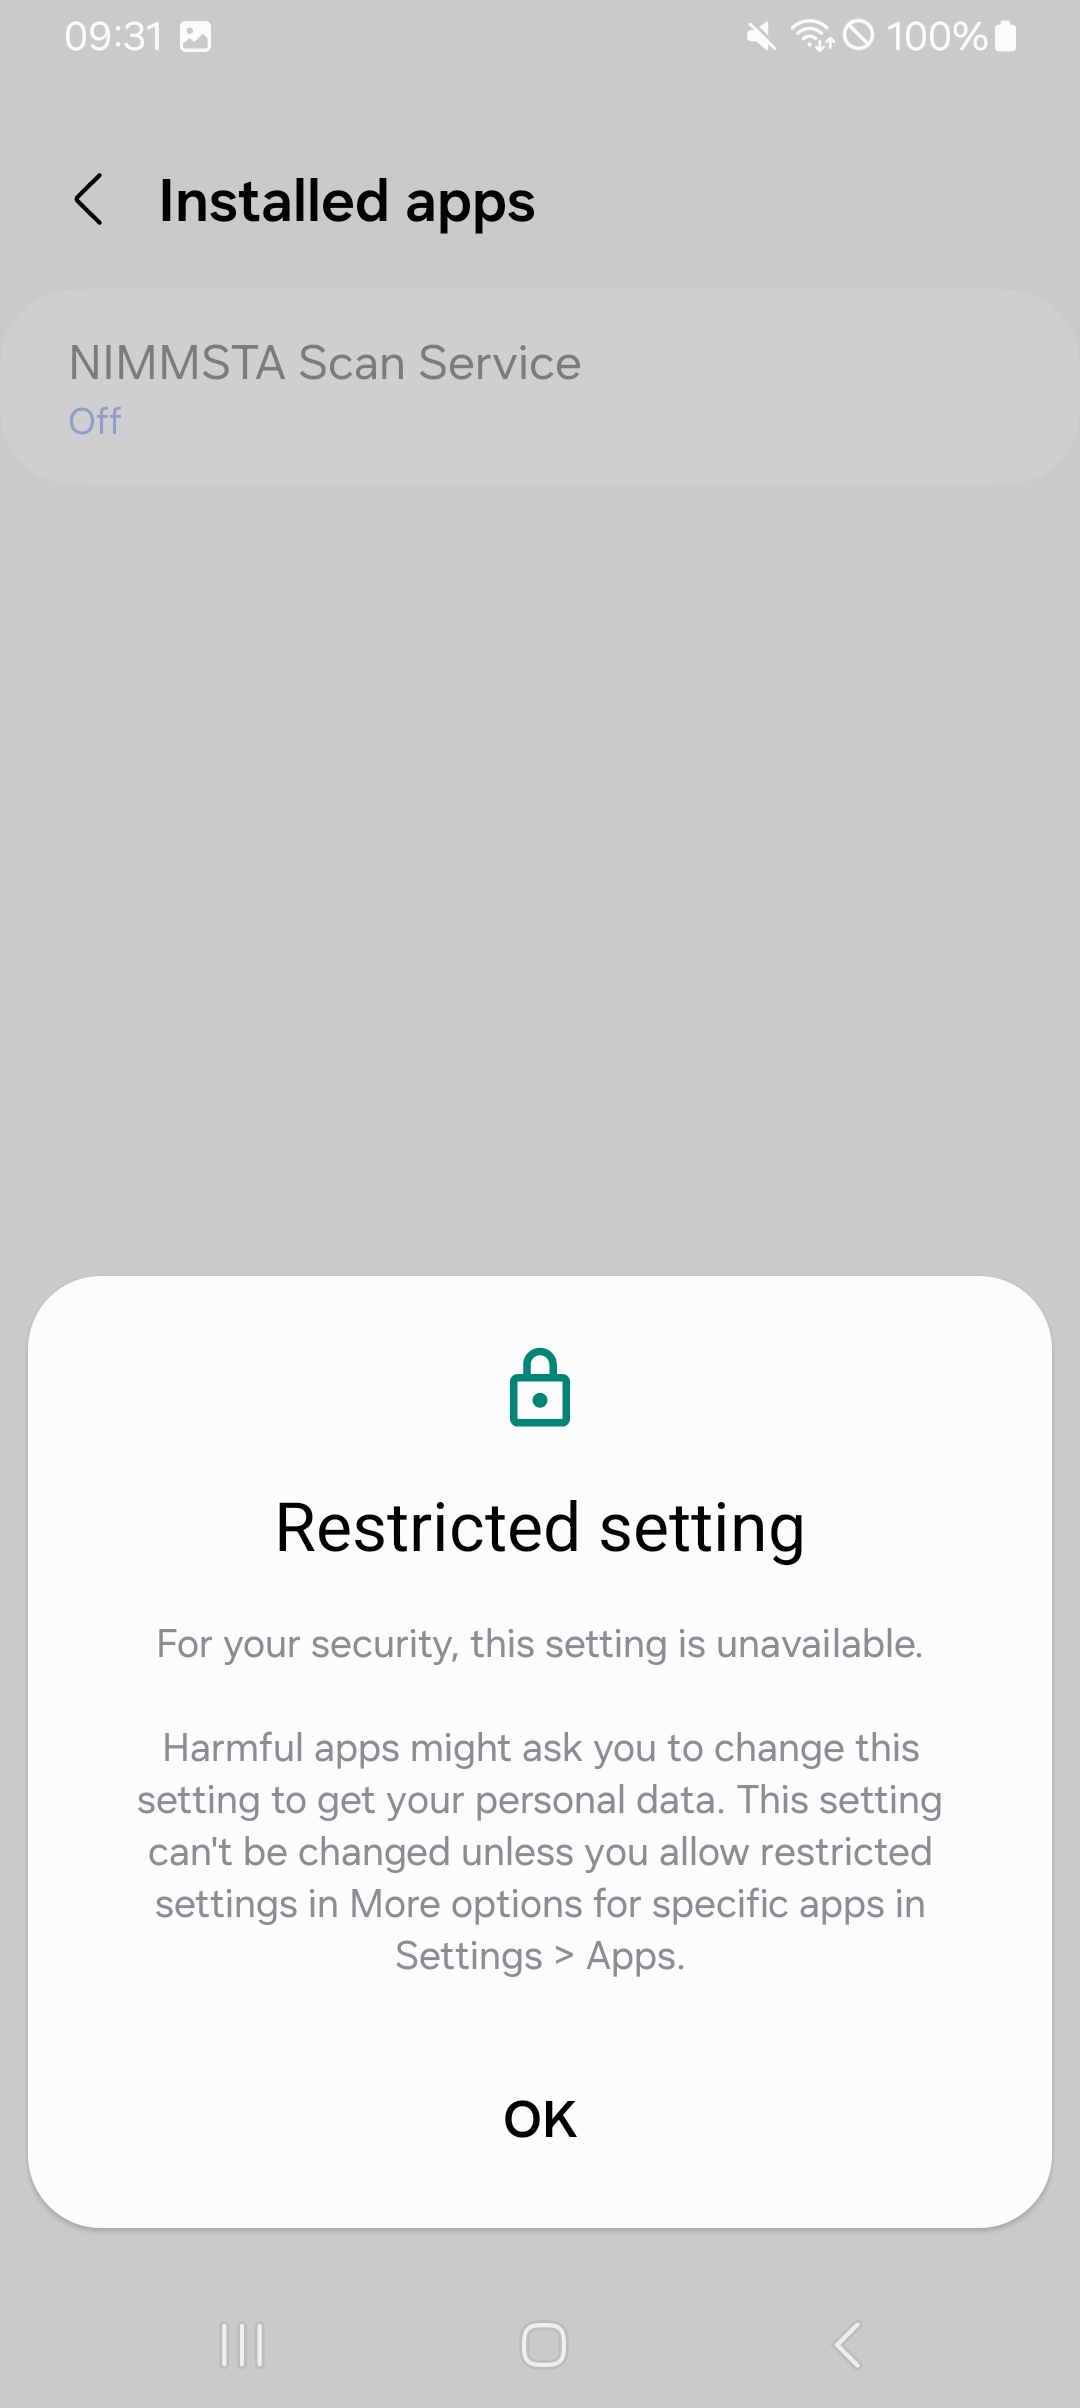
In this case, additional steps are required. The procedure is described in the "Allow NIMMSTA Scan Service activation" section.
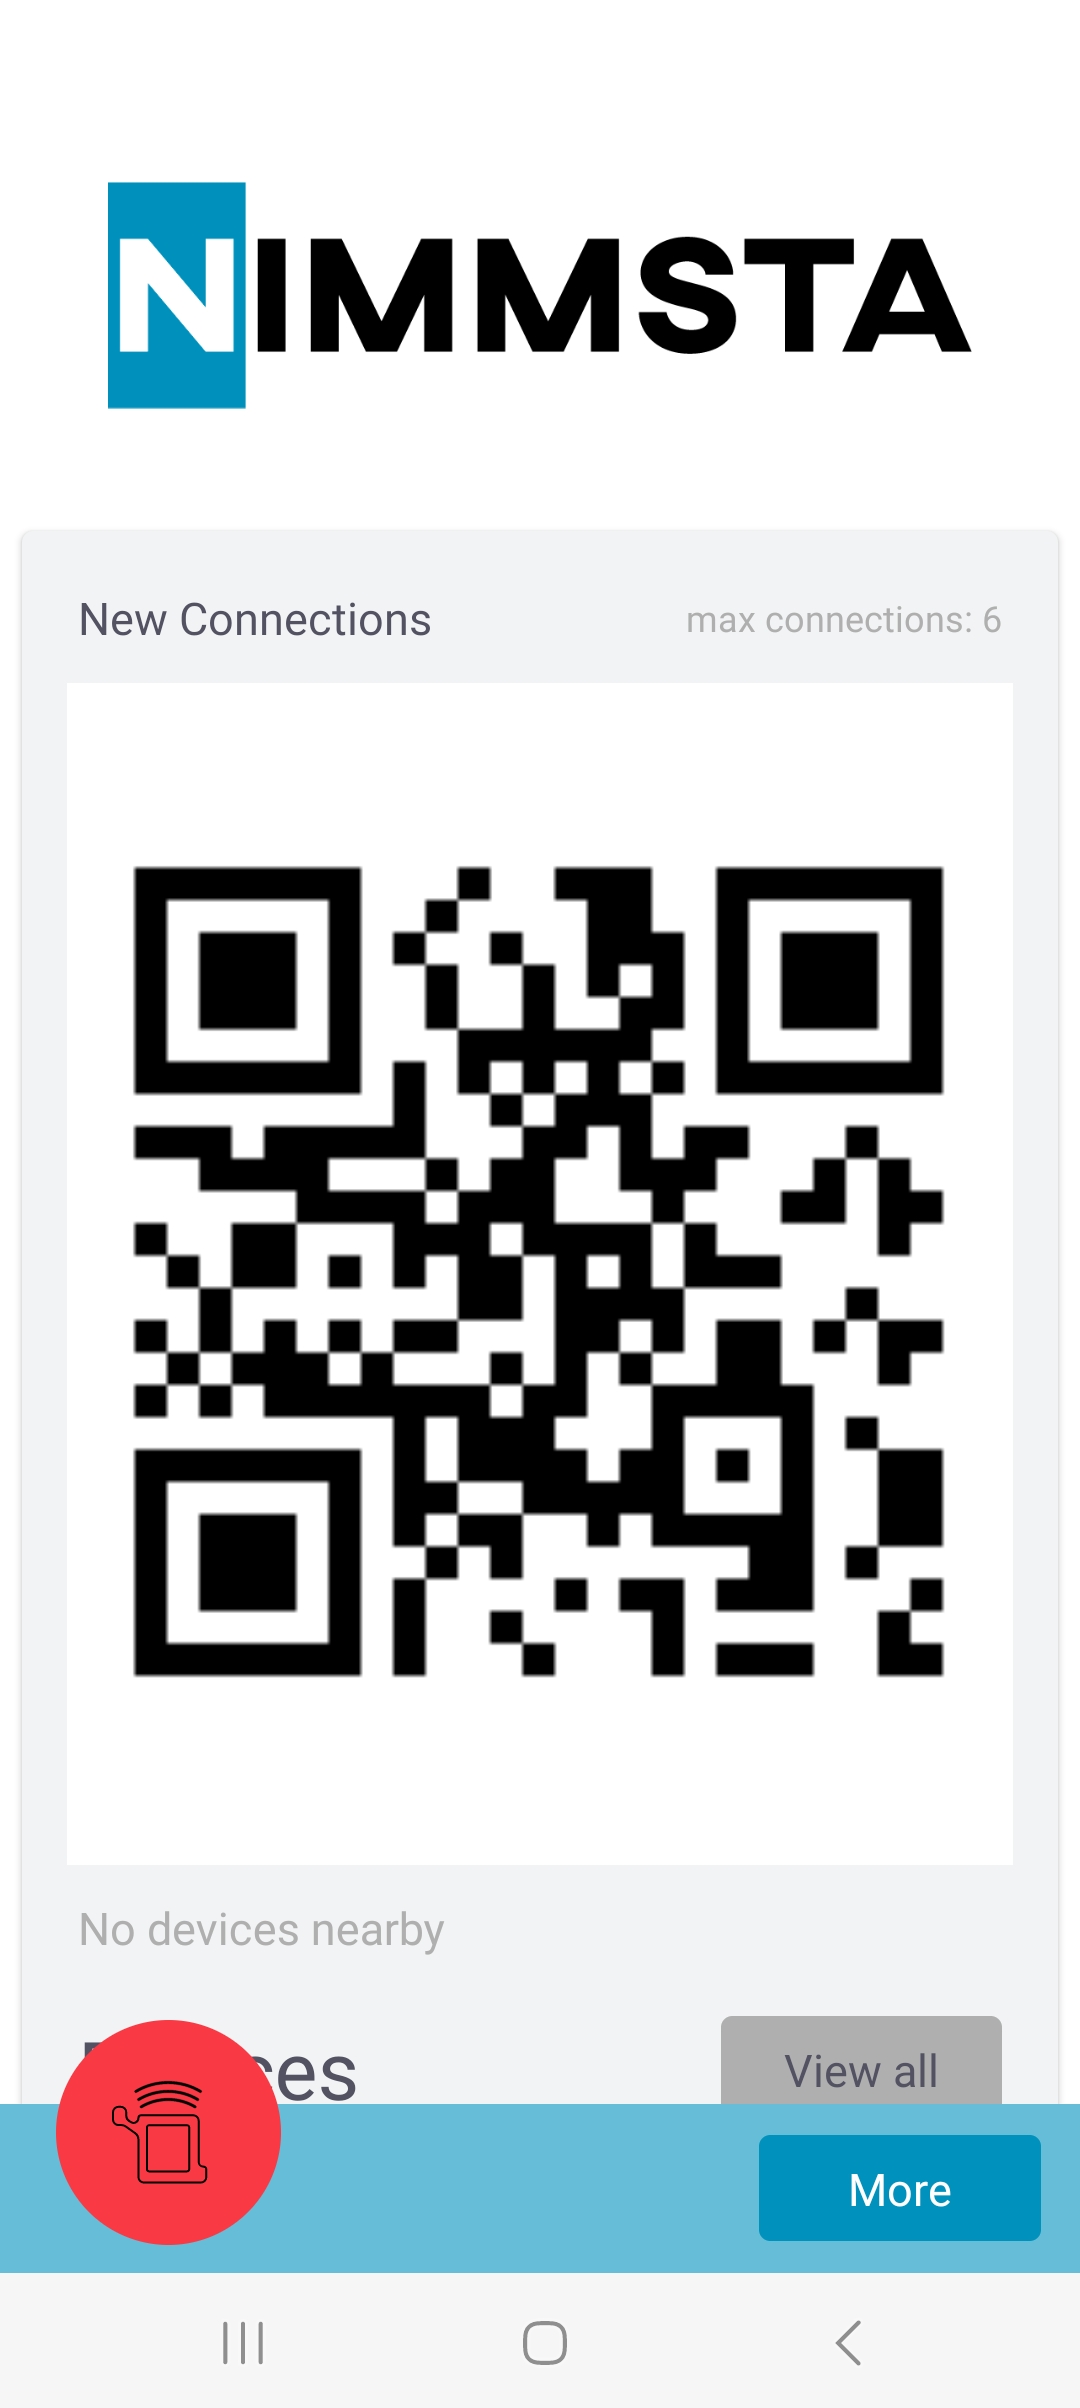
After successfully activating the NIMMSTA Scan Service, press the Back button on your Android device several times until you return to the NIMMSTA App. The Accessibility Service now shows the status Enabled. You can then connect the NIMMSTA Smart Watch HS 50 to the Android device by scanning the Connect QR code displayed in the app.
Allow NIMMSTA Scan Service activation
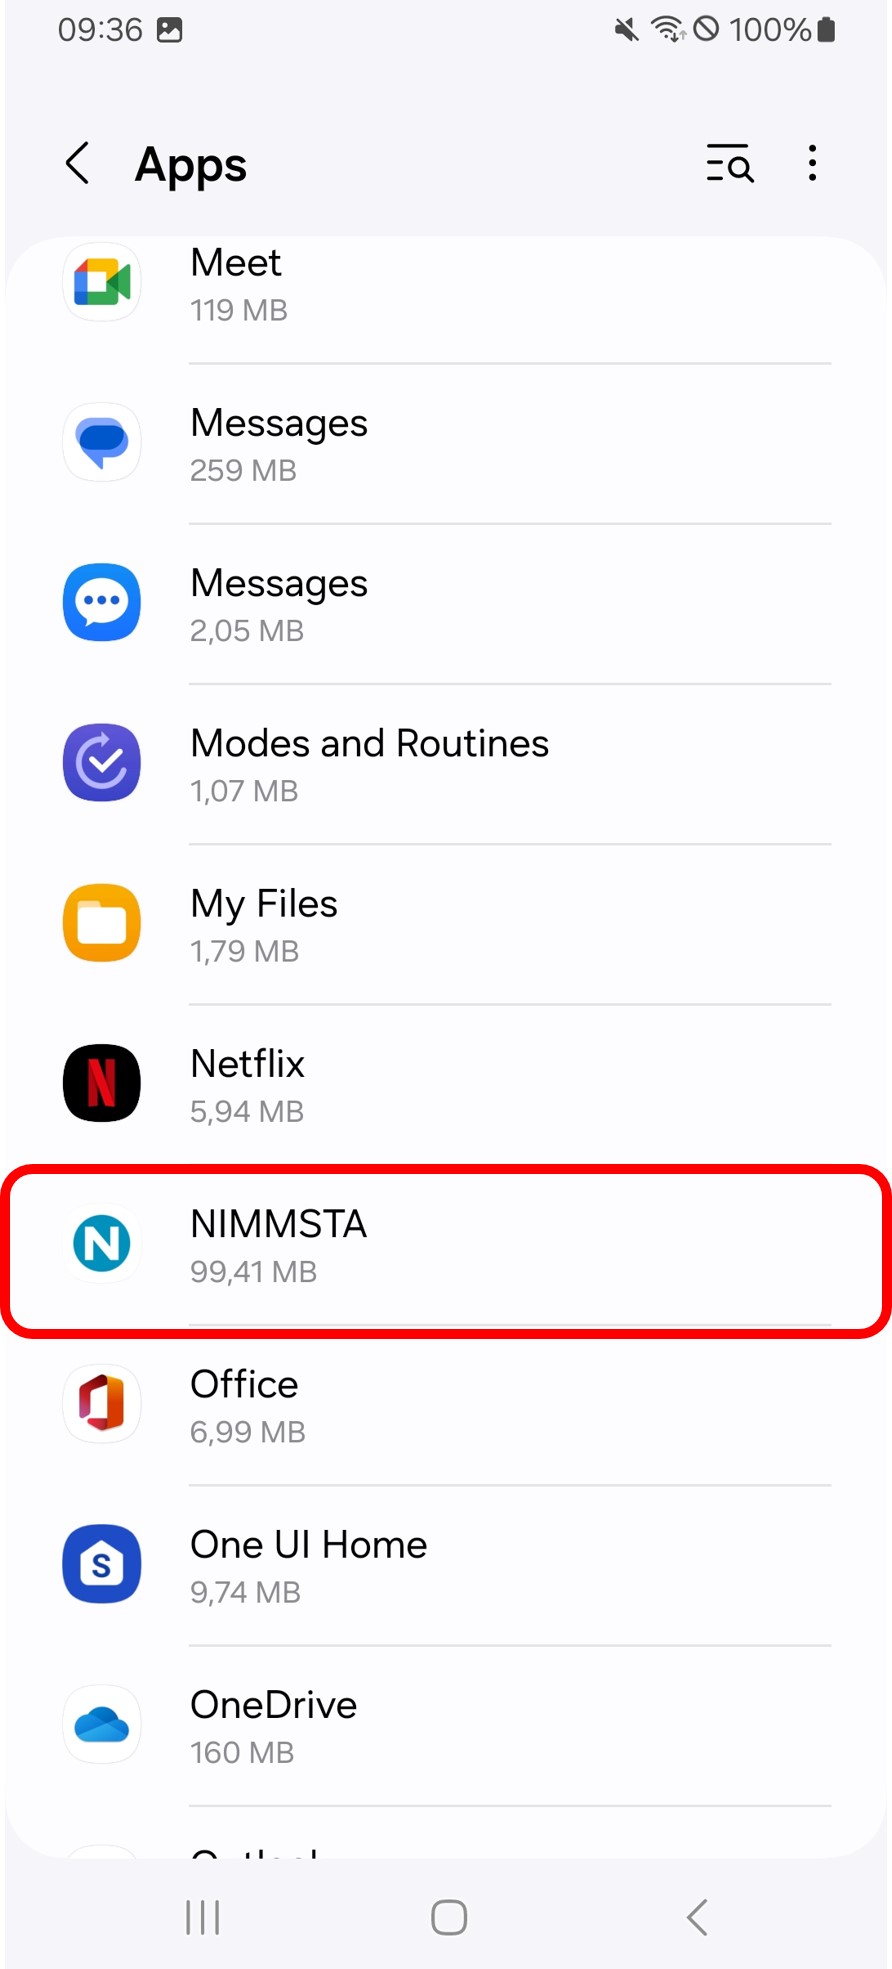
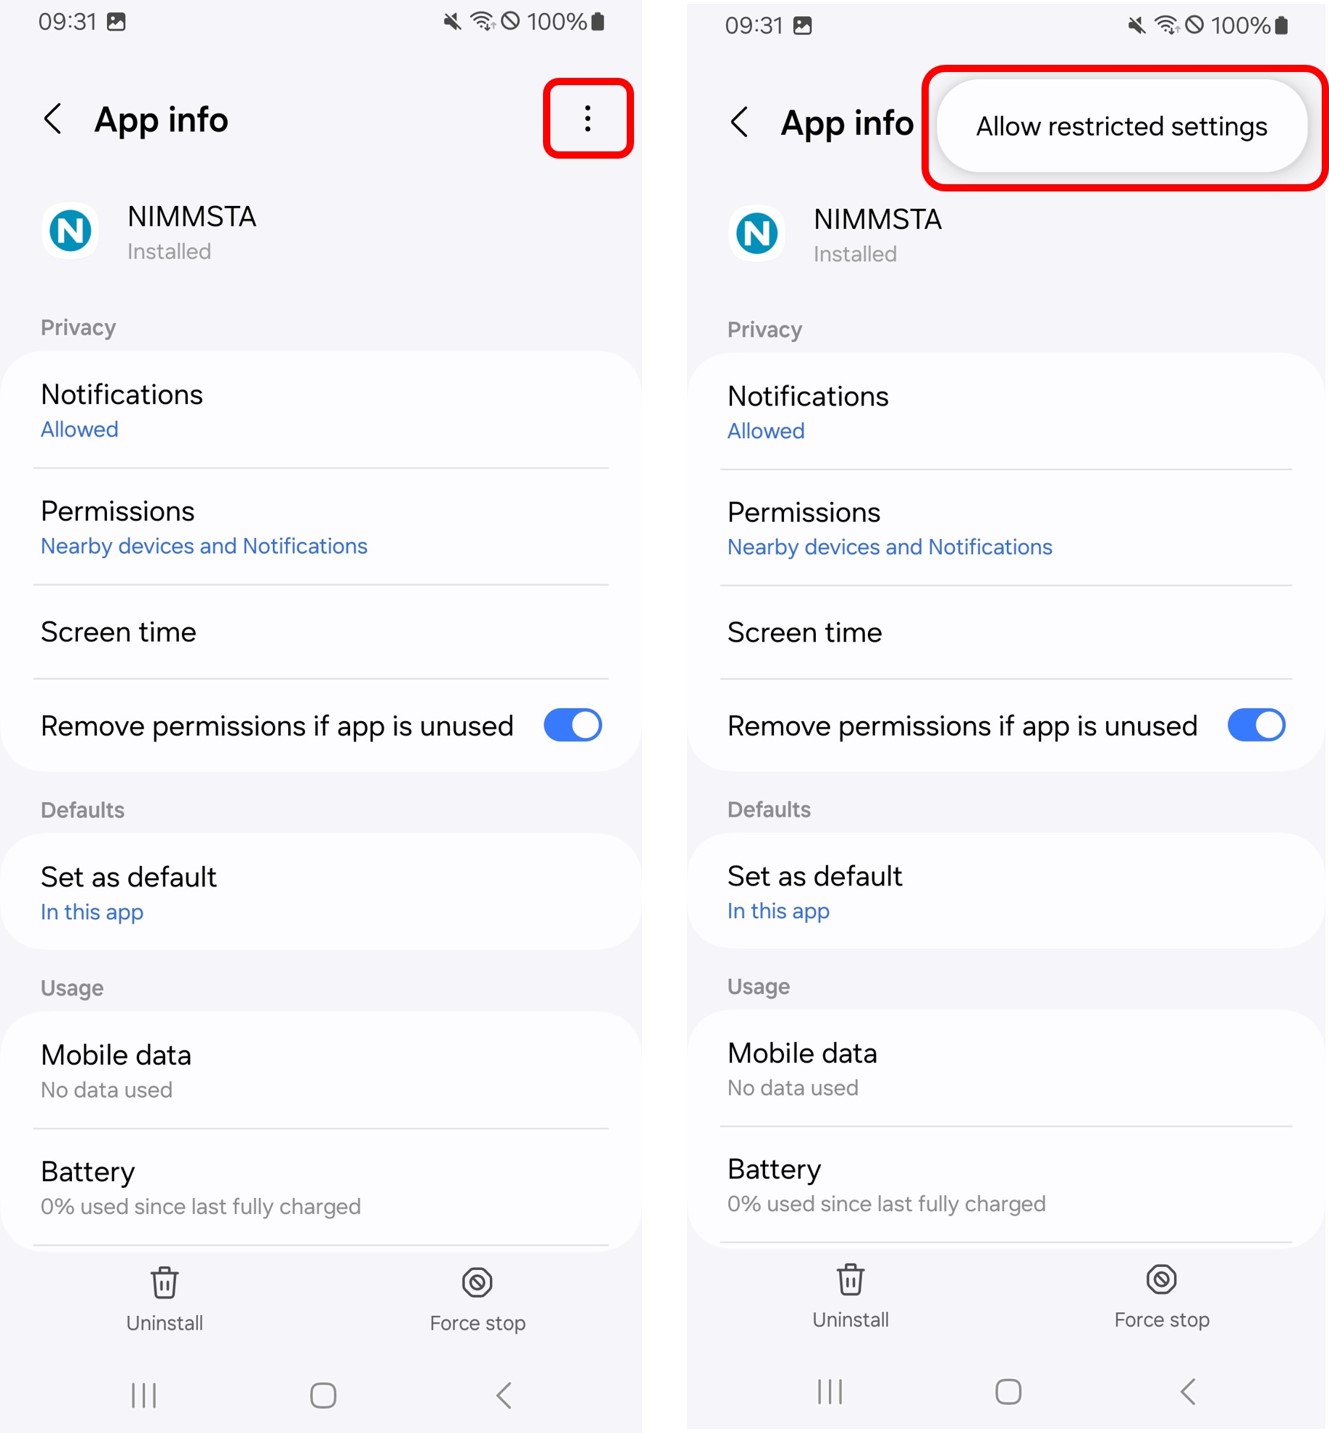
In Settings, go to "Apps" and select the NIMMSTA App:
Tap the three dots at the top right, then tap “Allow restricted settings”:
The NIMMSTA Scan Service can now be activated:
Android Permissions
The NIMMSTA App requires the following permissions to function properly.
- Storage
- Location
- Accessibility Service (for automatic barcode input) - Standard App only
- Bluetooth (for device connection)
- Internet (for log uploads and cloud features)
When using Mobile Device Management (MDM), ensure that the NIMMSTA App is granted the following Android permissions.
Android V6 up to and including Android V11
- android.permission.BLUETOOTH_CONNECT
- android.permission.BLUETOOTH_PRIVILEGED
- android.permission.INTERNET
- android.permission.FOREGROUND_SERVICE
- android.permission.BLUETOOTH
- android.permission.BLUETOOTH_ADMIN
- android.permission.ACCESS_FINE_LOCATION
- android.permission.ACCESS_COARSE_LOCATION
- android.permission.READ_EXTERNAL_STORAGE
- android.permission.WRITE_EXTERNAL_STORAGE
From Android V12 (API level 31)
- android.permission.BLUETOOTH_SCAN"
- android:usesPermissionFlags="neverForLocation"
- tools:targetApi="s"
- android.permission.BLUETOOTH_CONNECT
- android.permission.INTERNET
- android.permission.FOREGROUND_SERVICE
- android.permission.READ_EXTERNAL_STORAGE
- android.permission.WRITE_EXTERNAL_STORAGE
Android app variants and integrations
Various app variants are available depending on the use case:
Standard NIMMSTA App
- Usage: Standard app for most use cases
- Functions: Bluetooth LE connection, Accessibility Service for automatic barcode input
- Android-specific: Automatically detects whether the cursor is in a writable field (requires Accessibility Service)
- Webserver & Intent integrations: Supports webserver- and intent-based integrations
NIMMSTA Intent App
- Usage: For intent integrations
- Advantage: Works without Accessibility Service
- Application: For use with intent-based integrations
NIMMSTA Webserver App
- Usage: For webserver integrations
- Advantage: Works without Accessibility Service
- Application: For use with webserver-based integrations
Enable services required for Mobile Device Management (MDM)
If the NIMMSTA App is deployed through an MDM, the following commands can be used to ensure that the user does not have to approve permissions manually.
Grant all required permissions
# Bluetooth und Standort-Berechtigungen
adb shell pm grant com.nimmsta android.permission.ACCESS_FINE_LOCATION
adb shell pm grant com.nimmsta android.permission.ACCESS_COARSE_LOCATION
adb shell pm grant com.nimmsta android.permission.BLUETOOTH
adb shell pm grant com.nimmsta android.permission.BLUETOOTH_ADMIN
adb shell pm grant com.nimmsta android.permission.BLUETOOTH_CONNECT
adb shell pm grant com.nimmsta android.permission.BLUETOOTH_SCAN

# Speicher-Berechtigungen
adb shell pm grant com.nimmsta android.permission.READ_EXTERNAL_STORAGE
adb shell pm grant com.nimmsta android.permission.WRITE_EXTERNAL_STORAGE

# Service-Berechtigungen
adb shell pm grant com.nimmsta android.permission.FOREGROUND_SERVICE
adb shell pm grant com.nimmsta android.permission.INTERNET
Activate Accessibility Service
# NIMMSTA Accessibility Service aktivieren
adb shell settings put secure enabled_accessibility_services com.nimmsta/com.nimmsta.core.android.accessibilityservice.NimmstaAccessibilityService

# Überprüfen, ob der Service aktiviert ist
adb shell settings get secure enabled_accessibility_services
Complete setup script
For automated deployment, you can use this complete script:
#!/bin/bash
# NIMMSTA App MDM Setup Script

echo "Erteile NIMMSTA App Berechtigungen..."

# Alle erforderlichen Berechtigungen erteilen
adb shell pm grant com.nimmsta android.permission.ACCESS_FINE_LOCATION
adb shell pm grant com.nimmsta android.permission.ACCESS_COARSE_LOCATION
adb shell pm grant com.nimmsta android.permission.BLUETOOTH
adb shell pm grant com.nimmsta android.permission.BLUETOOTH_ADMIN
adb shell pm grant com.nimmsta android.permission.BLUETOOTH_CONNECT
adb shell pm grant com.nimmsta android.permission.BLUETOOTH_SCAN
adb shell pm grant com.nimmsta android.permission.READ_EXTERNAL_STORAGE
adb shell pm grant com.nimmsta android.permission.WRITE_EXTERNAL_STORAGE
adb shell pm grant com.nimmsta android.permission.FOREGROUND_SERVICE
adb shell pm grant com.nimmsta android.permission.INTERNET

echo "Aktiviere Accessibility Service..."

# Accessibility Service aktivieren
adb shell settings put secure enabled_accessibility_services com.nimmsta/com.nimmsta.core.android.accessibilityservice.NimmstaAccessibilityService

echo "Überprüfe Setup..."

# Berechtigungen überprüfen
adb shell dumpsys package com.nimmsta | grep permission

# Accessibility Service überprüfen
adb shell settings get secure enabled_accessibility_services

echo "NIMMSTA App Setup abgeschlossen!"
Troubleshooting ADB commands
If problems occur, use these commands for troubleshooting:
# Überprüfen, ob NIMMSTA App installiert ist
adb shell pm list packages | grep nimmsta

# Aktuelle Berechtigungen überprüfen
adb shell dumpsys package com.nimmsta | grep permission

# Accessibility Services Status überprüfen
adb shell settings get secure enabled_accessibility_services

# Accessibility Services zurücksetzen (falls erforderlich)
adb shell settings put secure enabled_accessibility_services ""

# Accessibility Service erneut aktivieren
adb shell settings put secure enabled_accessibility_services com.nimmsta/com.nimmsta.core.android.accessibilityservice.NimmstaAccessibilityService
|
|
Make sure that USB debugging is enabled on the Android device before running ADB commands. |

|
IMPORTANT: These commands require the device to be in developer mode with USB debugging enabled. |
NIMMSTA App for Windows
System requirements
- Windows 10 or higher
- BLE 4.2-compatible Bluetooth module with Windows 10 Fall Creators Update or later (Build 1709, released 17.10.2017)
- 2-Core CPU
- 4 GB RAM
- 2 GB HDD
- At least Java version 8+
If Java is not installed correctly or an outdated version is installed, the following error message may appear:
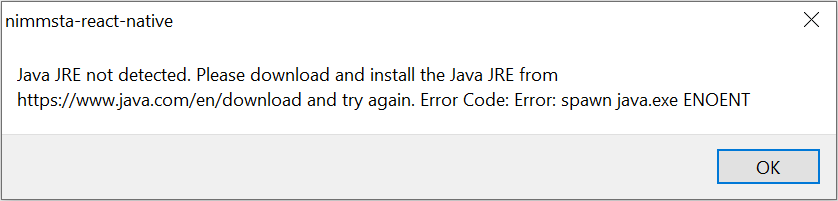
In this case, the correct version must be installed.
Installation Java
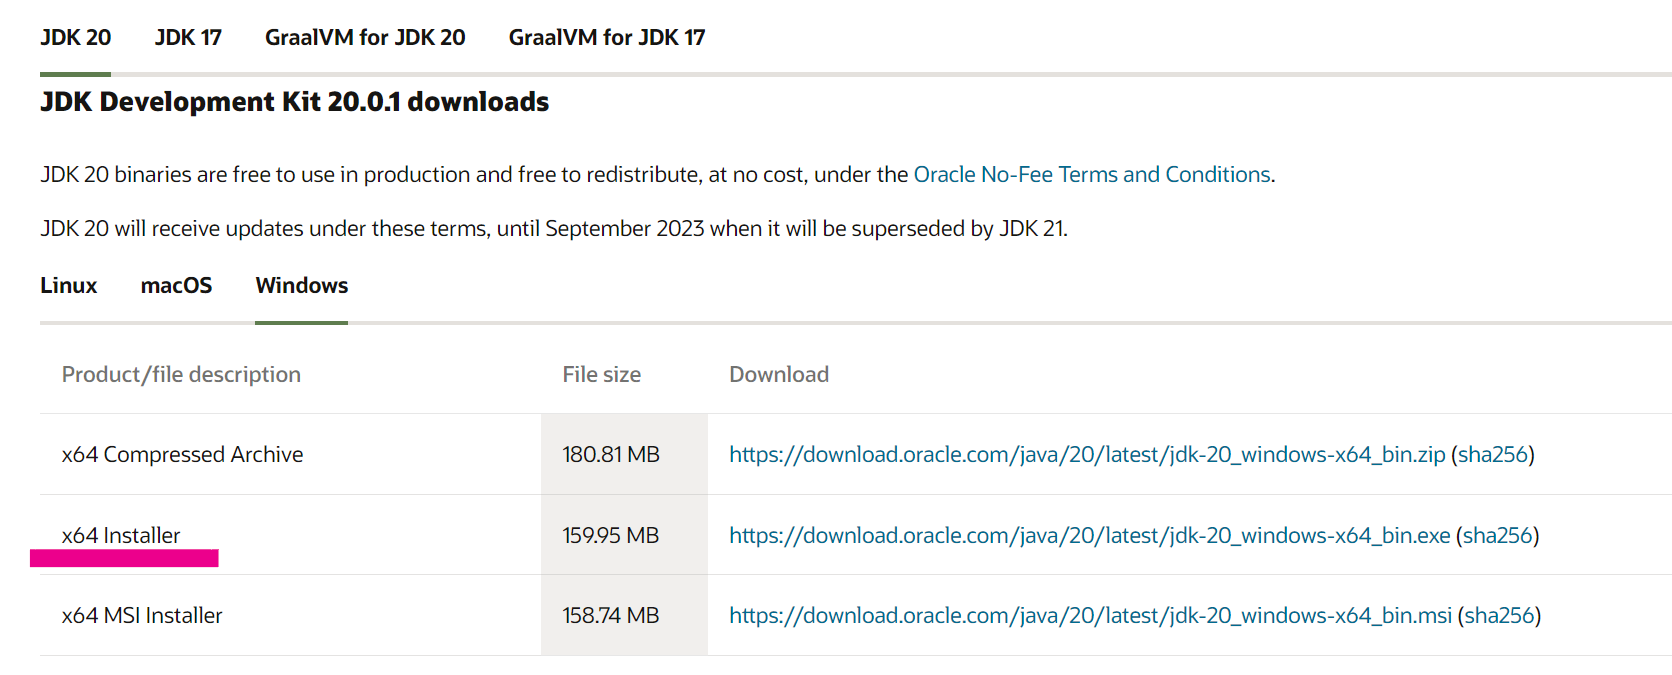
Java can be downloaded from the following link: Java JDK / JRE
Either the JDK (Java Development Kit) or the JRE (Java Runtime Environment) can be used.
The JRE is recommended.
Java JDK 17+
Java JRE
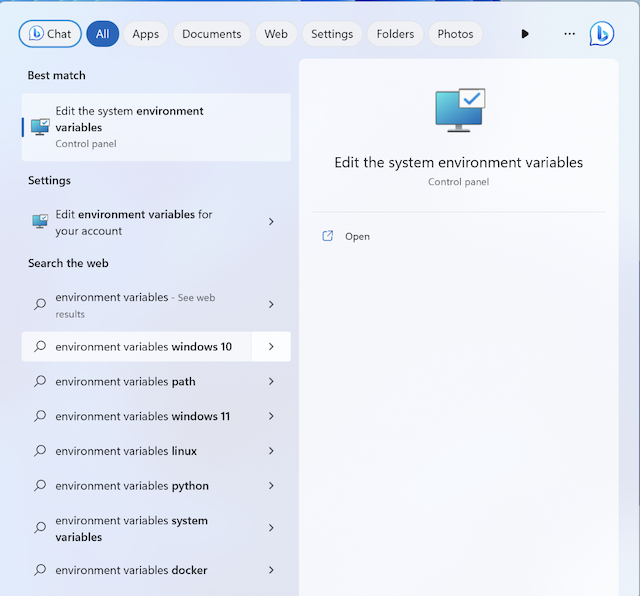
To configure Java correctly, add Java to the Path system environment variable. First, open System Properties:
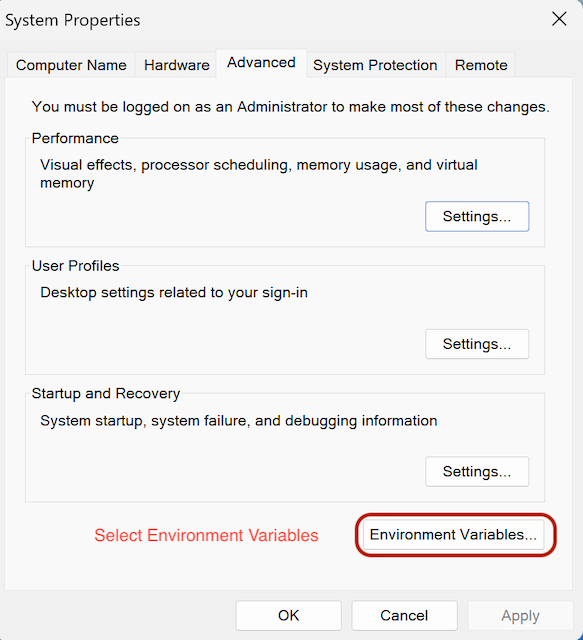
On the "Advanced" tab, select "Environment Variables":
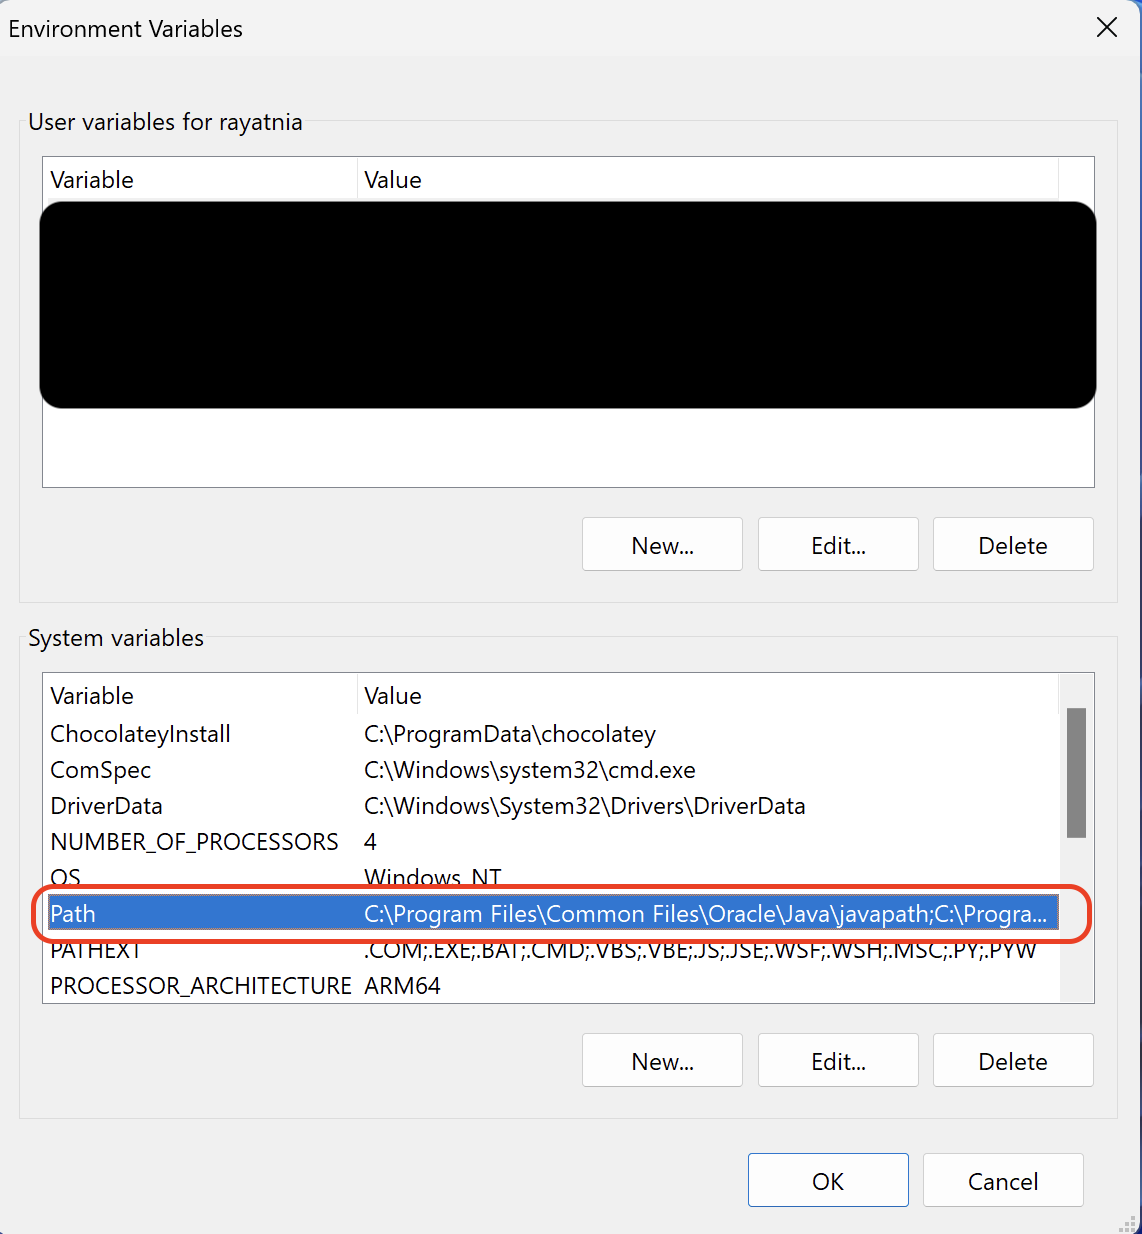
Select the "Path" variable and click "Edit":
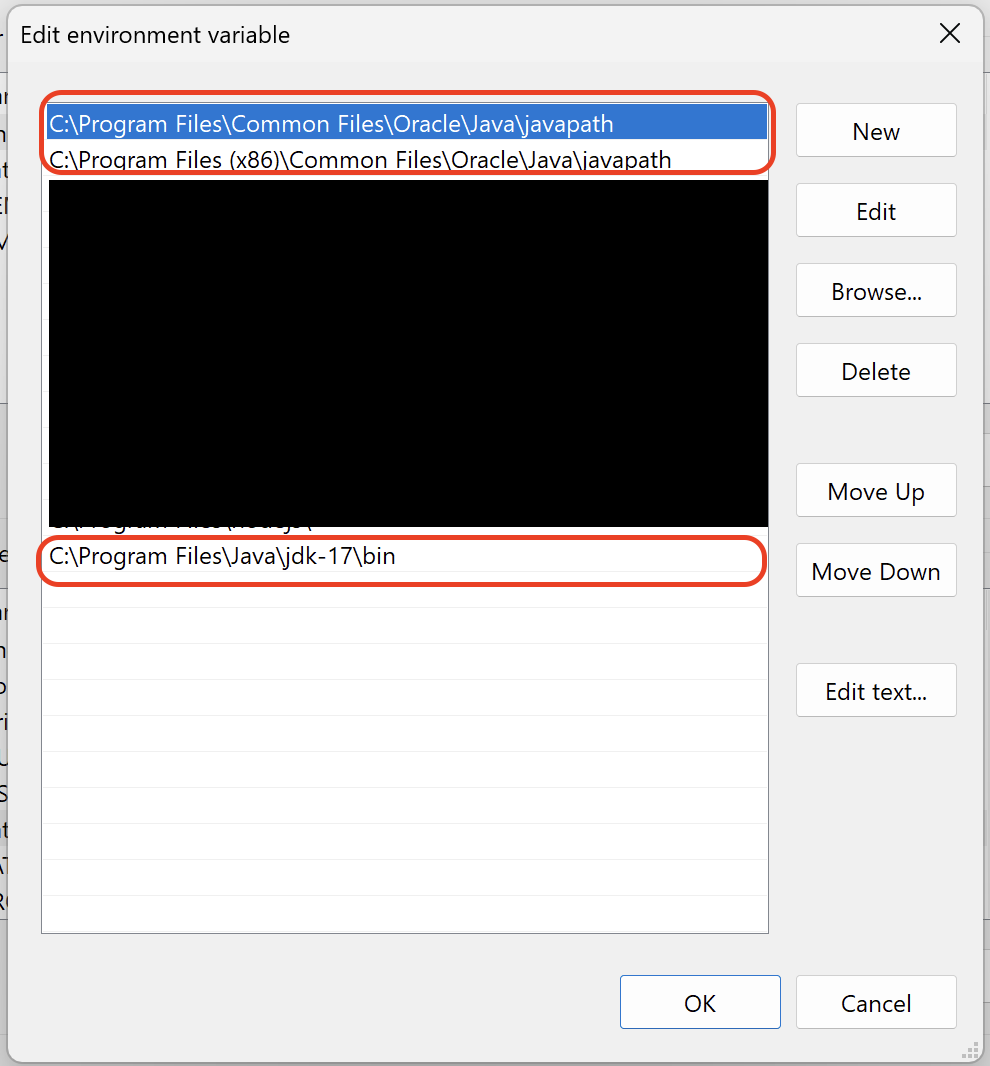
The variables marked in red in the following illustration must be present. If necessary, add them by clicking "New".
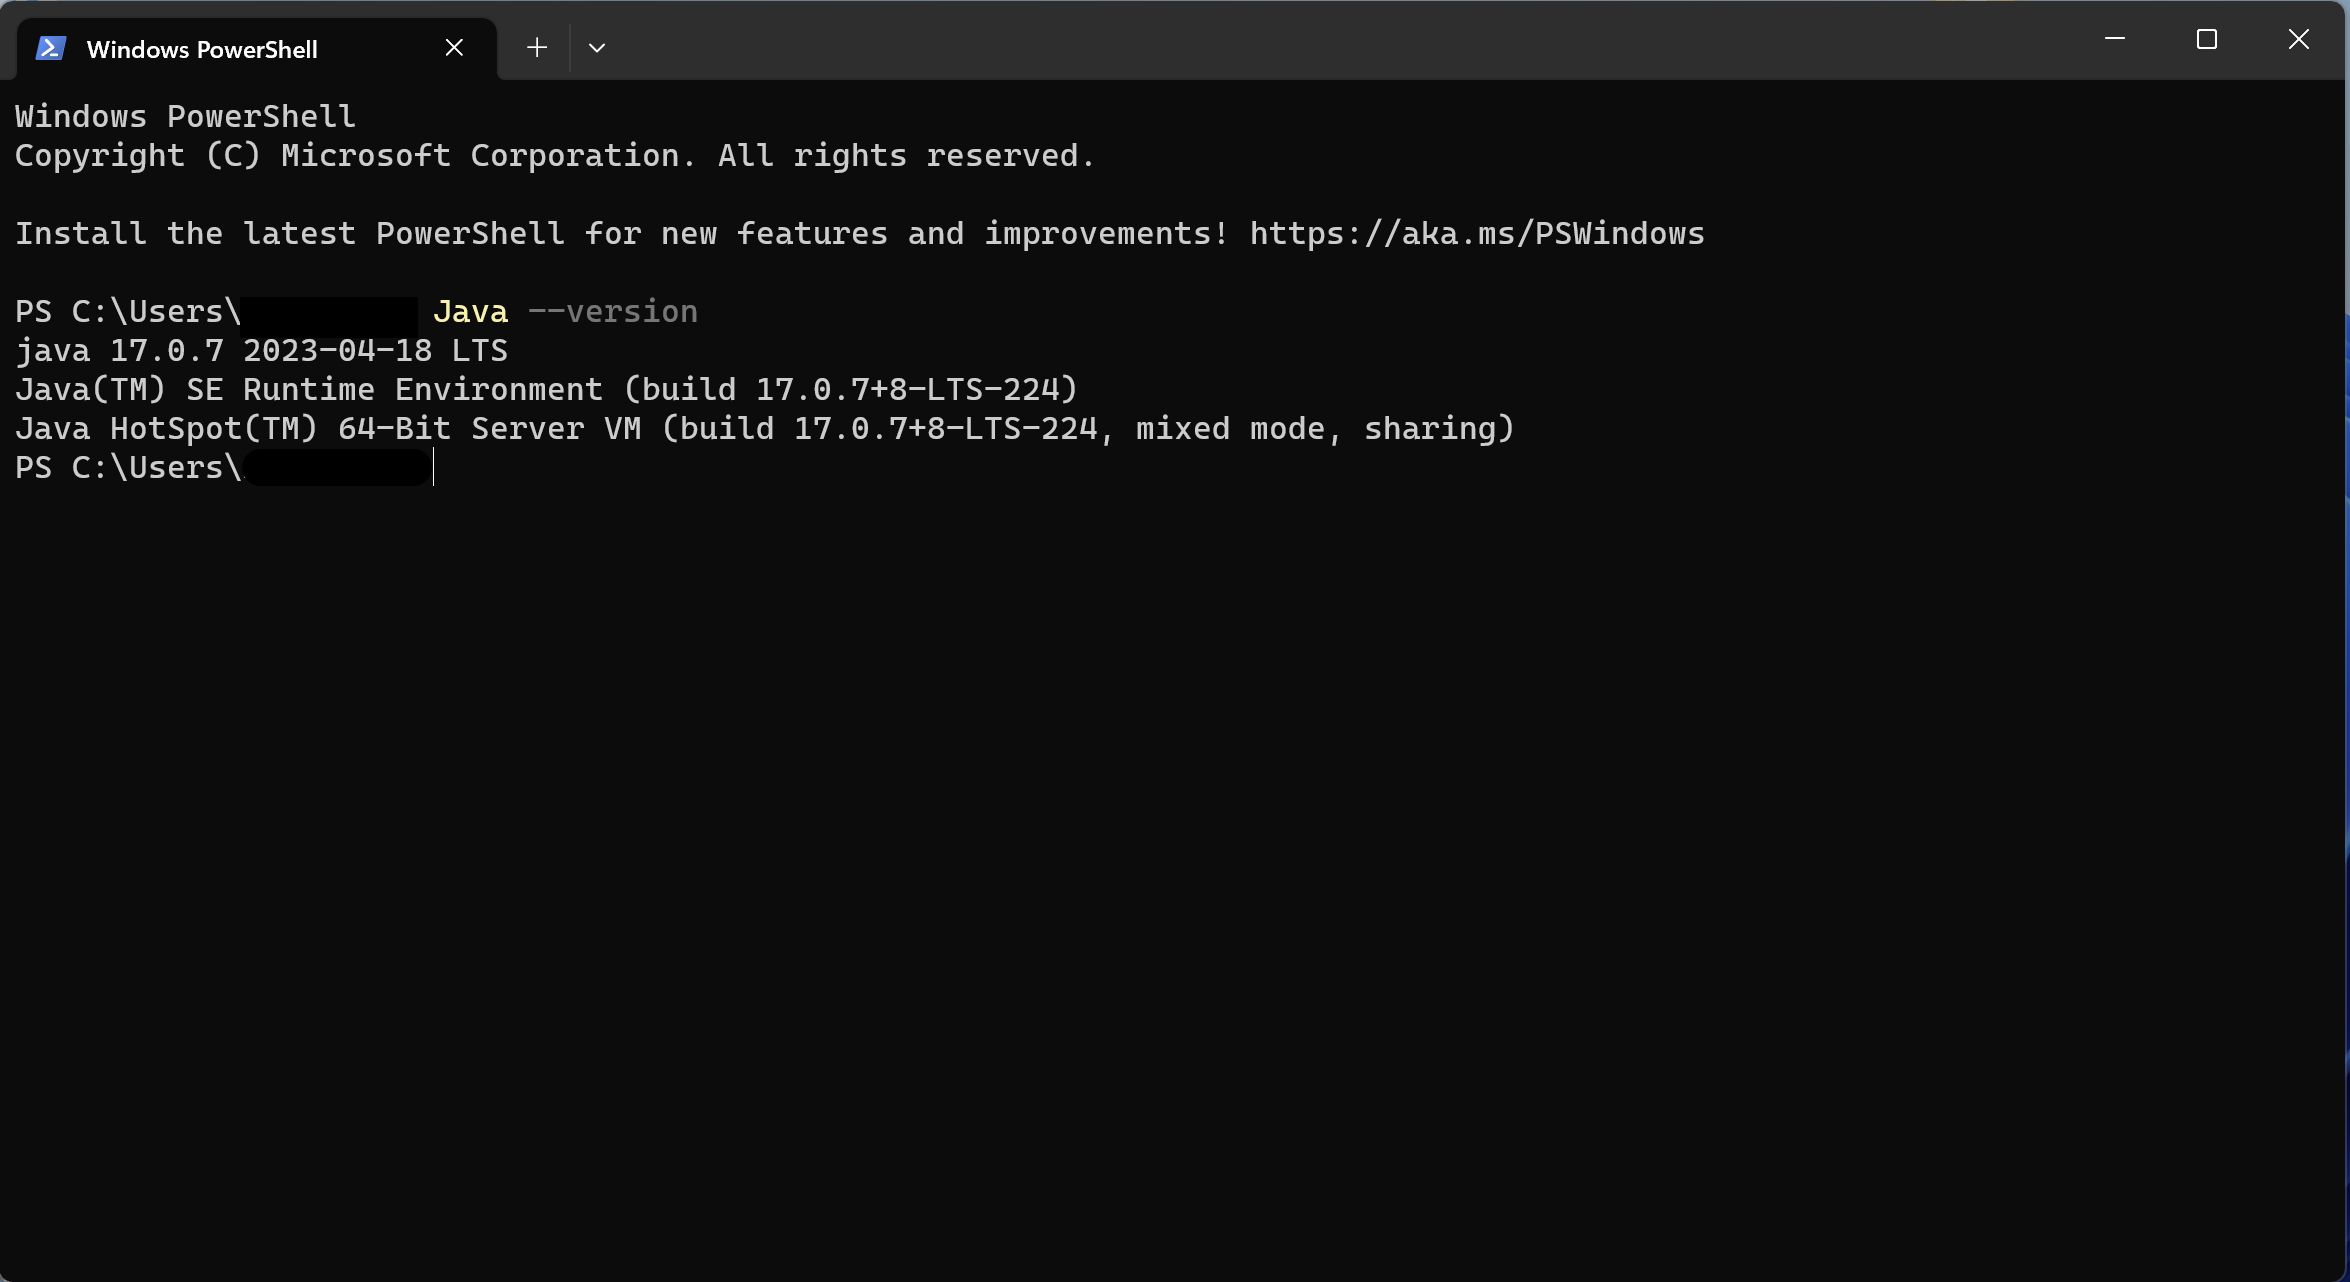
Use the command prompt (cmd) or PowerShell to verify that Java is installed and working correctly. The following output should appear:
Download NIMMSTA App
The NIMMSTA App can be downloaded from the NIMMSTA Productivity Cloud at the following link:
NIMMSTA Productivity Cloud
When downloading from the Productivity Cloud, you will receive an EXE file.
|
|
If you use the Edge browser, a warning may appear after the download. To save the download, select the three dots and then Keep. In the window that opens, select Keep anyway. |
Install NIMMSTA App
The following descriptions refer to Windows 10 with Java already installed.
- Start the installation
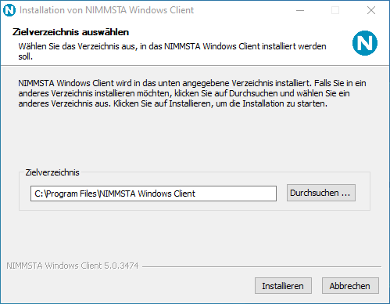
- Select the destination directory for installing the application
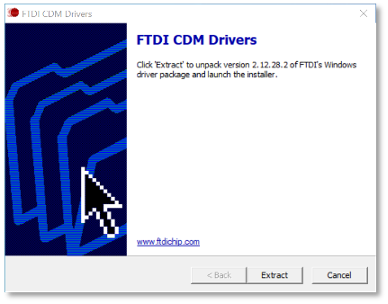
- During installation, the program for installing the required drivers also opens. Install these drivers as well.
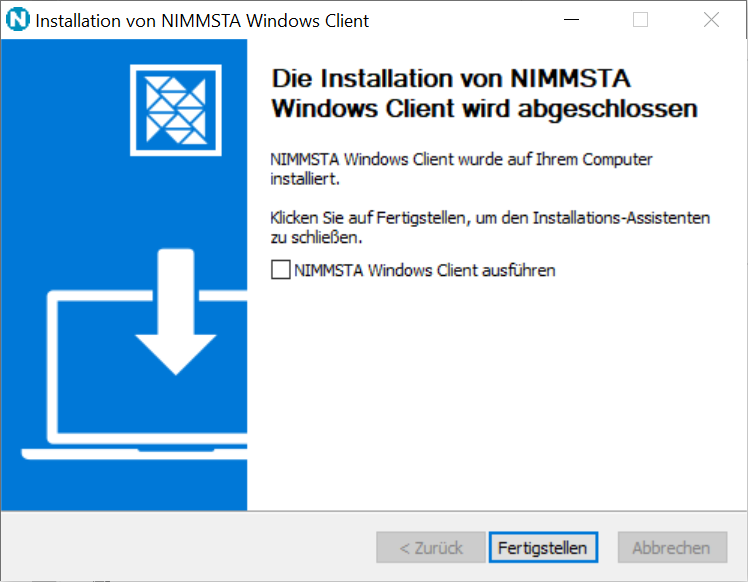
- After installation is complete, you can choose whether to start the NIMMSTA App immediately. Do not start the NIMMSTA App directly after installation.
- To ensure correct operation, restart the operating system and then start the NIMMSTA App.
Use NIMMSTA App
- The following step is only required if your terminal does not have a BLE 4.2-compatible Bluetooth module:
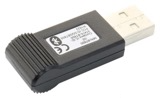
Connect the NIMMSTA Bluetooth Dongle to the Windows computer.
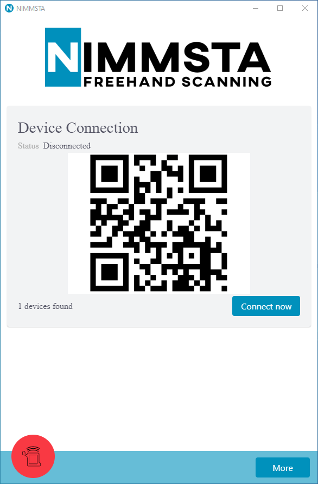
- The NIMMSTA App can be opened using the Start menu entry or desktop icon.
- As soon as the NIMMSTA App starts, the Connect screen is displayed.
Windows Multi App mode
Press Windows + R to open the dialog box.
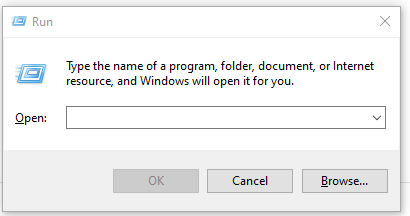
Enter the following command and click OK
The following window should appear:
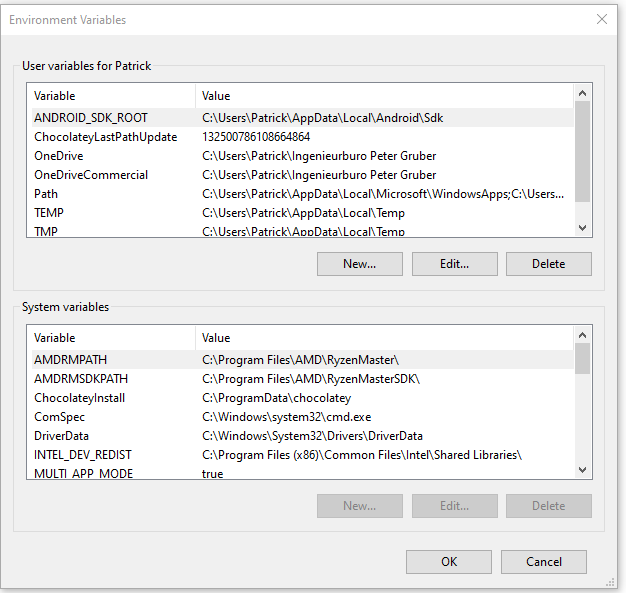
Click New....
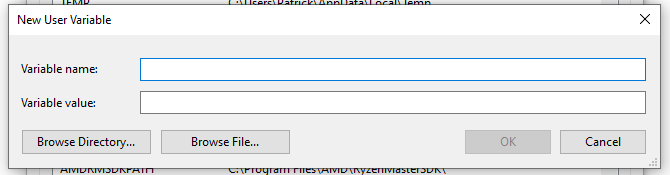
Enter MULTI_APP_MODE as the variable name and true as the variable value.
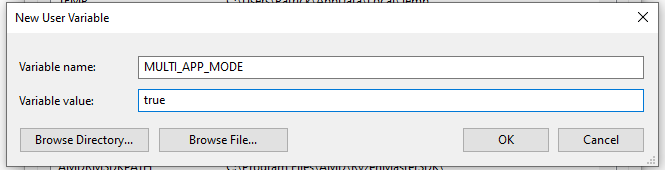
Click OK.
Repeat the process with NIMMSTA_DISABLE_NATIVE and also set its value to true.
You can now start multiple instances of the app. To disable this behavior, remove the entry from the list.
FAQ Windows App
No desktop icon is created
This may occur if a separate administrator account is used for installation. In this case, the desktop shortcut can be created manually. Create a shortcut to the following file:
C:\Program Files\NIMMSTA Windows Client\NIMMSTA Windows Client.exe
Or
<Zielverzeichnis>\NIMMSTA Windows Client.exe
Perform firmware update
Download the firmware update file from the NIMMSTA Productivity Cloud. The file type is ".nimmstaupdate".
Transfer the file to the Android or Windows device.
Open the NIMMSTA App, connect the NIMMSTA Smart Watch HS 50 to be updated, and open the menu by selecting the button at the bottom right. Note: Before NIMMSTA App V6, the menu item is accessed through the green NIMMSTA Smart Watch HS 50 icon on the left.
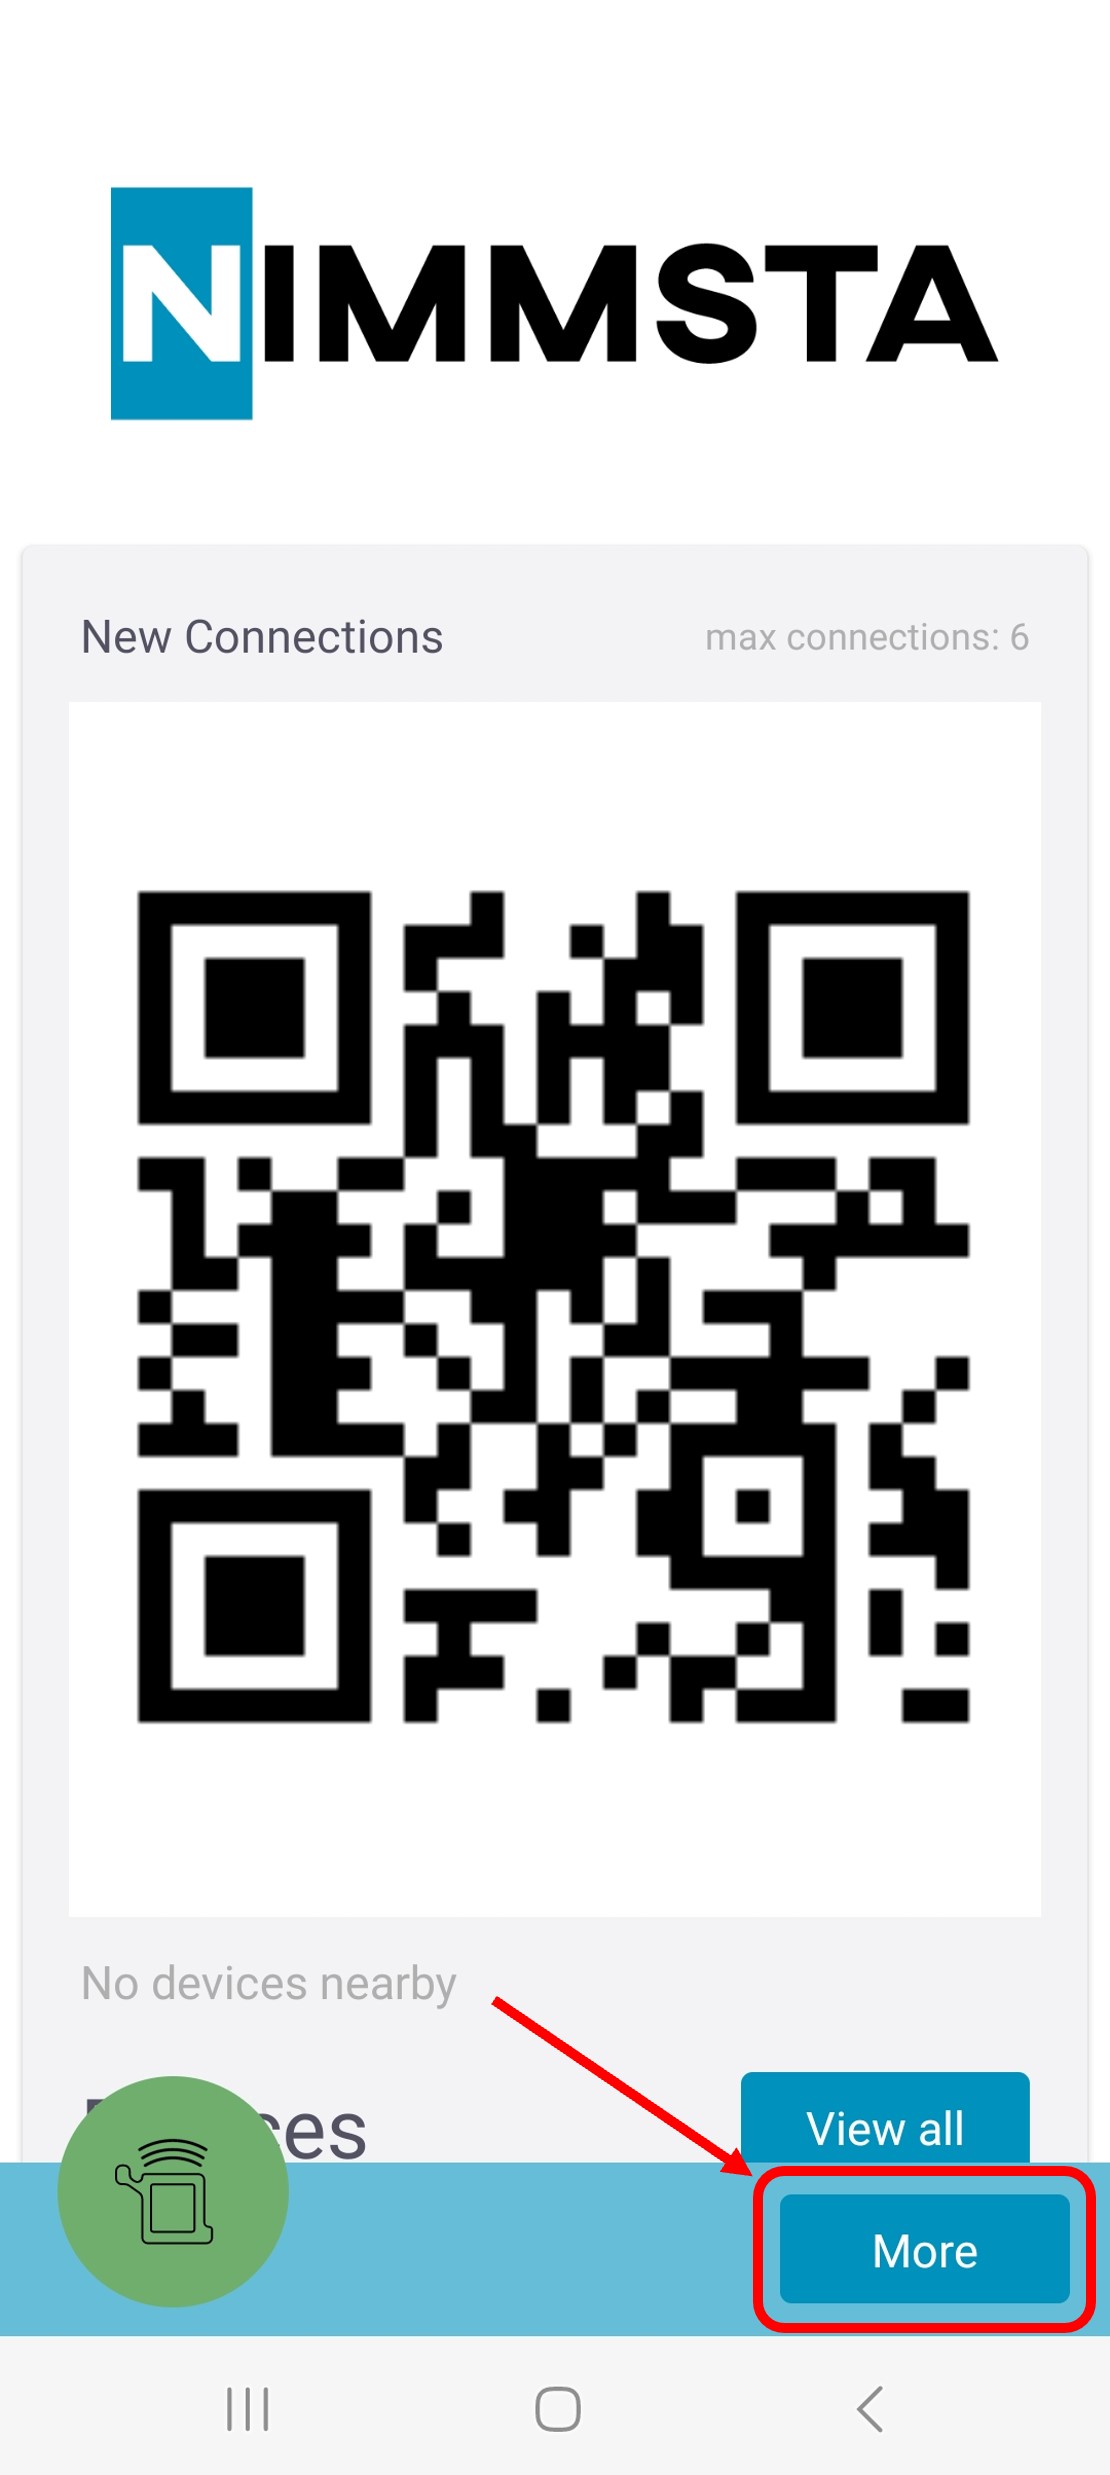
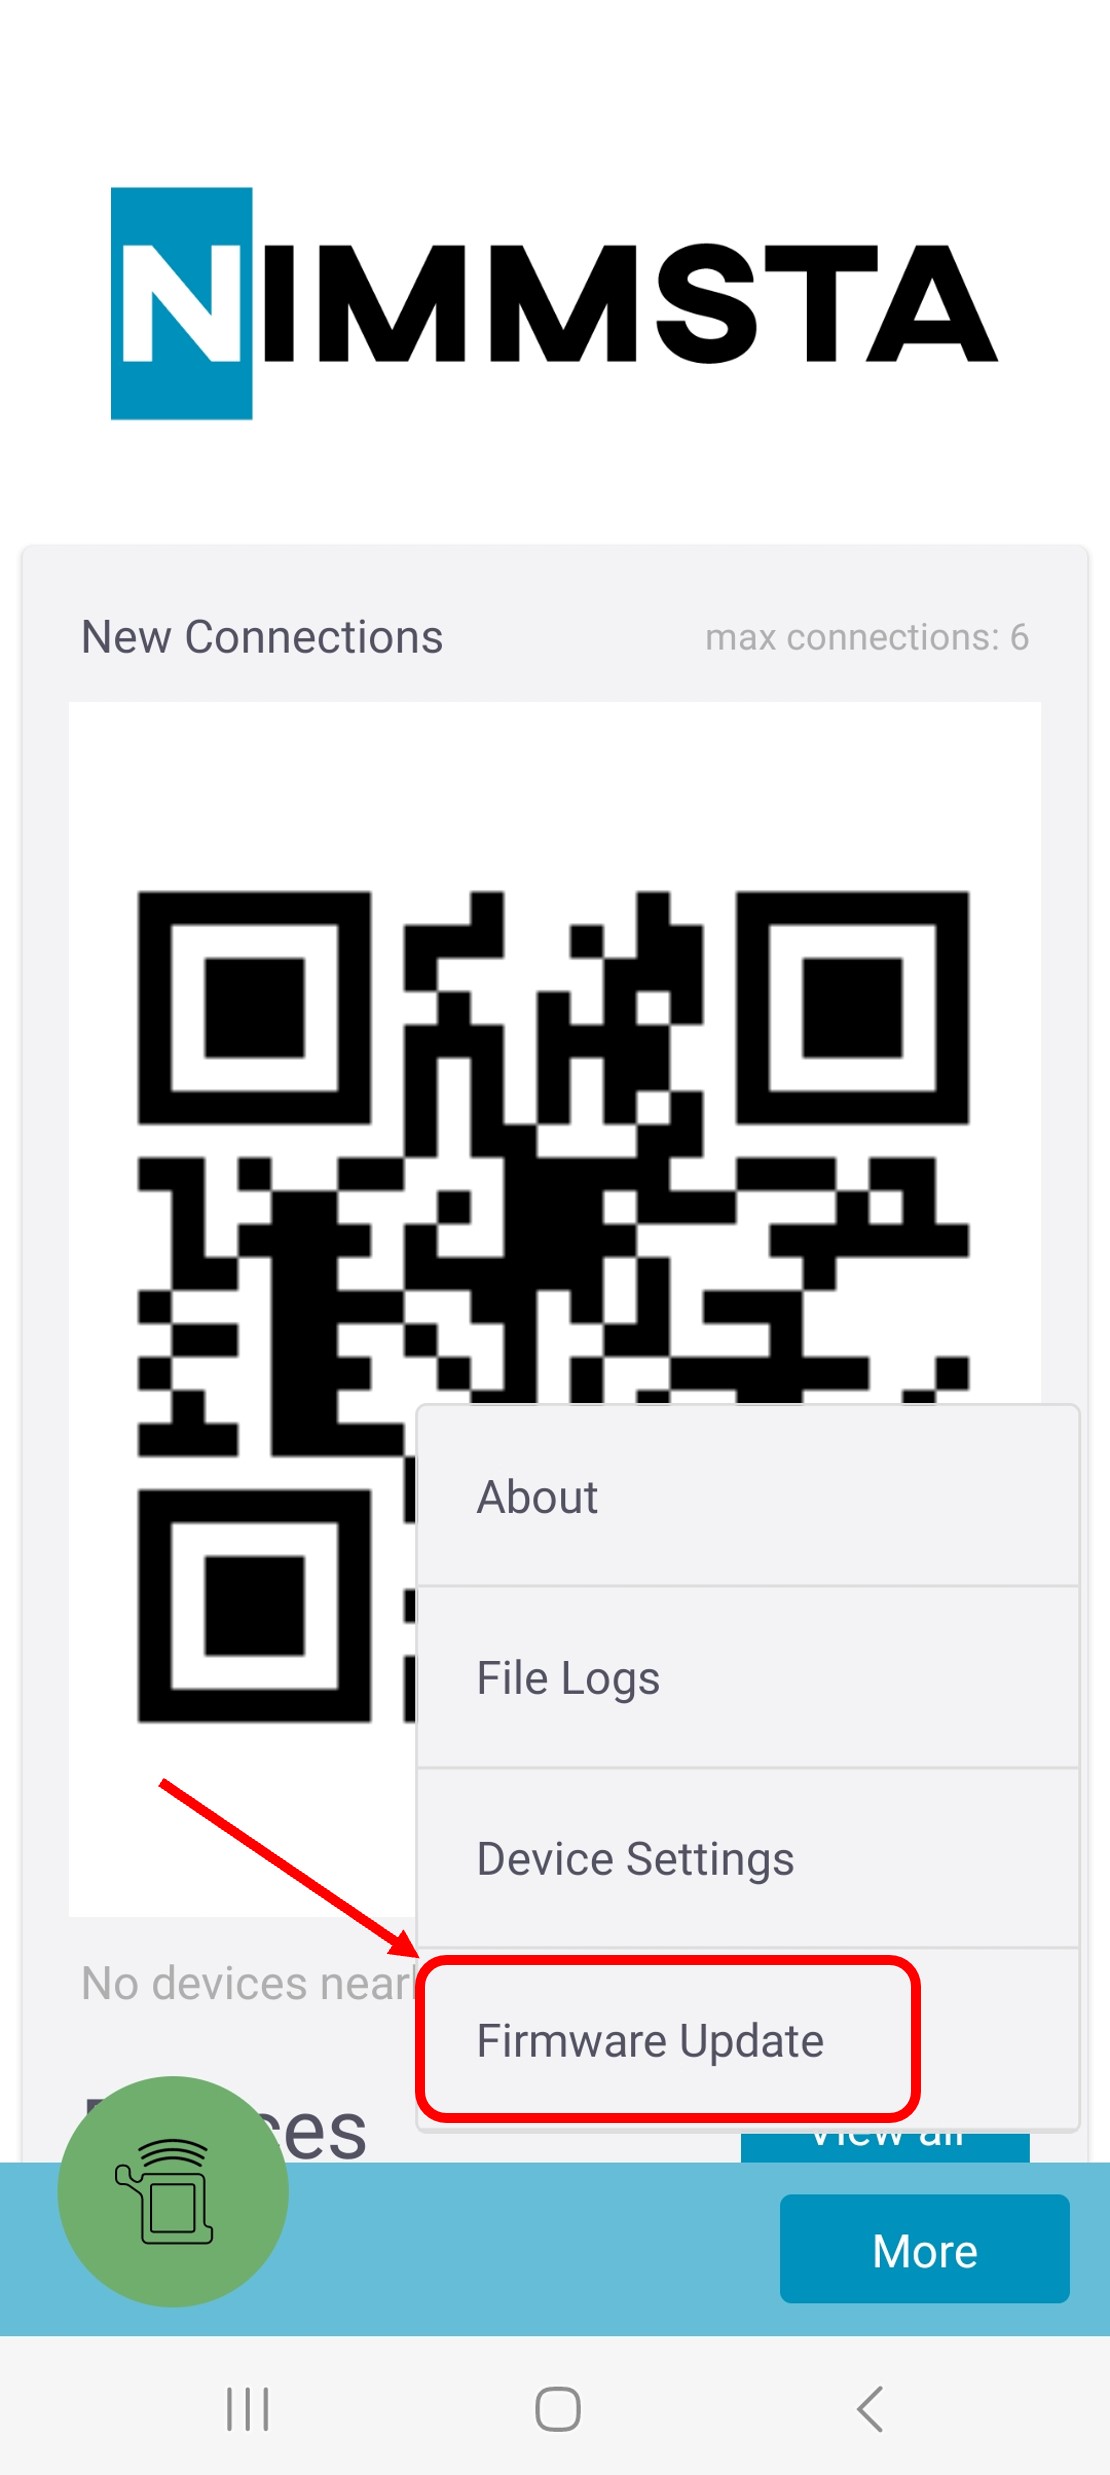
Select "Firmware Update".
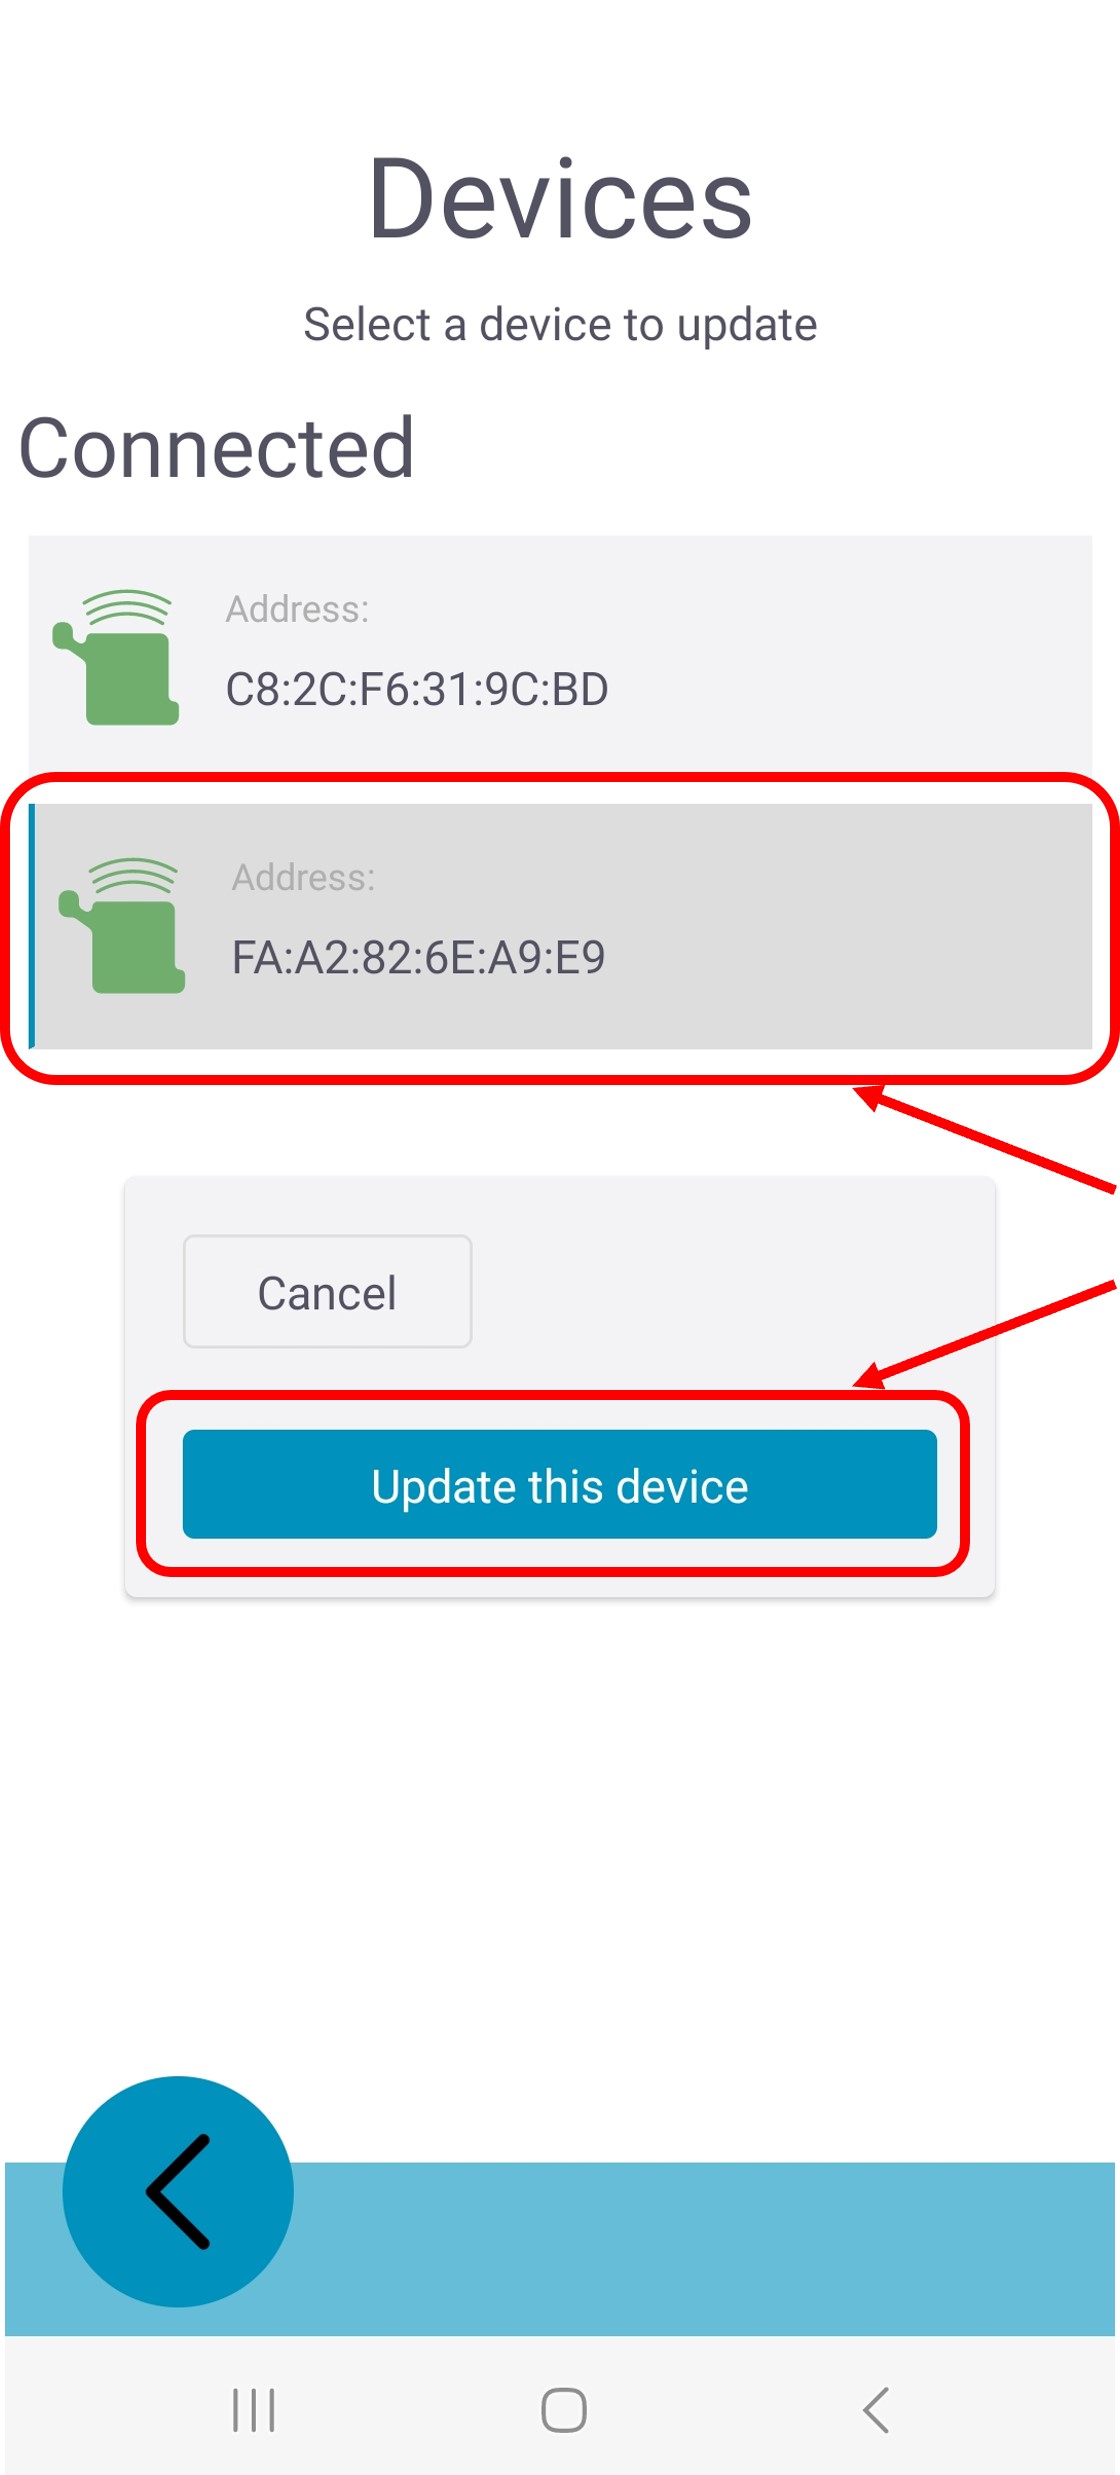
If multiple NIMMSTA Smart Watches HS 50 are connected to the app, NIMMSTA App V6 or newer requires you to select the NIMMSTA Smart Watch HS 50 to be updated. If only one Smart Watch is connected, the following screen is not displayed.
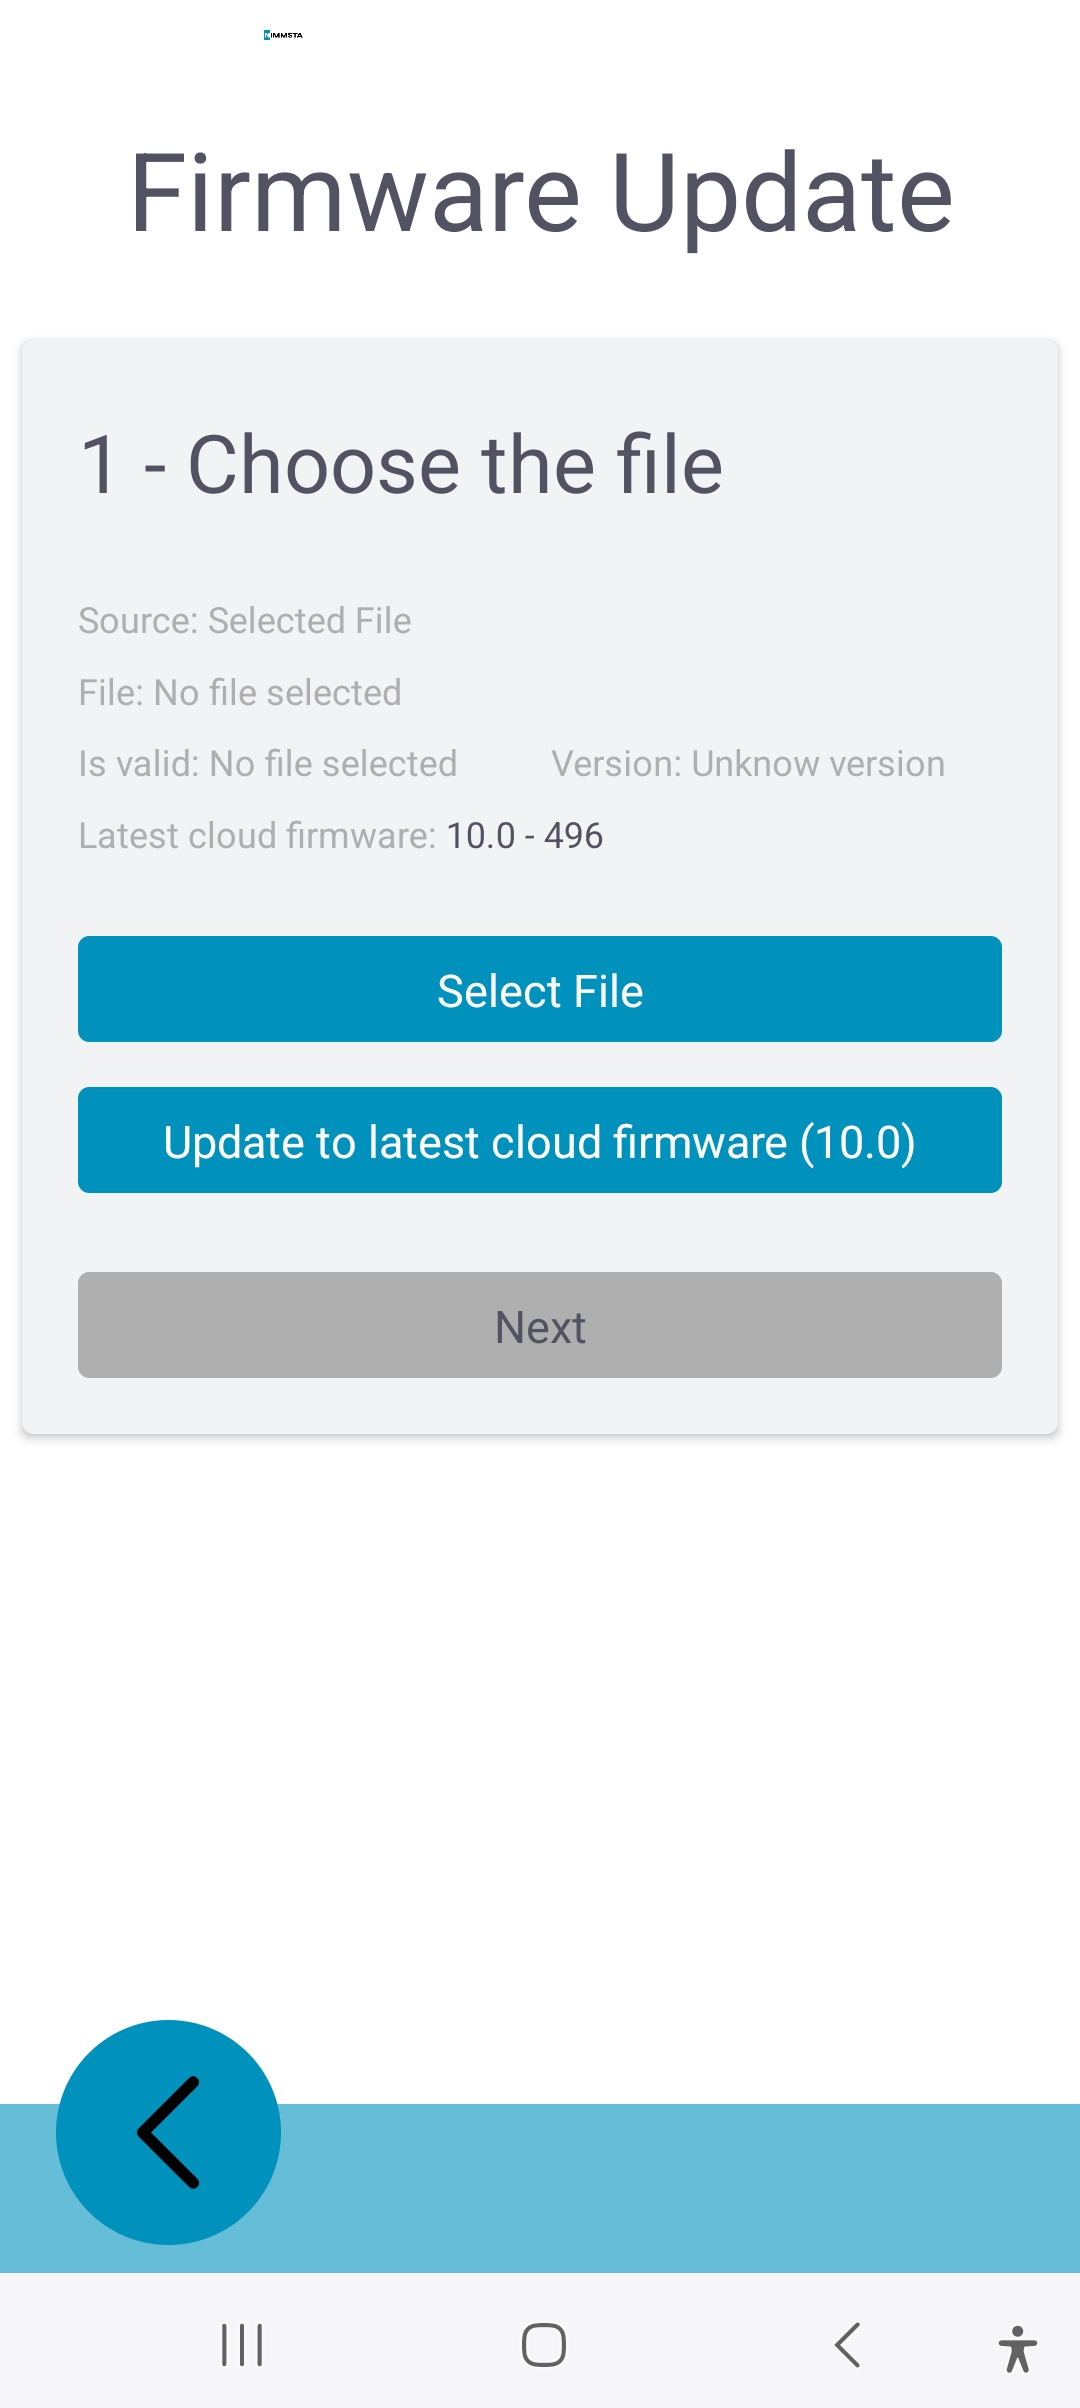
From app version 7.5.3, the current firmware can be downloaded directly from the cloud:
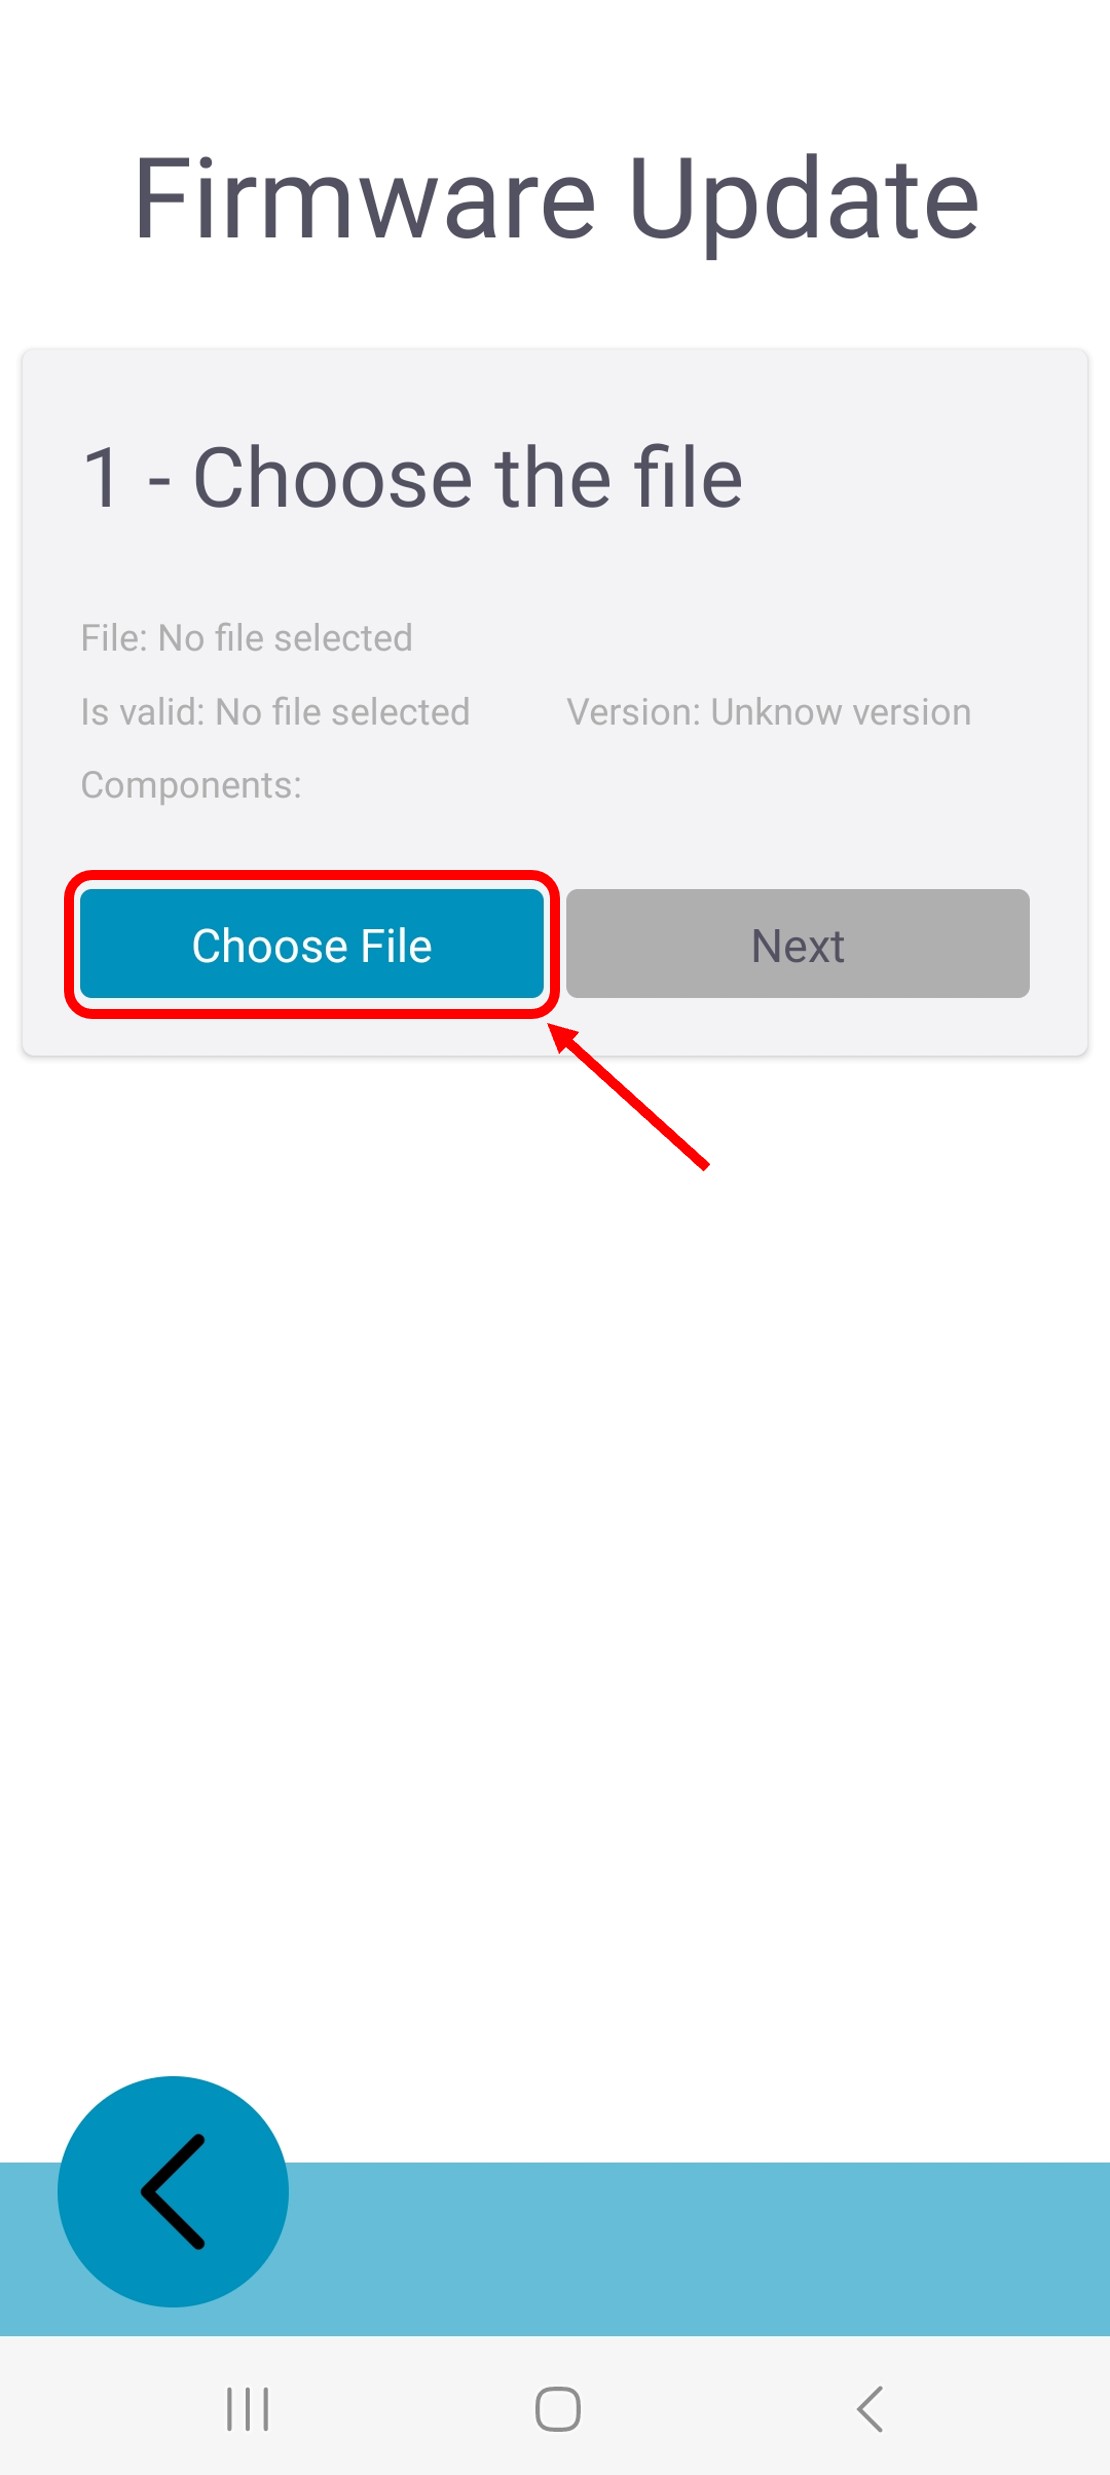
Alternatively, and on older versions, select the update file and then start the process.
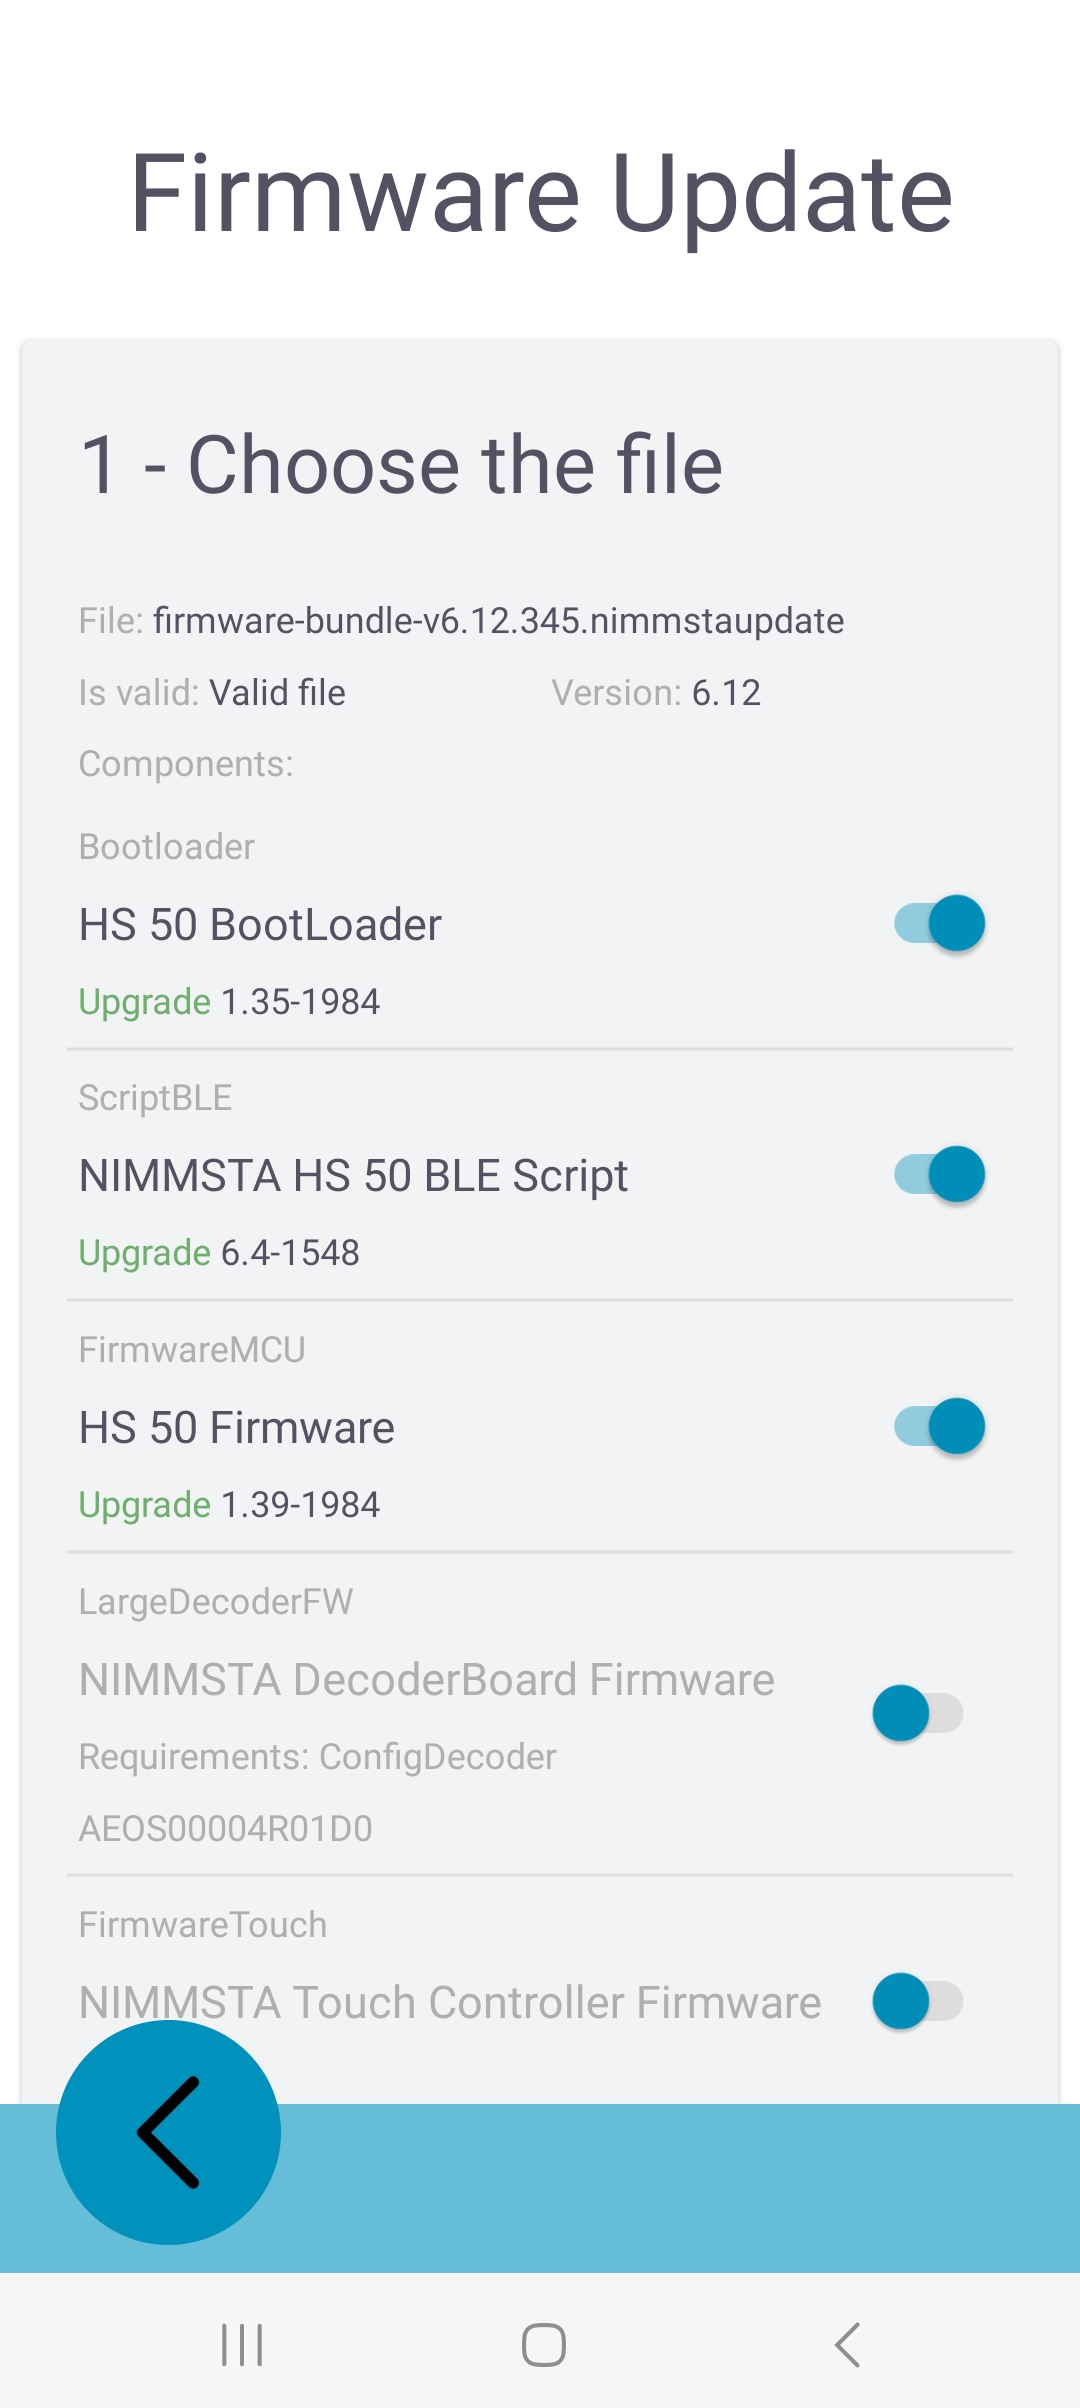
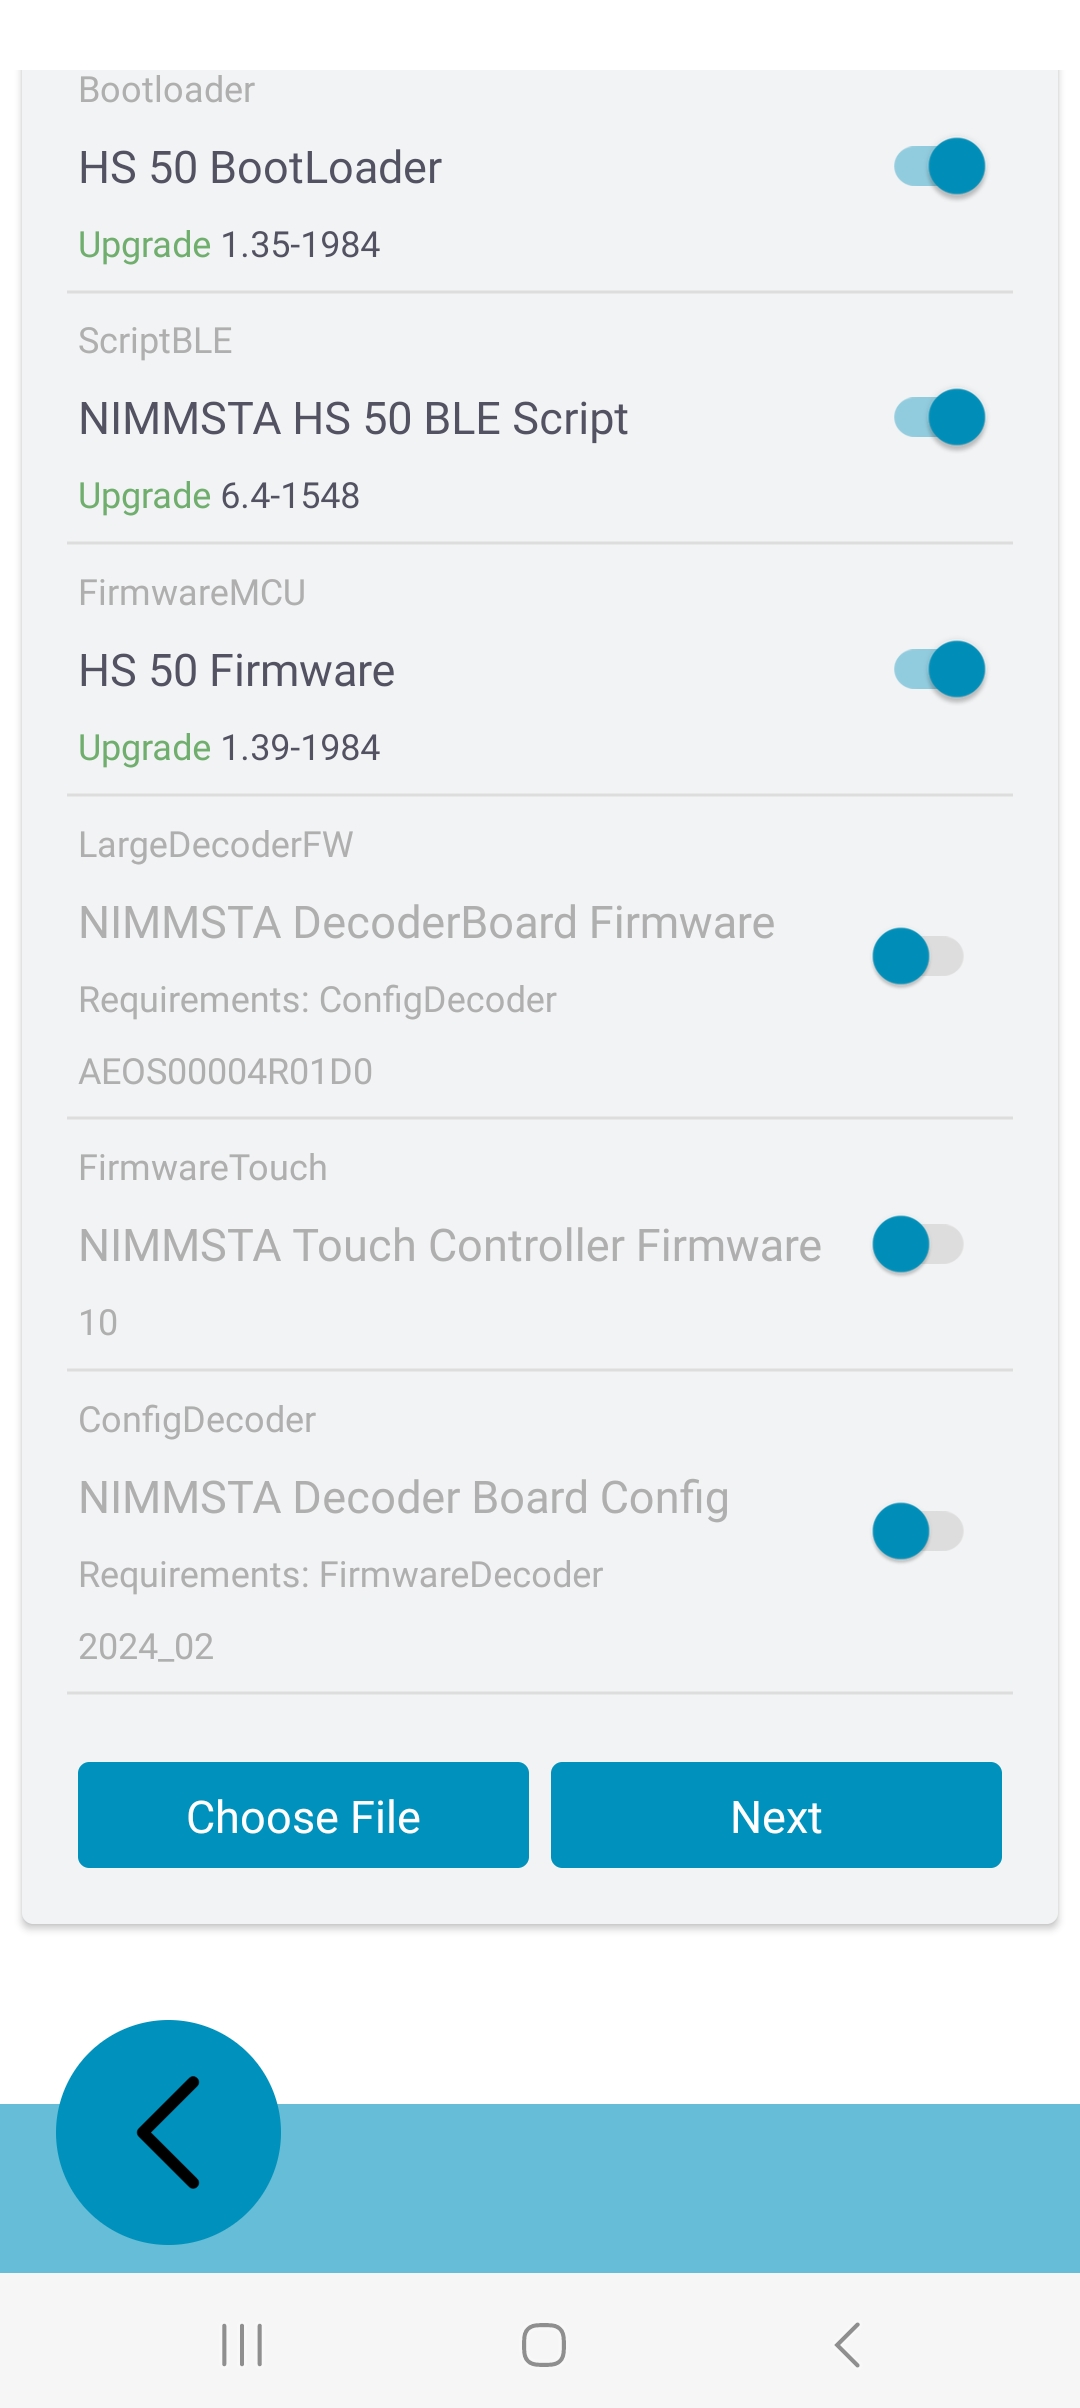
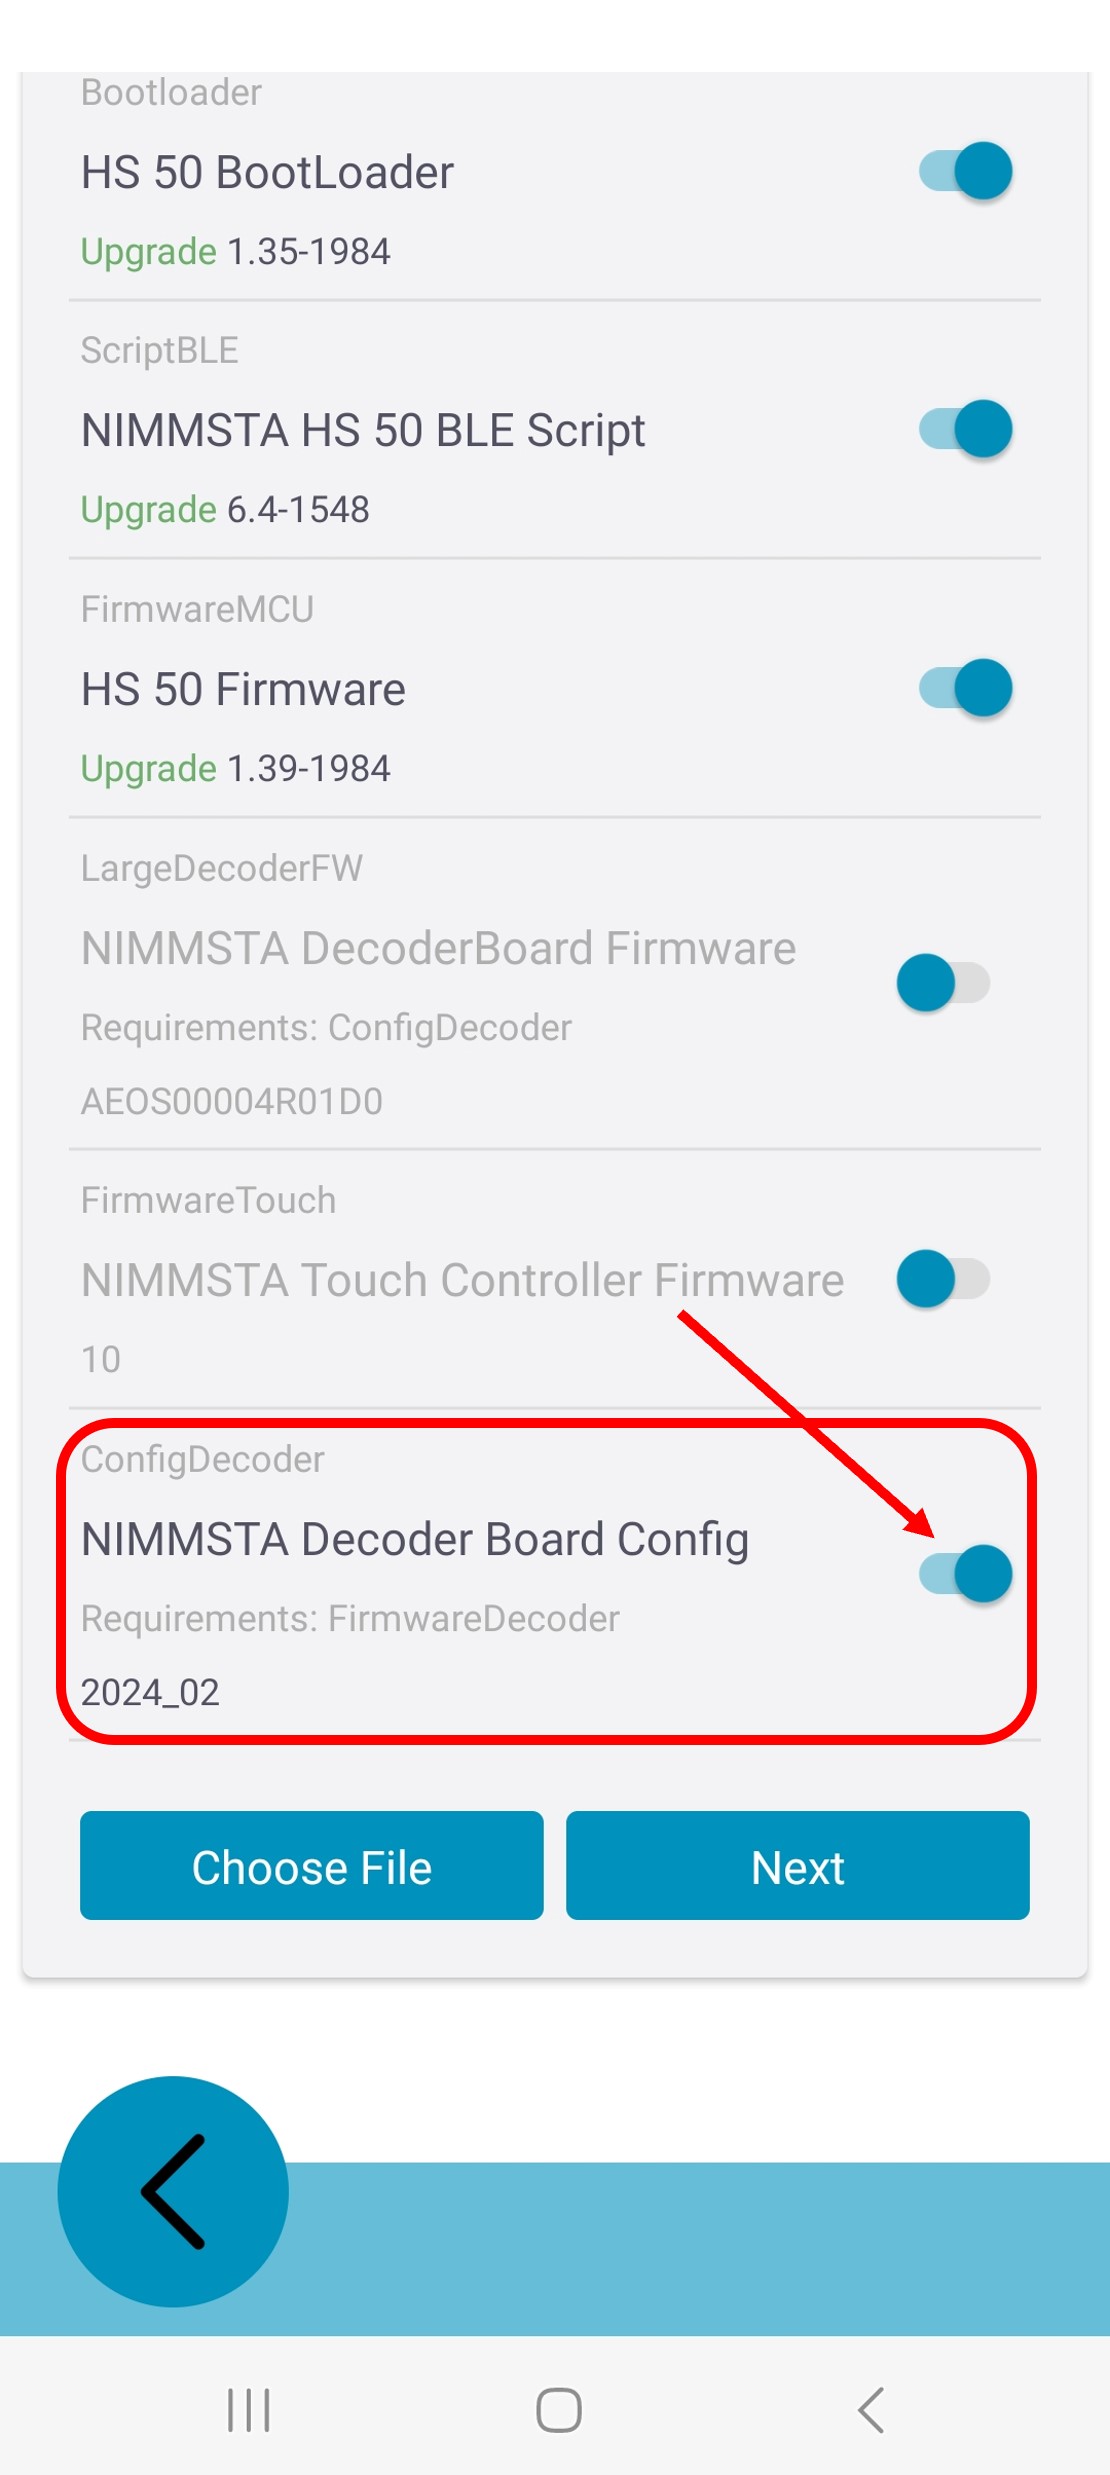
Outdated firmware components are automatically preselected for updating by the app ("Upgrade" shown in green). Unselected components are grayed out. The preselection can be adjusted if required.
|
|
The NIMMSTA Decoder Board Config settings were improved in the firmware update from V6.11 to V6.12. As these settings may be customized for the customer, automatic preselection is not enabled for this component. If there are no customer-specific changes, selecting this component is recommended. |
 |
 |
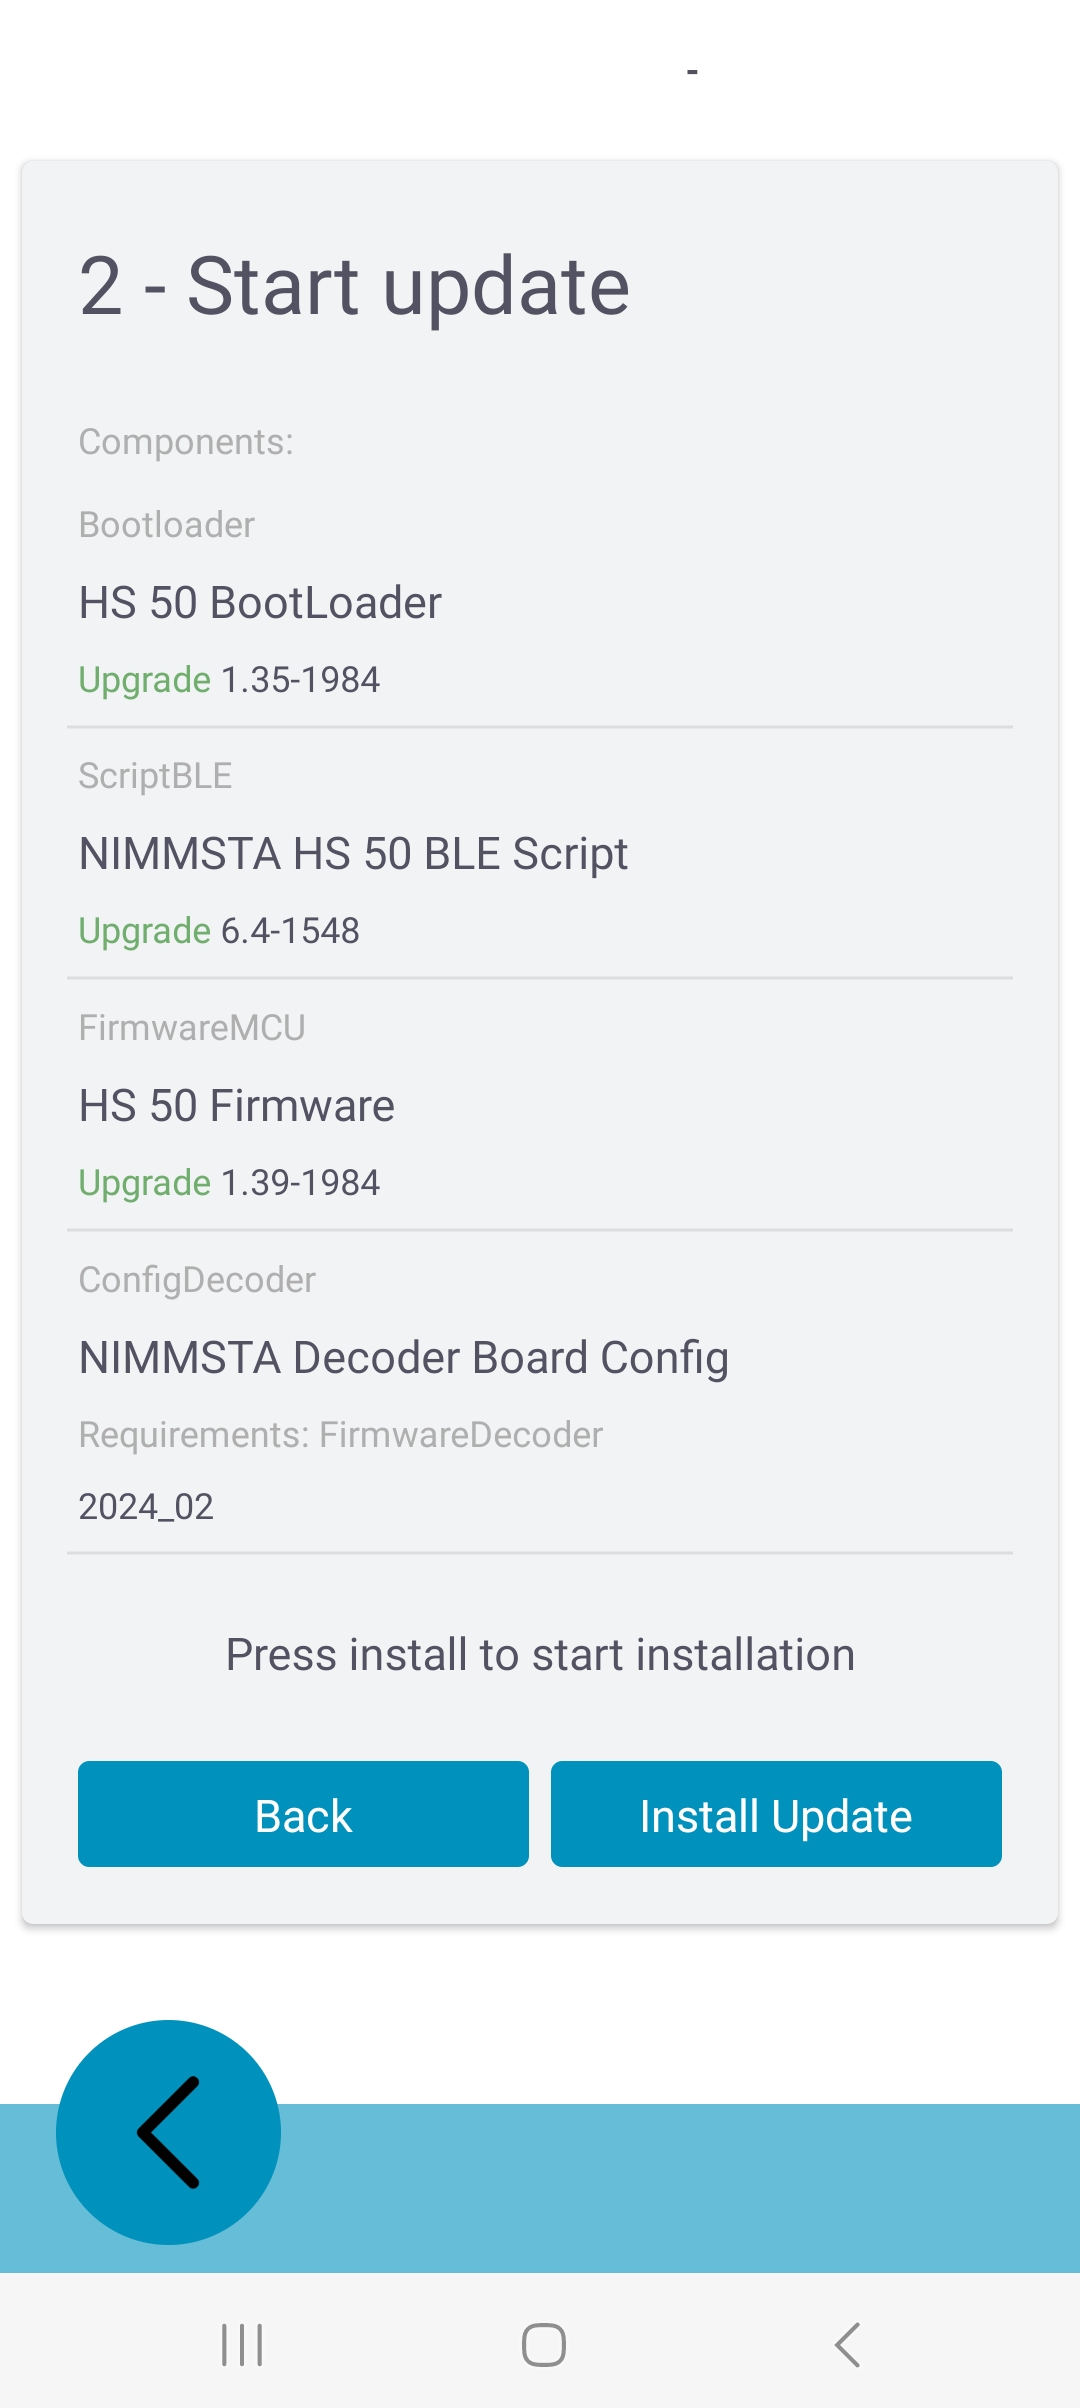
After confirming the firmware update components with "Next", another overview is displayed and you can start the firmware update.
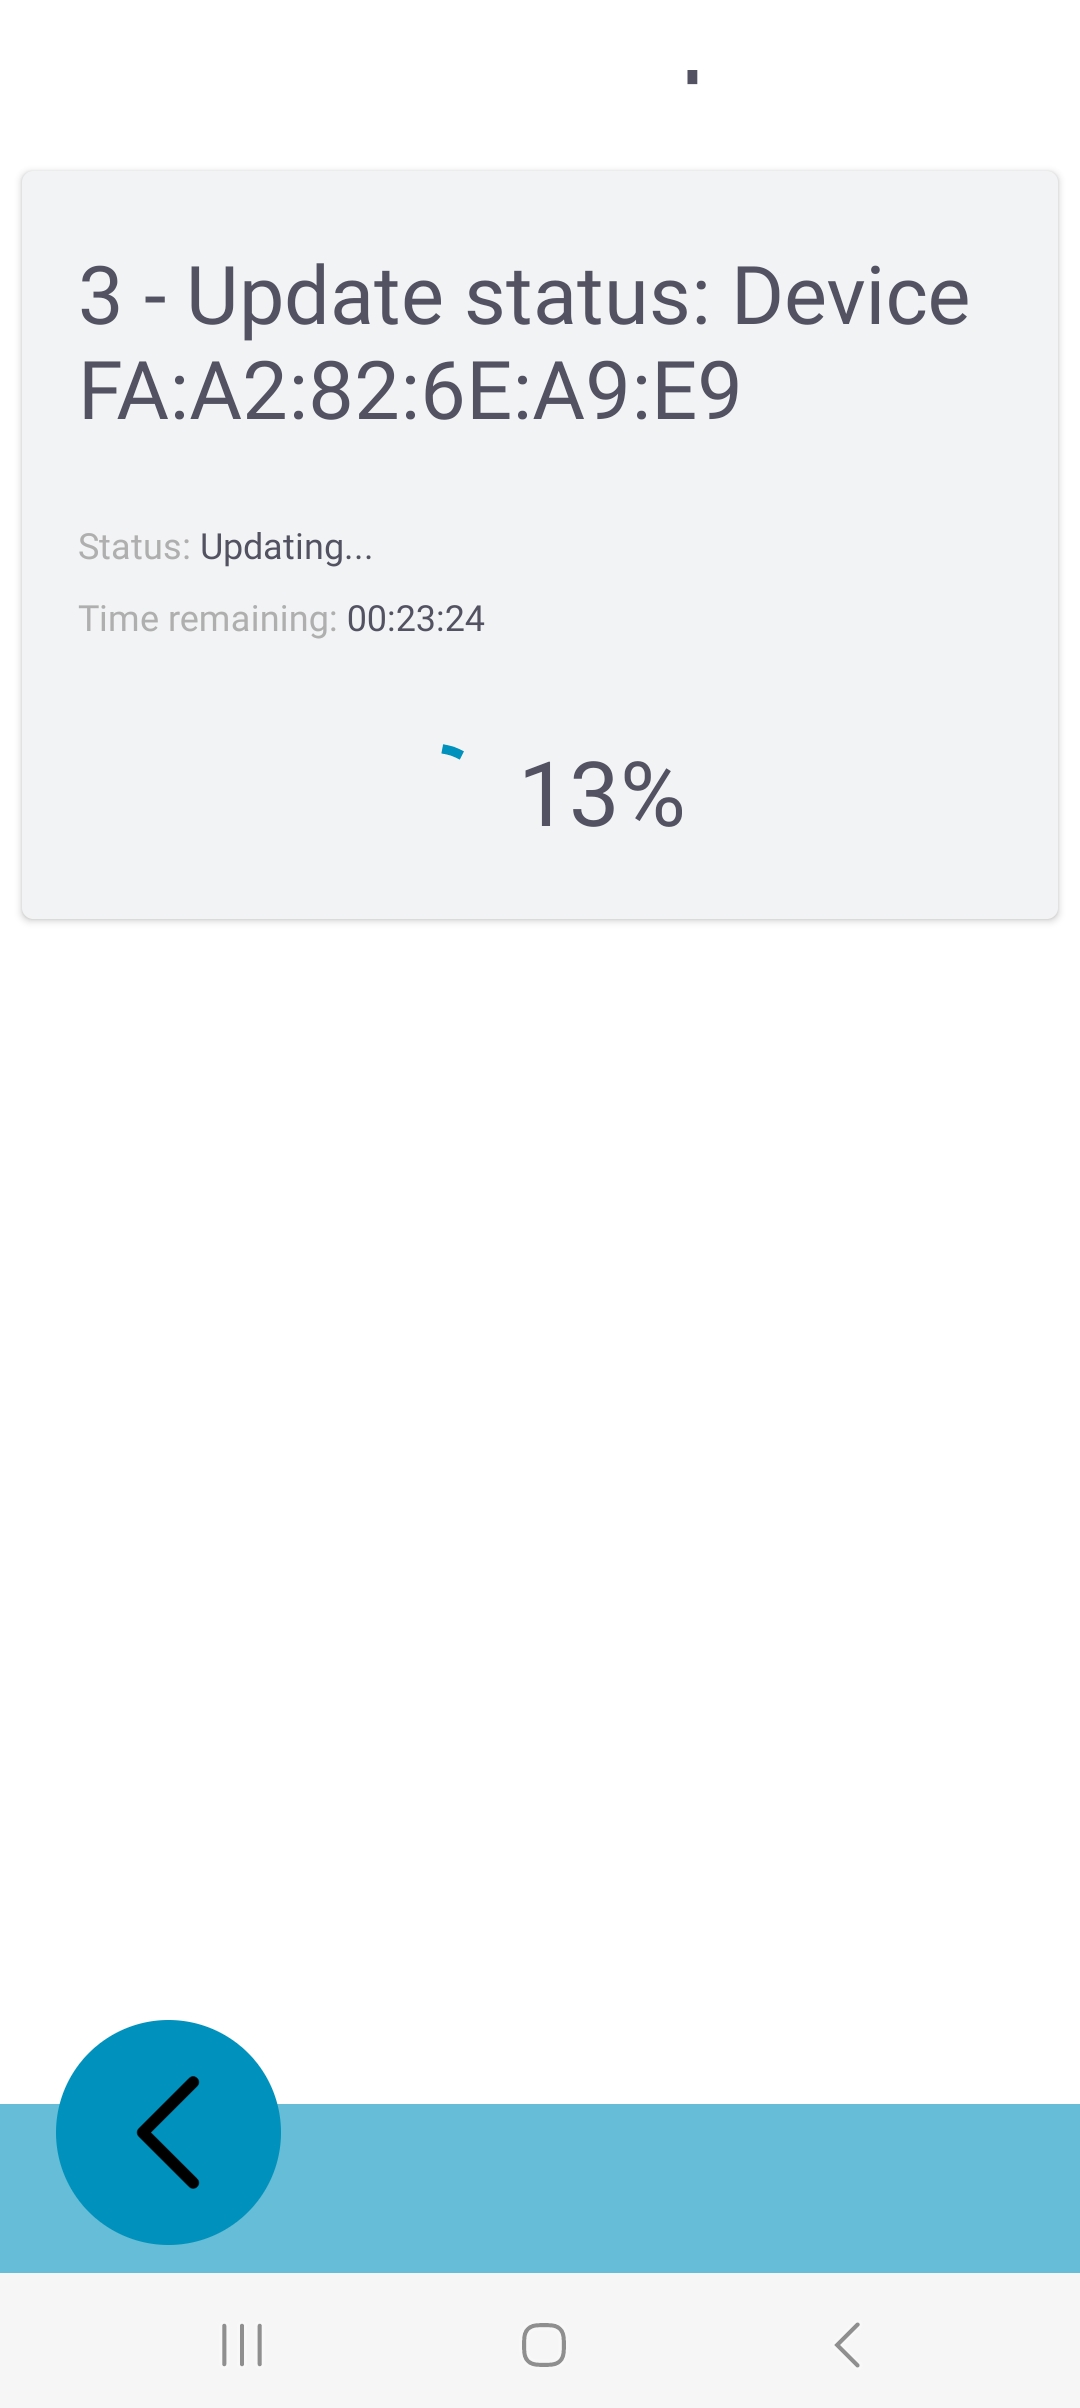
While the update is being transferred, the NIMMSTA App can be minimized and the NIMMSTA Smart Watch HS 50 can be used as usual. The app displays the remaining update time.
 |
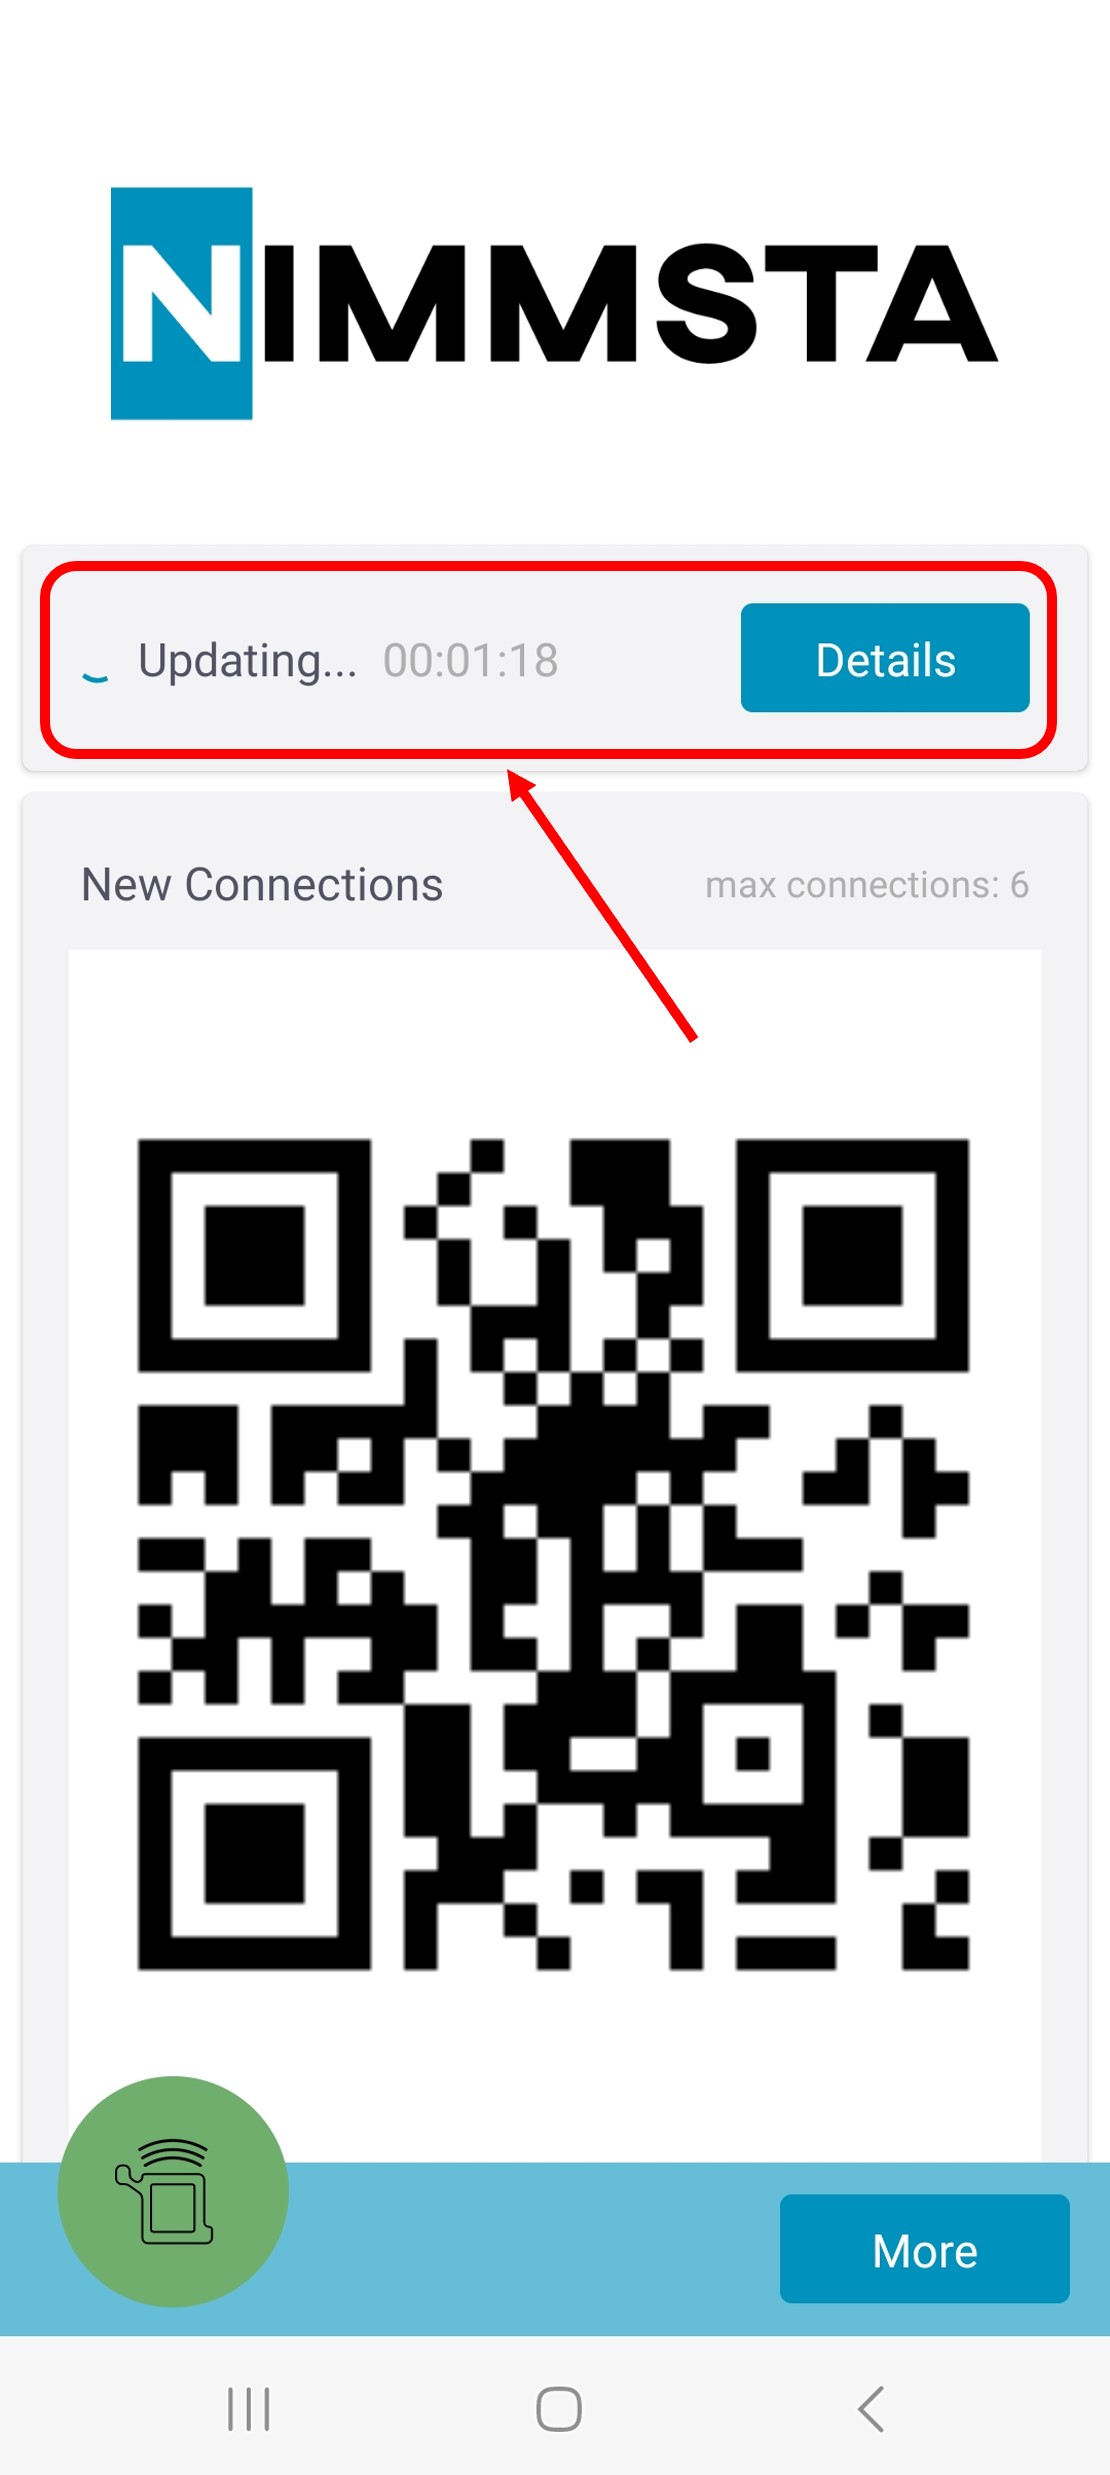 |
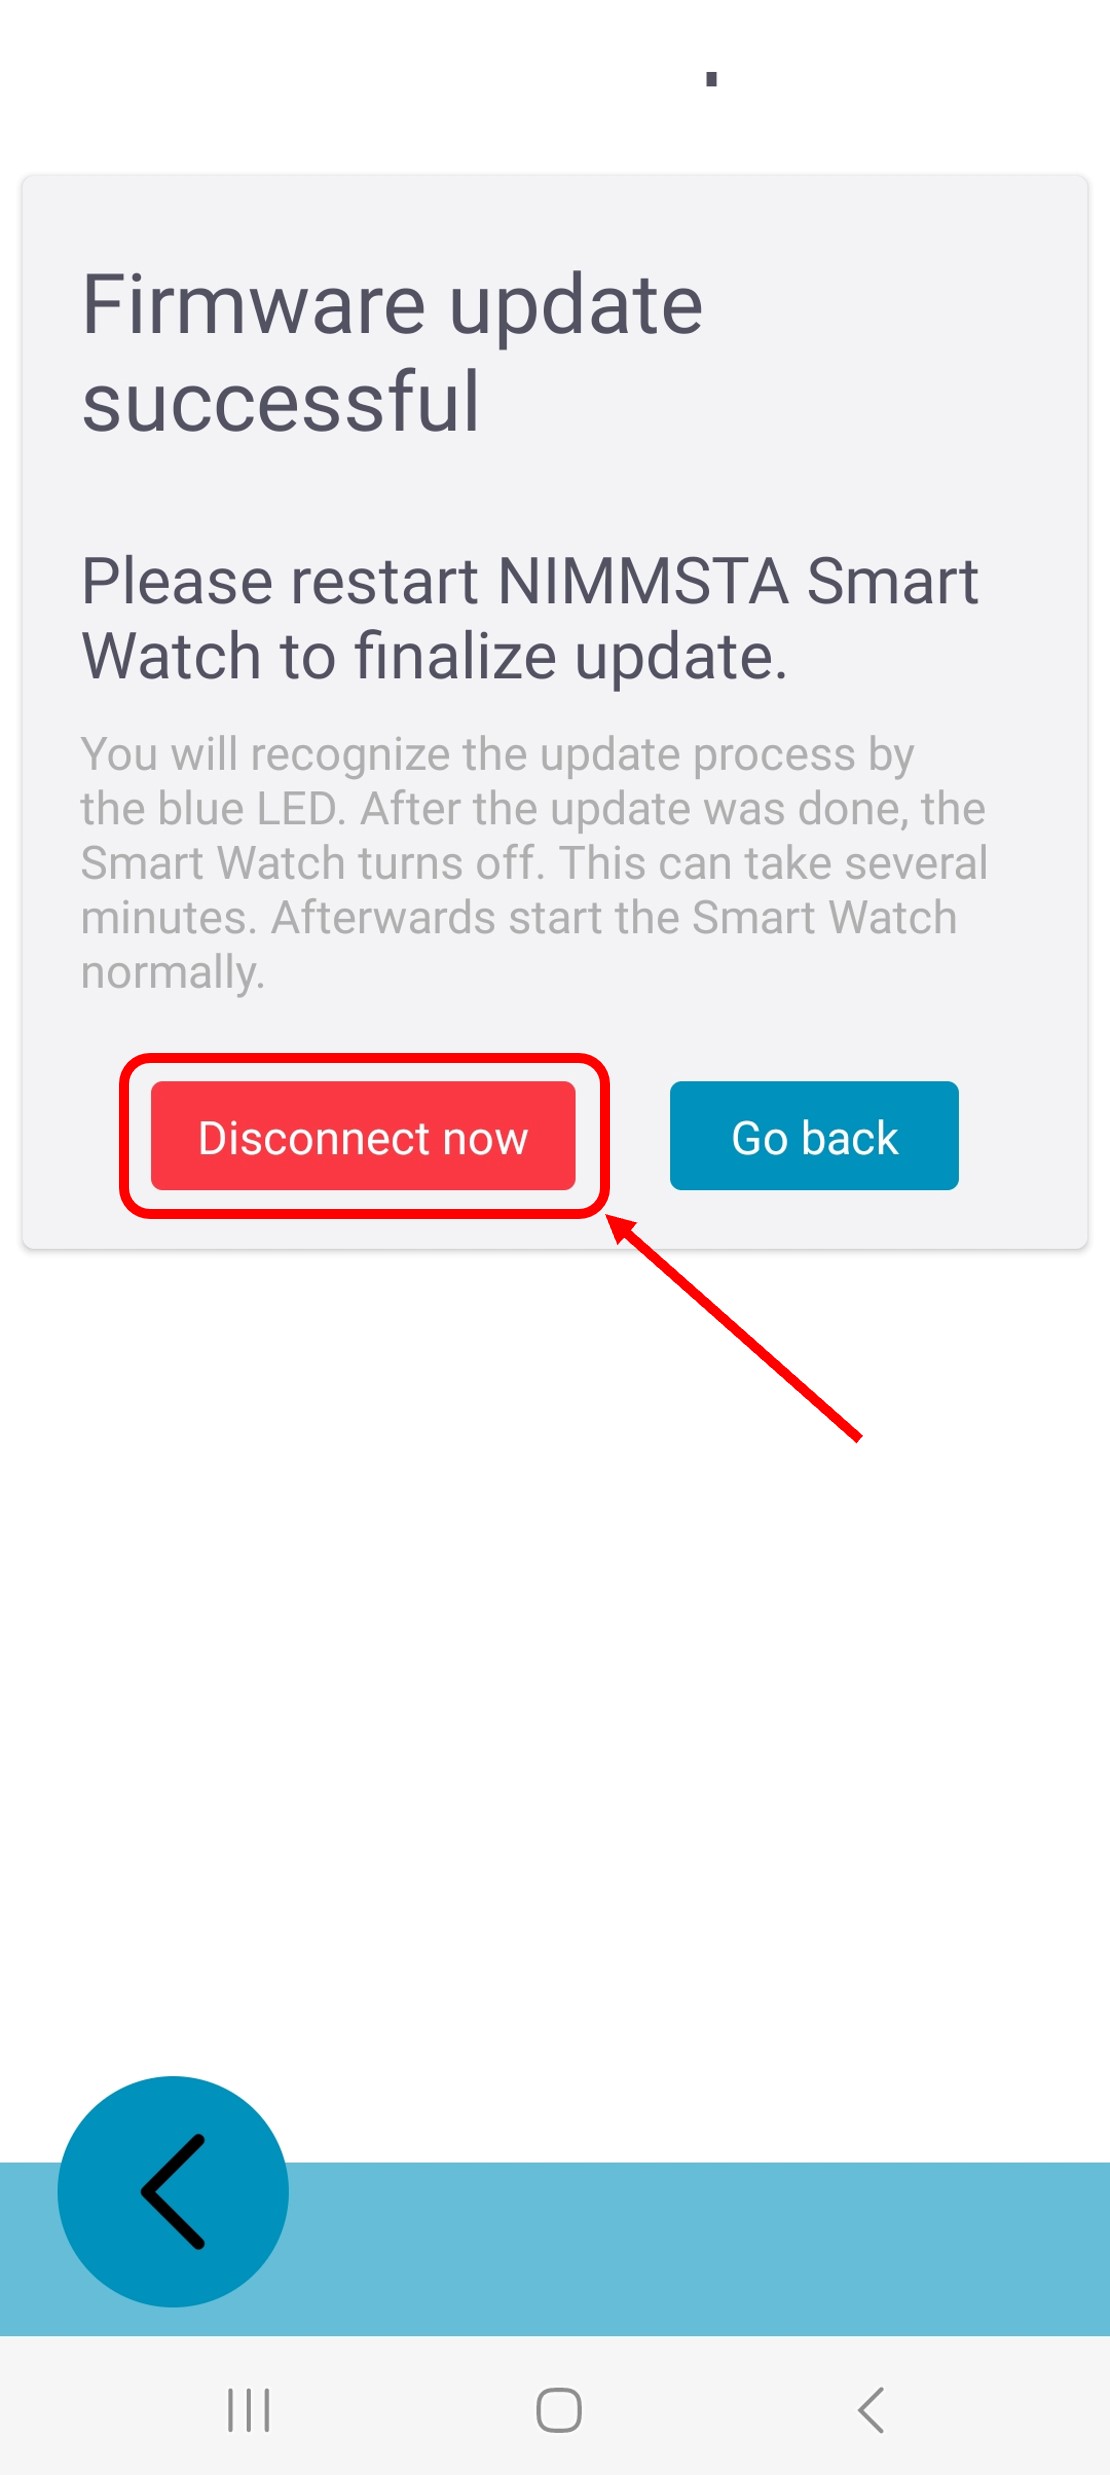
To complete the firmware update installation, disconnect the NIMMSTA Smart Watch HS 50 after the transfer is complete. If the screen has not been changed during the update, the app automatically displays a corresponding button when the update time has elapsed. Otherwise, disconnect using the corresponding menu item in the green NIMMSTA Smart Watch HS 50 icon area on the left.
Using Multi Device Connection
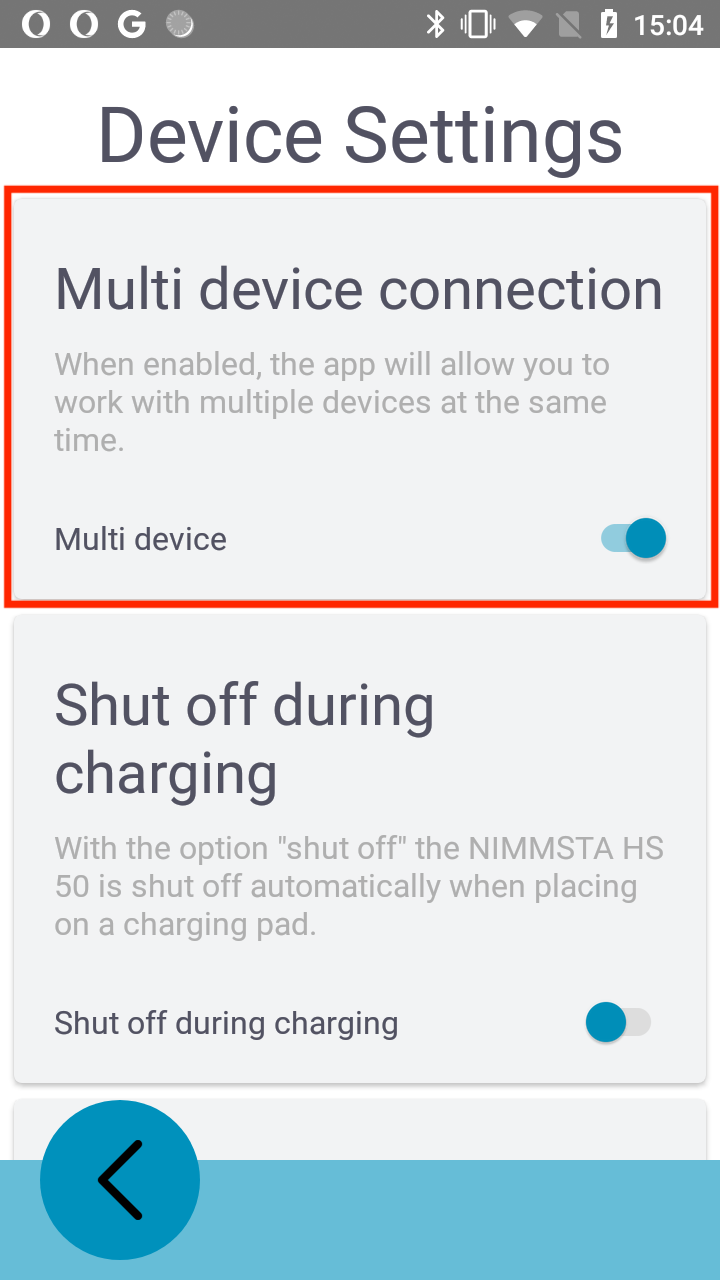
From NIMMSTA App version V6 (Android & Windows), up to six NIMMSTA Smart Watches HS 50 can be connected to one device simultaneously. This is called Multi Device Connection.
Enable/disable Multi Device Connection
Select More -> Device Settings -> Multi Device Connection to turn the option on or off
Reserved Devices
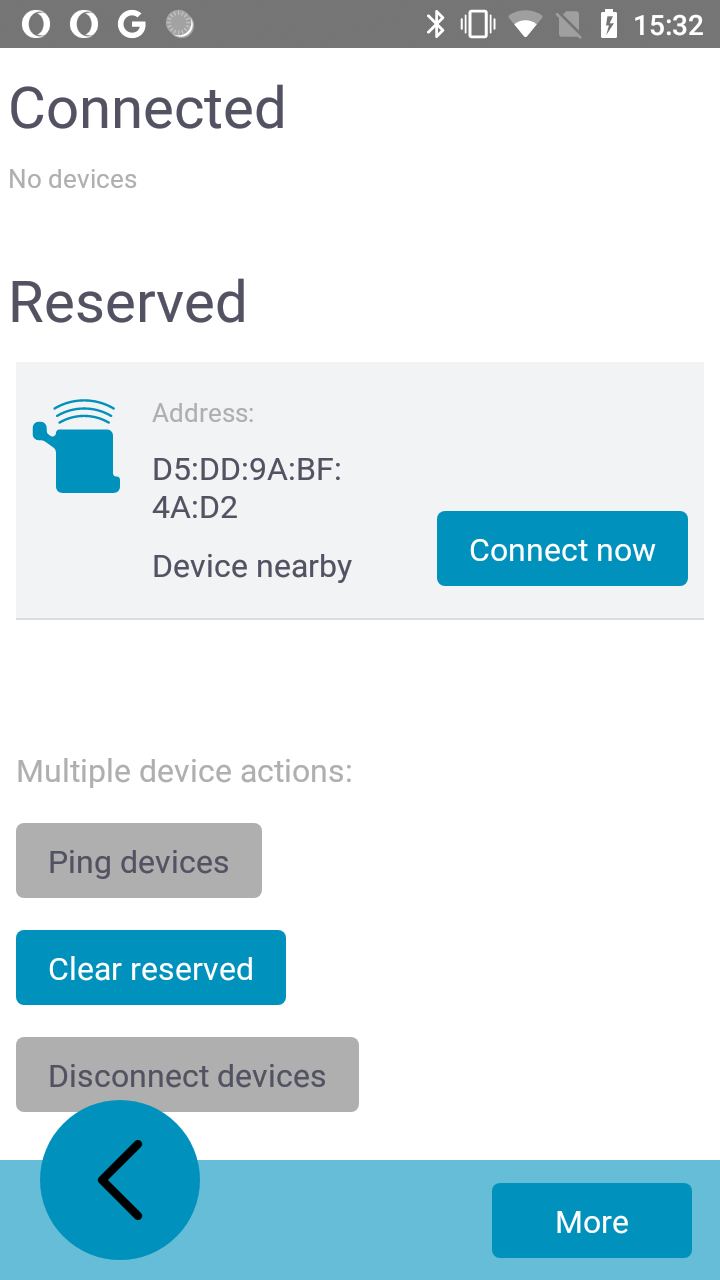
If a NIMMSTA HS50 is connected with Multi Device Connection enabled, a connection slot is reserved for that device. This restores the connection if it is lost. To clear the list of reserved devices, select Devices -> View All -> Clear Reserved
Ping devices
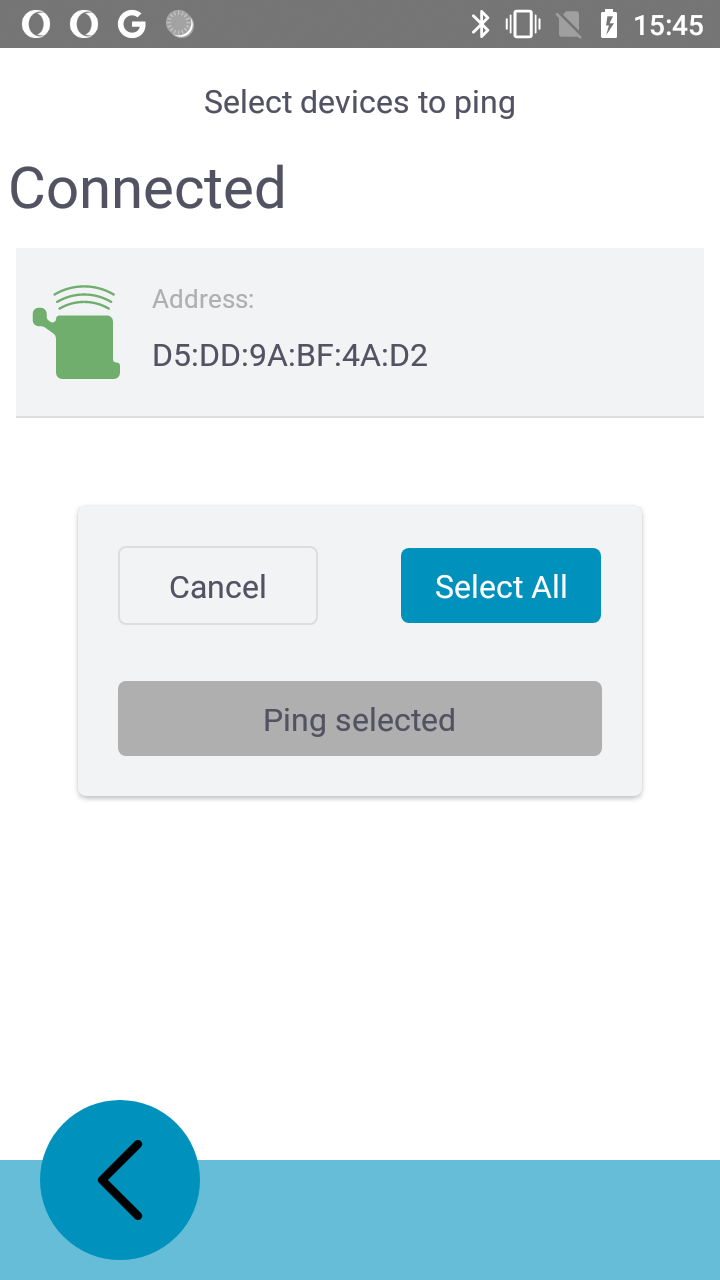
To identify a device, you can ping it. Select the NIMMSTA HS50 to be pinged from the device list under Devices -> View All -> Ping devices.
Log file creation and upload
You can create log files and send them directly to NIMMSTA Support.
Upload log file
To send log files directly from the app to NIMMSTA Support:
- Open the NIMMSTA App
- Navigate to More -> Logs
- Press the "Upload" button
- The file is automatically transferred to NIMMSTA via
https://backend.cloud.nimmsta.com/
|
|
Log files are stored only as long as they are needed for troubleshooting (GDPR-compliant). |
Create log file
NIMMSTA App for Android
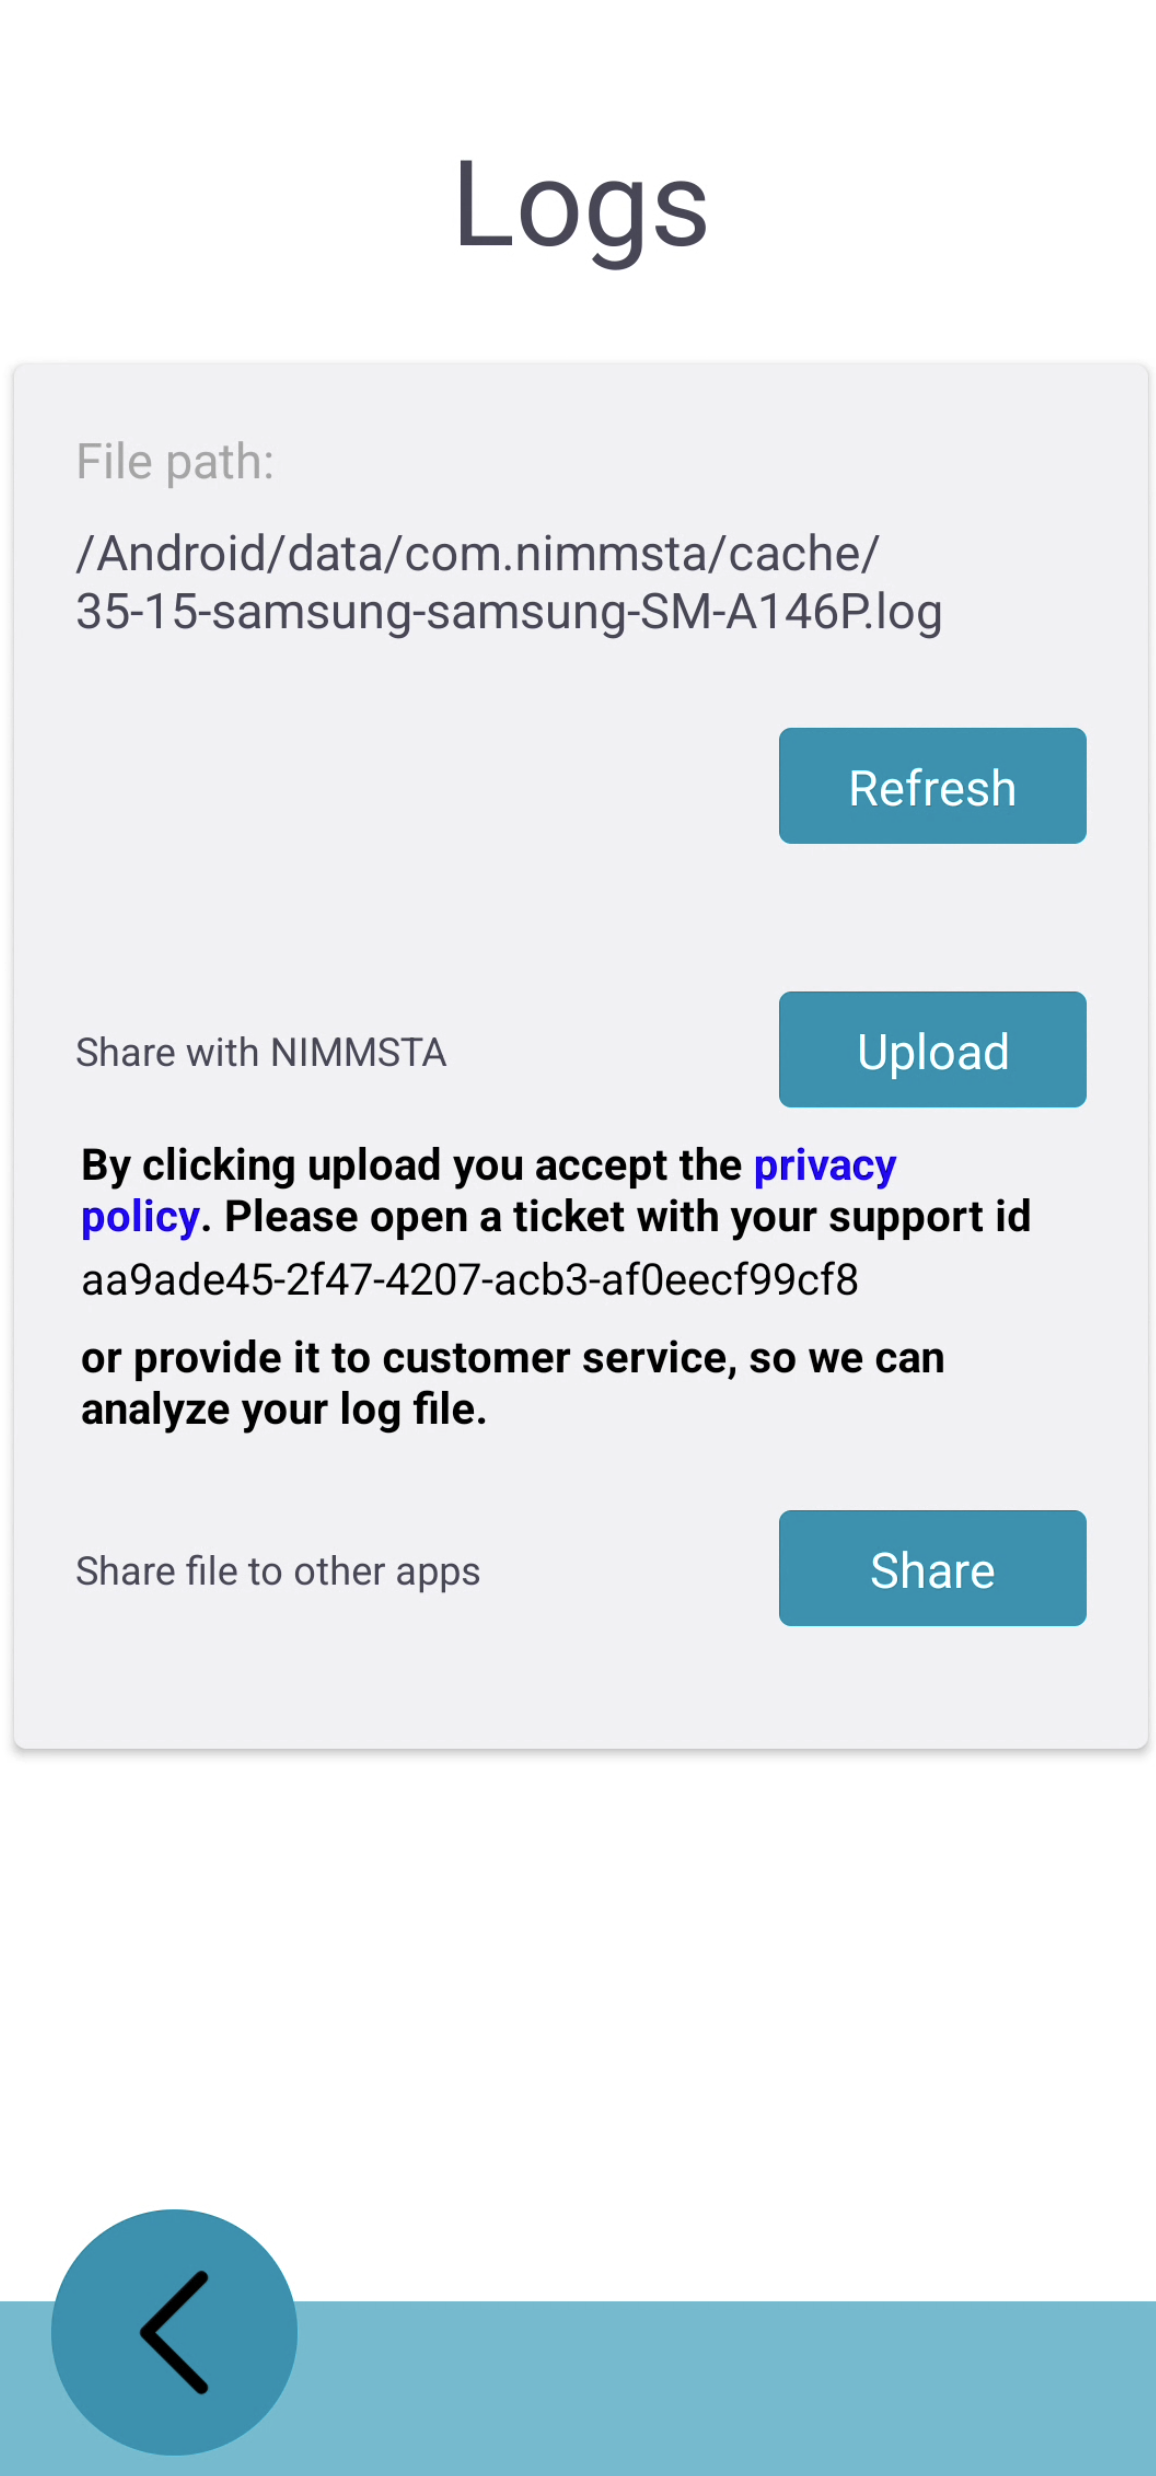
To create a log file, select More -> File Logs. The log file is then generated. You can copy the generated file to the Download directory (Download button), share the file (Share button), or copy the path to the generated file (Copy path button).
NIMMSTA App for Windows
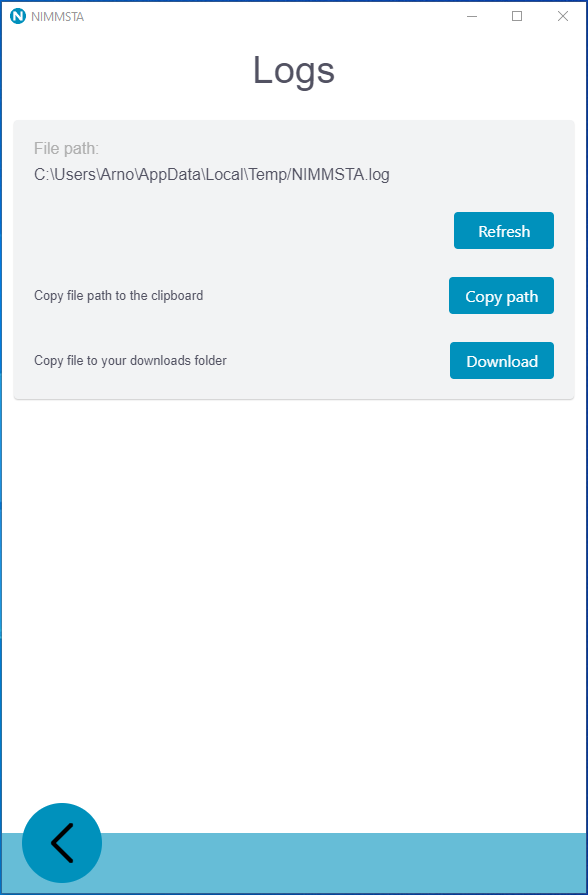
To create a log file, select More -> File Logs. You can copy the log file to the Download directory (Download button) or copy the path to the generated file (Copy path button).
Log file storage locations
If you do not want to upload the log file directly from the app, you can also create it manually and send it to NIMMSTA Support.
Android
- Default storage location:
/Android/data/com.nimmsta/files/logs/ - Download folder:
/Download/(after export)
Windows
- Default storage location:
%TEMP%\nimmsta-jvm\ - Download folder:
%USERPROFILE%\Downloads\(after export)
Windows Service (additional information)
For Windows Services, the %TEMP% path varies depending on the user context:
| Service context | %TEMP% path |
|---|---|
| Standard user | C:\Users\<USERNAME>\AppData\Local\Temp |
| LocalSystem | C:\Windows\Temp |
| NetworkService | C:\Windows\ServiceProfiles\NetworkService\AppData\Local\Temp |
| LocalService | C:\Windows\ServiceProfiles\LocalService\AppData\Local\Temp |
| Custom user | Follows the user profile |
Check the current TEMP path:
- Command prompt: echo %TEMP%
- PowerShell: [System.IO.Path]::GetTempPath()