NIMMSTA Productivity Cloud
The NIMMSTA Productivity Cloud is a software solution that was developed in combination with the NIMMSTA Smart Watch to make intralogistics processes such as picking, inventory and shipping more efficient. By integrating workflows on the touch display of the Smart Watch, employees can be guided interactively through their tasks, which increases productivity and reduces errors.
Registration with the NIMMSTA Productivity Cloud
The NIMMSTA Productivity Cloud uses the authentication protocol OpenID Connect (OIDC) to ensure a secure and standardized login.
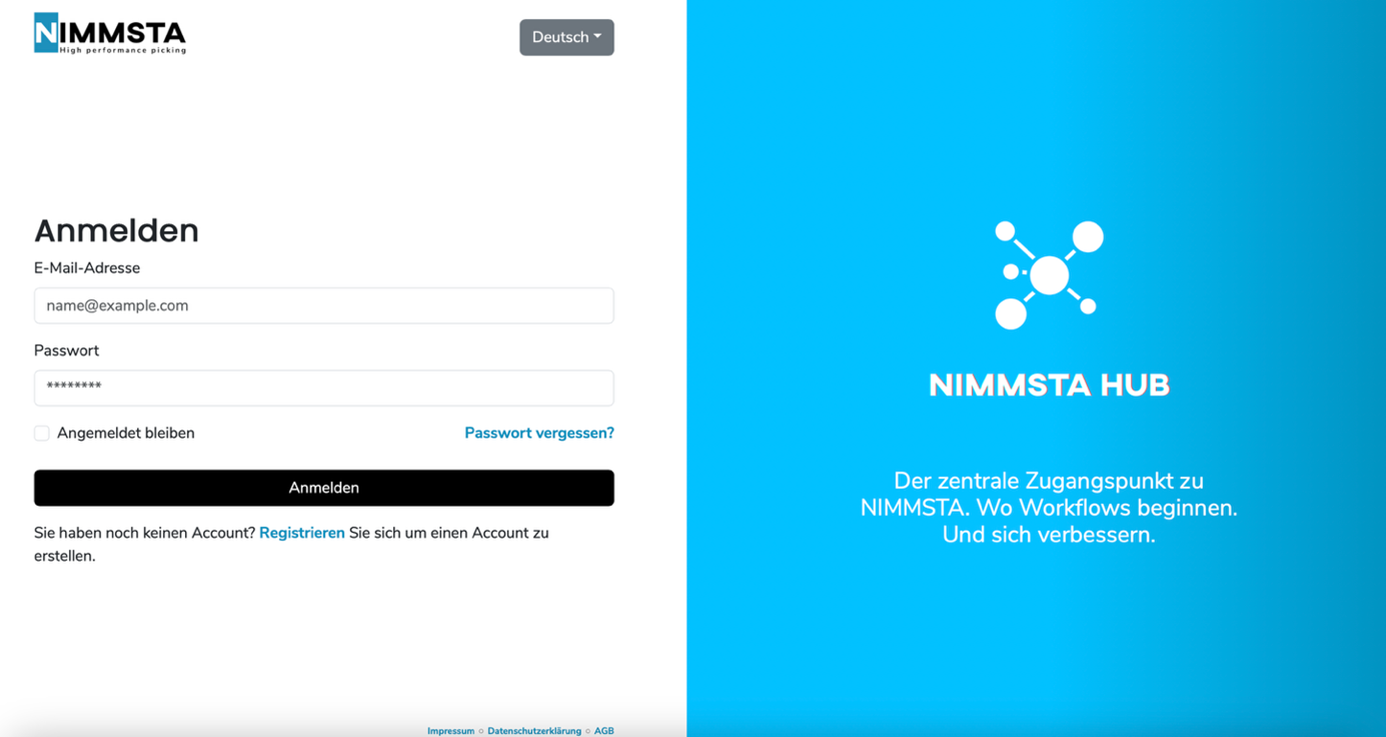
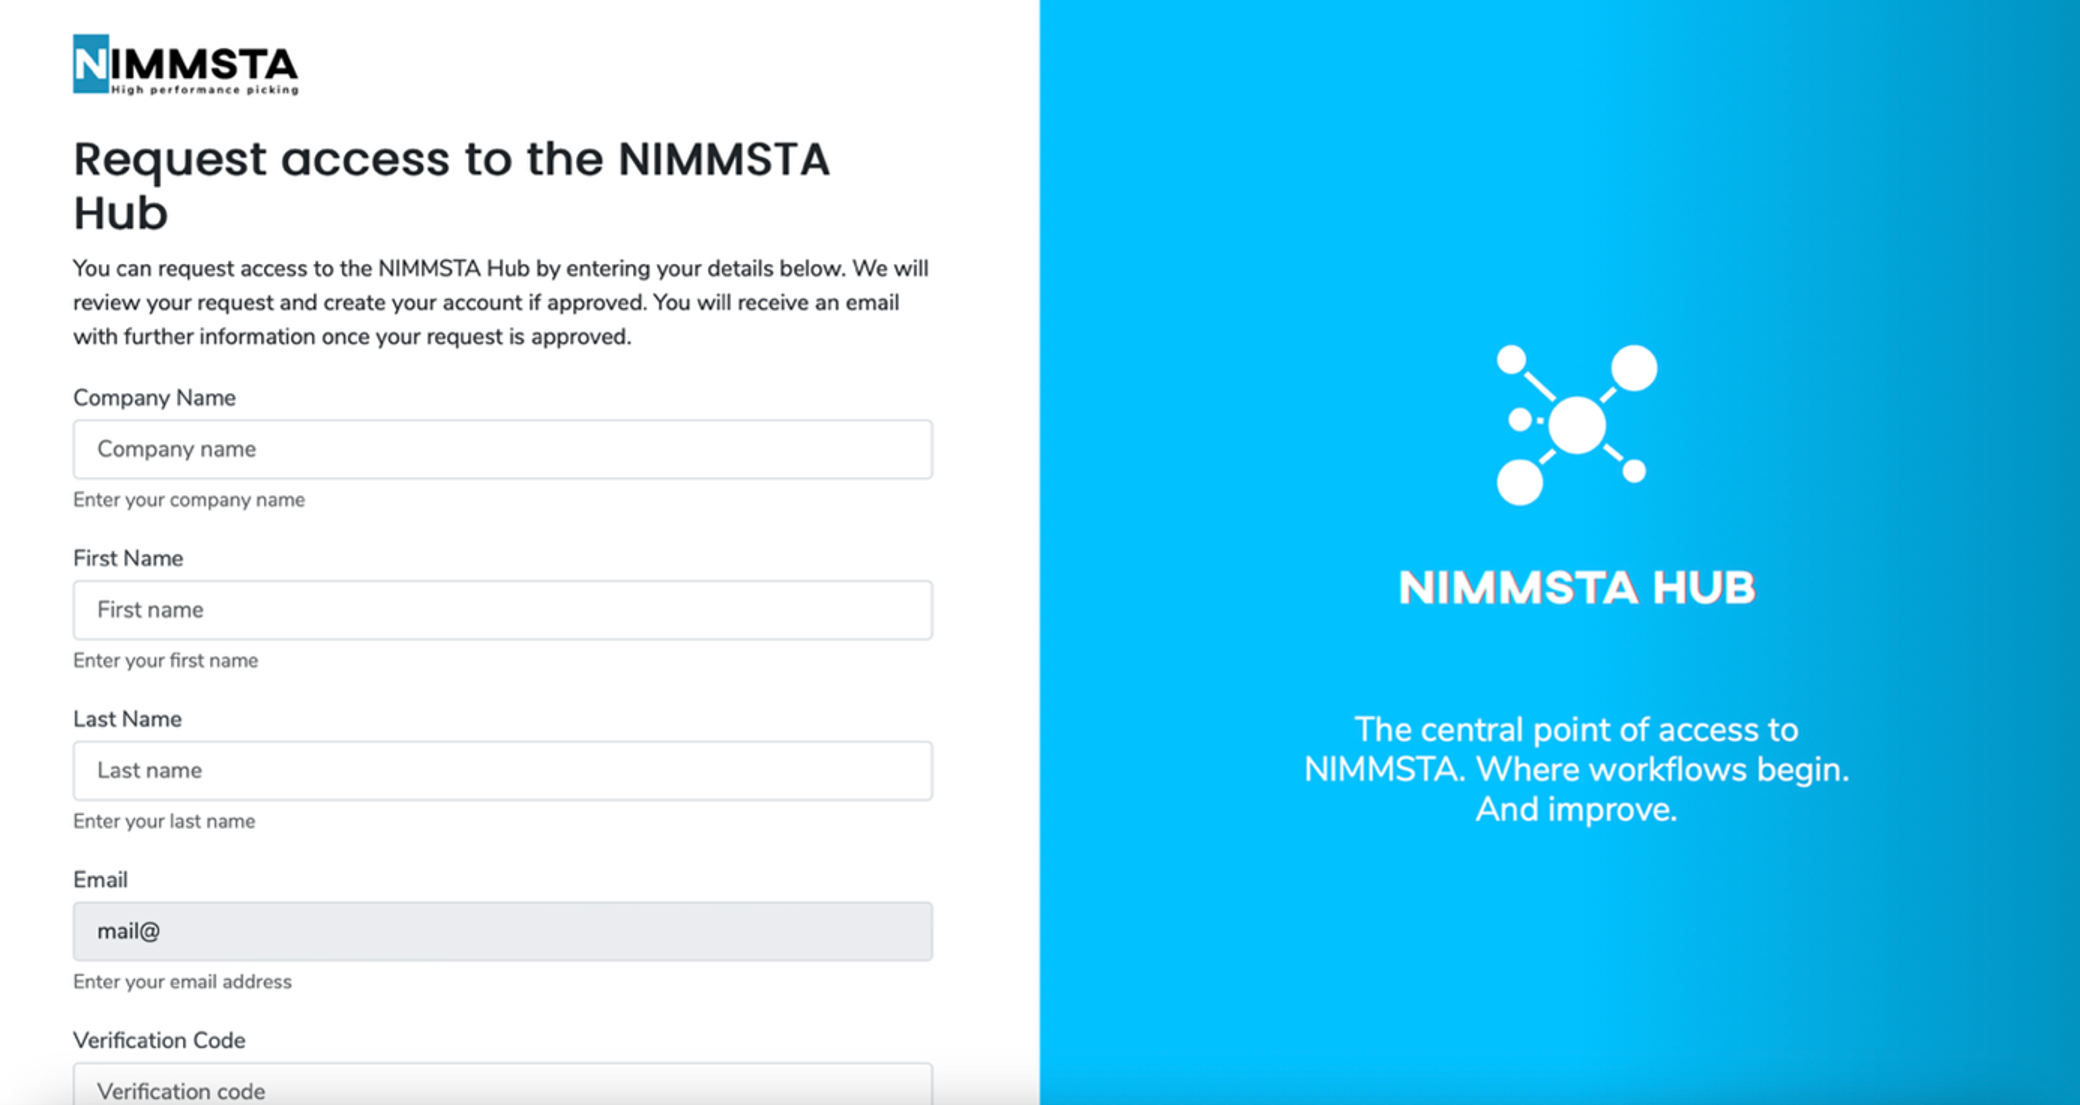
Open the NIMMSTA HUB Login Page
- Visit the login page of the NIMMSTA HUB.
- You will see a login form asking for your E-Mail address and password.
- If you do not yet have an account, click on “Register” to create one.
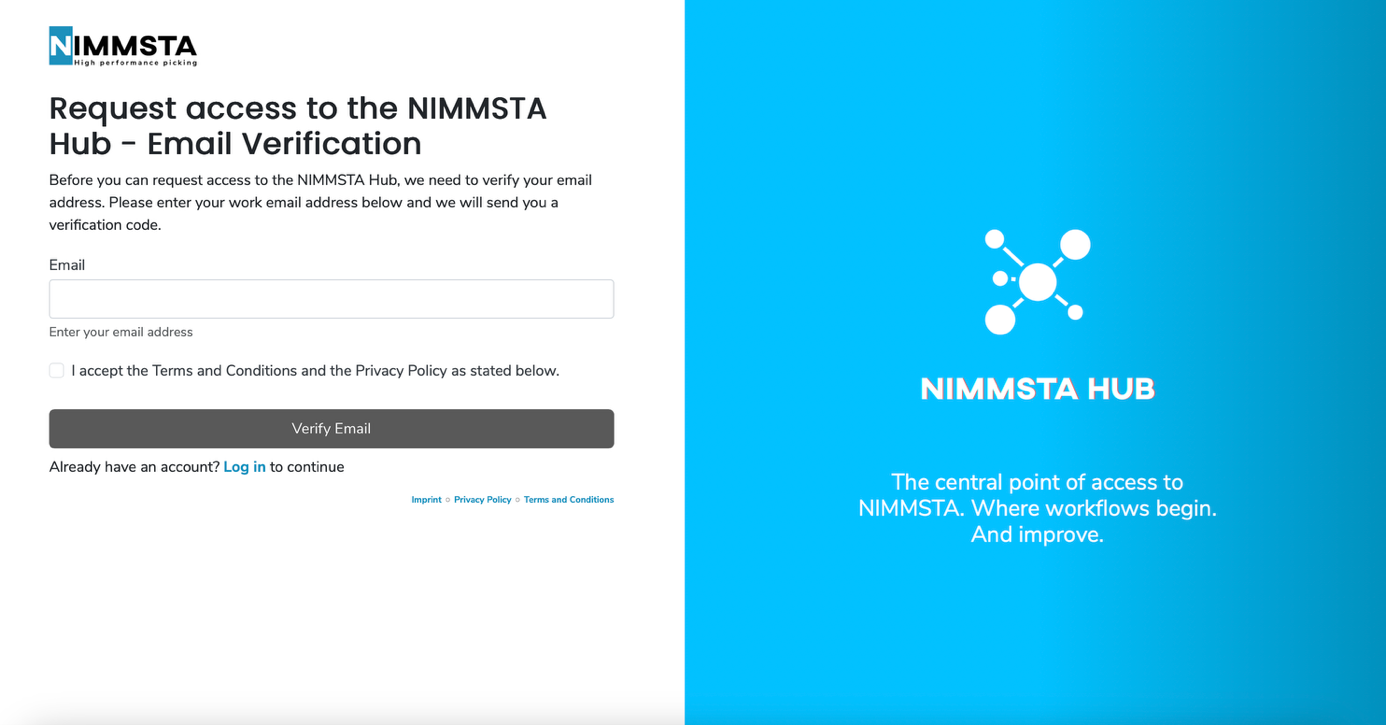
Start E-Mail Verification
- Enter your work E-Mail address in the field provided.
- Check the box to accept the Terms and Conditions and Privacy Policy.
- Click on “Verify E-Mail”.
Check Your E-Mail for the verification code
- Open your E-Mail inbox (and also check the spam / junk folder).
- You will receive an E-Mail from NIMMSTA containing a verification code.
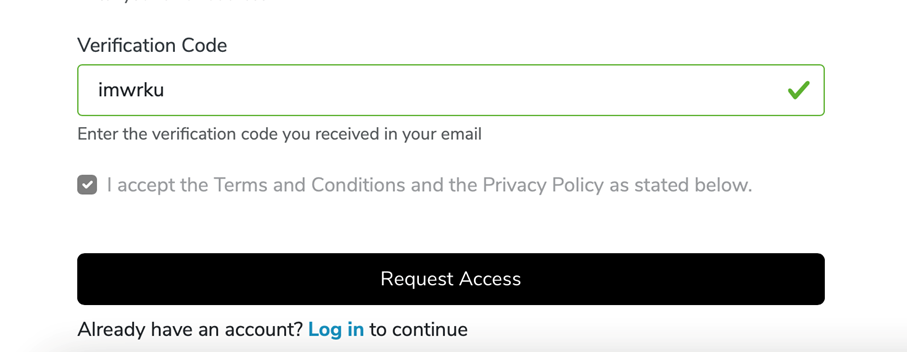
Enter the verification code
- Enter the verification code you received into the field labeled “Verification Code.”
- Confirm the Terms and Conditions again.
- Click on “Request Access”.
Provide Your Personal Details
- After verifying your email, you will be redirected to a form.
- Please fill in the following fields: Company name, first name, last name.
The email address and verification code are pre-filled. - Click on “Request Access” again.
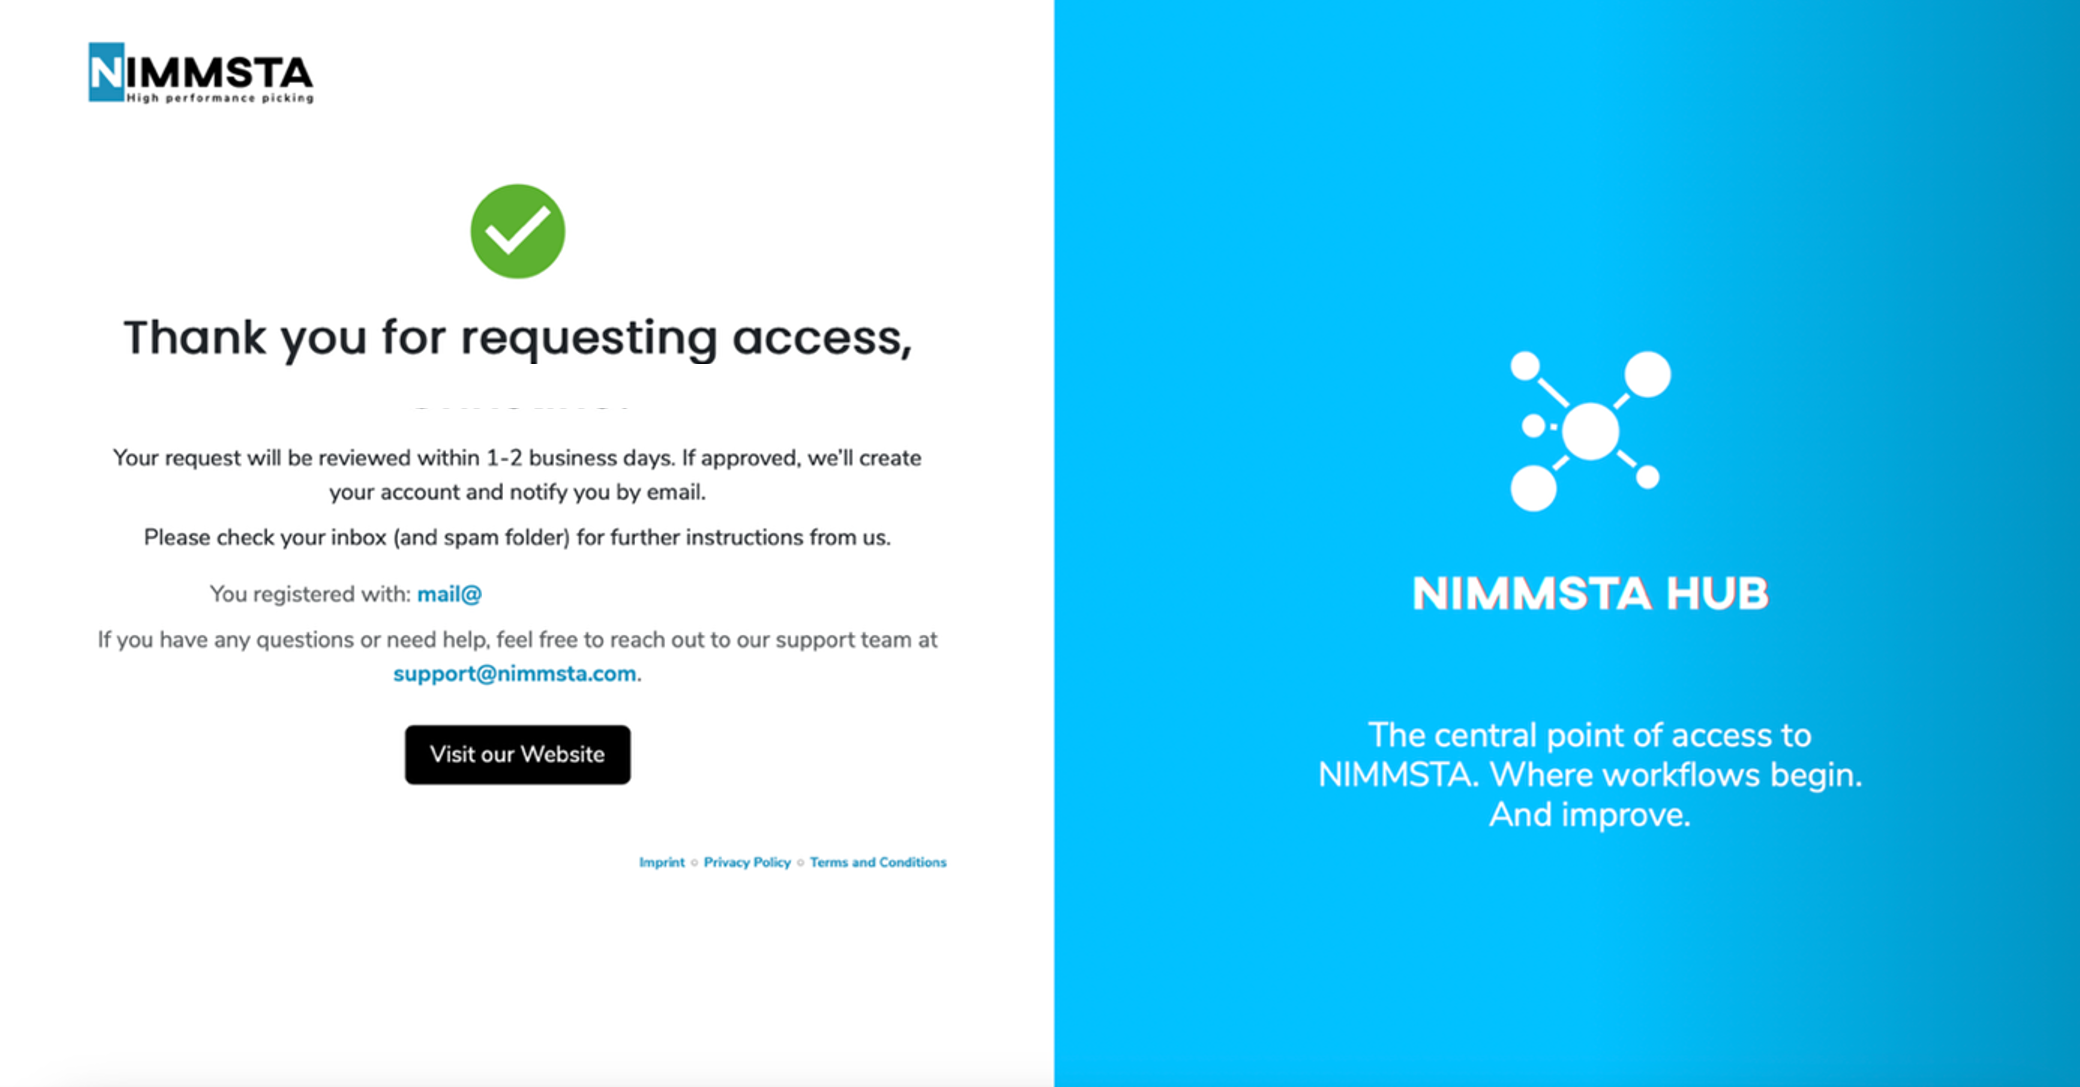
Confirmation Message
- A confirmation screen will appear:
“Thank you for requesting access, [First name]! Your request will be reviewed within 1–2 business days.” - Once approved, you will receive another email with further instructions.
Invitation & Password Setup
- If your request is approved, you will receive an invitation email stating:
“NIMMSTA GmbH has invited you to collaborate on the NIMMSTA HUB…” - Click the “Set your password” button in the email to activate your account.

Log In to the NIMMSTA HUB
- Return to the login page:
https://hub.nimmsta.com - Enter your email address and newly set password.
- Optionally, select “Stay signed in”.
- Click on “Log in”.
You’re All Set!
You now have access to the NIMMSTA HUB – your central platform to start and improve workflows.
Integration into your systems
The Productivity Cloud can be seamlessly integrated into existing warehouse or ERP systems. For individual advice and technical support, please contact the NIMMSTA support team or a certified partner directly.
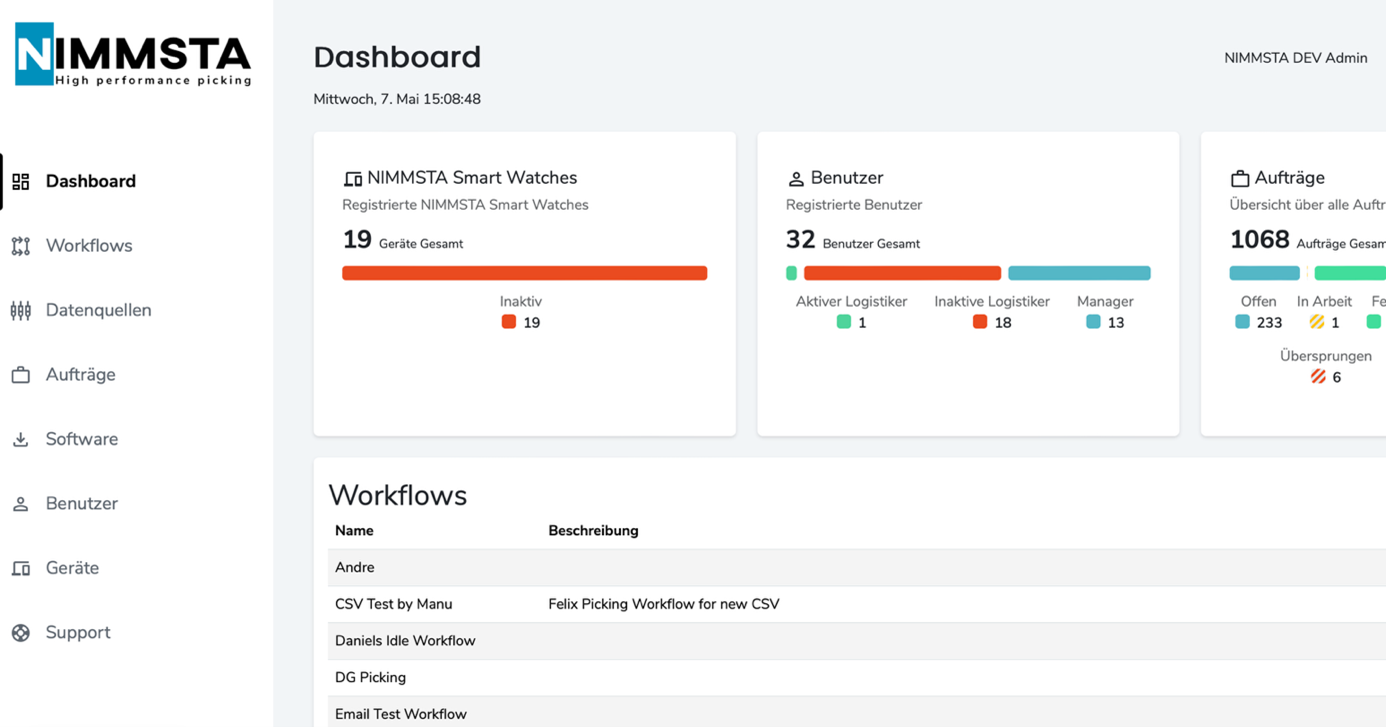
Dashboard
The dashboard provides you with a central overview of your organizations, workflows and devices.
- Organizations: Manage your company structure and user rights.
- Workflows: Create and edit individual workflows for various processes such as picking, inventory or shipping.
- Device management: Monitor and configure your NIMMSTA Smart Watches and other connected devices.
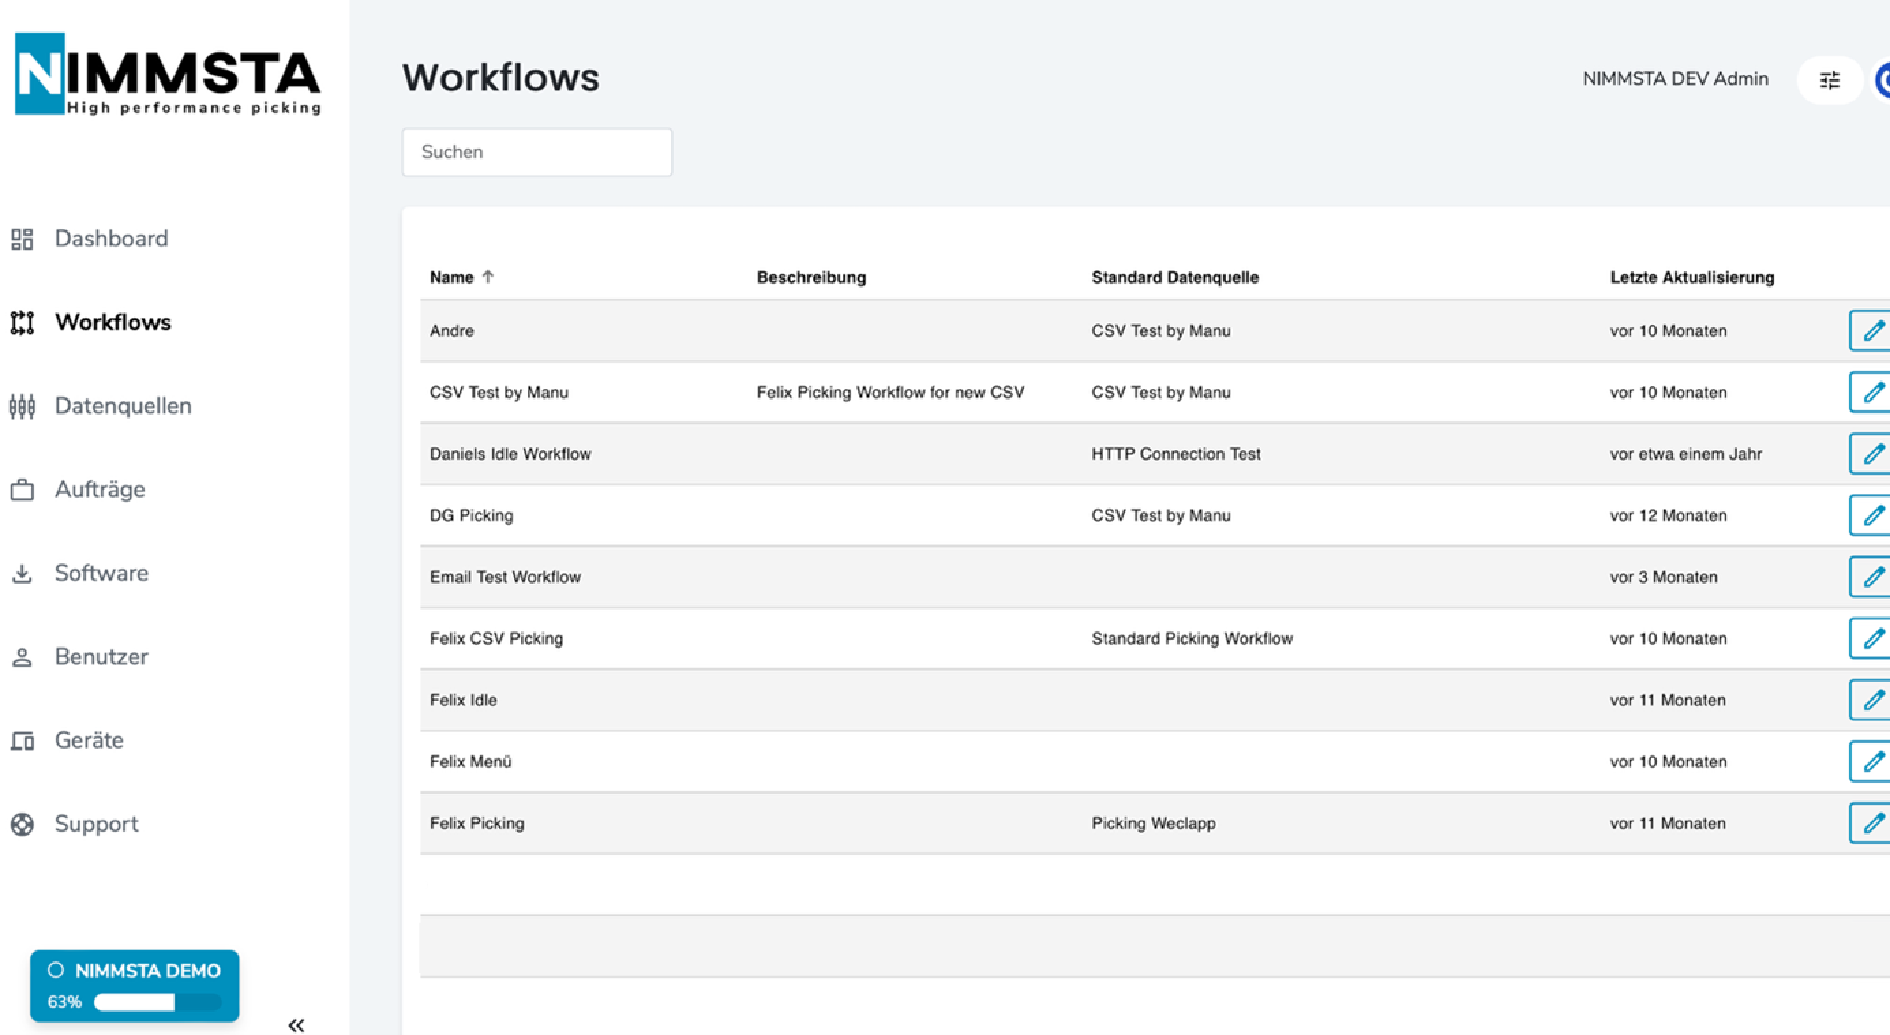
Workflow
Access to the workflow area
- Login: Navigate to https://staging.cloud.nimmsta-test.de/workflows and log in with your access data.
- Overview: After successfully logging in, you will see a list of your existing workflows, sorted by name.
Instructions: Create workflow with or without template
Step 1: Open dialog window
- As soon as you open the “Create workflow” function, a dialog box with the title “Create workflow” appears.
Step 2: Select template (optional)
- You will see a drop-down menu in the “Template” area.
- Click on the drop-down menu to see a list of predefined templates.
Step 3: Selection options
You now have the following options:
- „Create your own workflow.“
Select this option if you want to define the workflow completely manually. - Predefined templates:
- Picking Workflow with Light Tag (CSV-Connection)
- Sorting Workflow with Light Tag (CSV-Connection)
- Standard Picking Workflow
These options allow you to get started quickly with a predefined structure.
Step 4: Click next
- Once you have selected a template (or deliberately not selected one), click on the blue “Next” button to start the next step of the workflow.
Step 5: Optionally Save or Cancel
At the bottom, you will find the buttons:
- Cancel: Cancels the process.
- Save: Only becomes active when a valid workflow is defined.
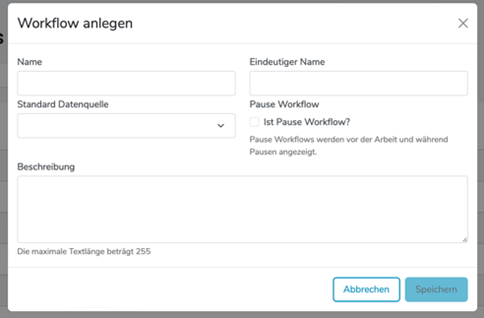
Step 6: Enter General Workflow Data
- Name
- Enter a freely chosen name for your workflow.
- Unique Name
- This is a technical, system-wide unique identifier.
- Do not use spaces or special characters.
- Default Data Source
- Select the primary data source for this workflow from the dropdown menu.
Step 7: Additional Settings
Pause Workflow
- Check the box “Is Pause Workflow?” if this workflow is intended specifically for break times.
- Note: These workflows are displayed separately before starting work or during official breaks.
Step 8: Add a Description
- Add a short description to document the purpose or process of this workflow.
- Maximum 255 characters allowed.
Step 9: Save or Cancel
- Click Save to create the workflow.
- Click Cancel to discard the process without changes.
Step 10: Workflow Successfully Saved
After clicking Save, the new workflow will appear in the workflow list. From here you can:
- Activate the workflow
- Add further steps, actions, or conditions
- Test the workflow or assign it to a user
Data Sources
Navigation
- In the left sidebar, click the menu item “Data Sources”.
- This will display all currently configured data sources.
Data Source Overview
The table provides an overview of all existing data sources:
| Column | Description |
|---|---|
| Name | Name of the data source |
| Description | A short internal description |
| Type | CSV or HTTP – depending on the source |
| Last Update | When the data source was last updated |
| Actions | “Upload CSV” button for manual file updates |
Add a New Data Source
At the top right, you will find three buttons:
- New: Manually create a new data source
- Create from Template: Use predefined templates
- Import: Import a data source by uploading a file
Upload CSV
For CSV data sources, you can upload a new file using the “Upload CSV” button:
- Click the respective button to the right of the data source
- Select the CSV file from your system
- Upload the file – the data source will be updated automatically
More Options
- To the right of each row, you’ll find a three-dot menu (⋮).
- Use it to perform actions like Edit, Delete, or Export
Create New Data Source
- Click New
- You’ll find the New button at the top right of the “Data Sources” view
- A new dialog window titled “Data Source” opens
- Select Type
- Open the dropdown menu under “Type”
- Choose one of the following:
- CSV Data Source – For uploading CSV files
- HTTP Data Source – For accessing data via an HTTP interface
- Additional Fields
- Additional input fields will appear based on the selected type
- Fill Out the Form
- Provide the required data depending on the type
- Make sure all required fields are filled out correctly
- Save
- The Save button becomes active once all required fields are filled
- Click it to create the data source
- Cancel
- You can cancel the process at any time via the Close button

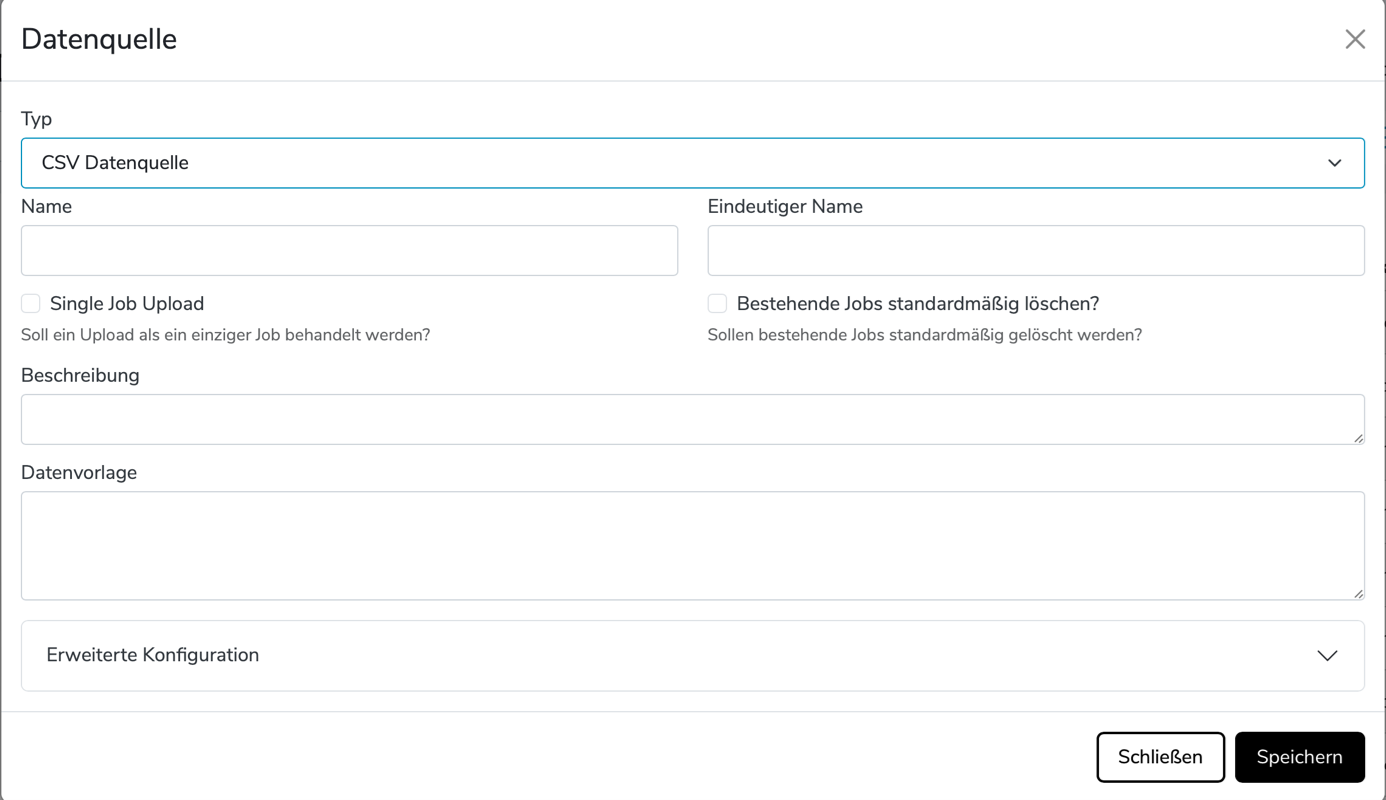
CSV Data Source
After selecting a CSV data source, the following options appear:
| Field / Option | Description |
|---|---|
| Name | Name of the data source |
| Single Job Upload | A full CSV upload is treated as a single job |
| Delete Existing Jobs by Default | Old jobs are automatically removed on new upload |
| Data Template | Template defining the CSV schema |
| Advanced Configuration | Use this field for advanced settings (see platform documentation) |
Click Save after filling in all fields.
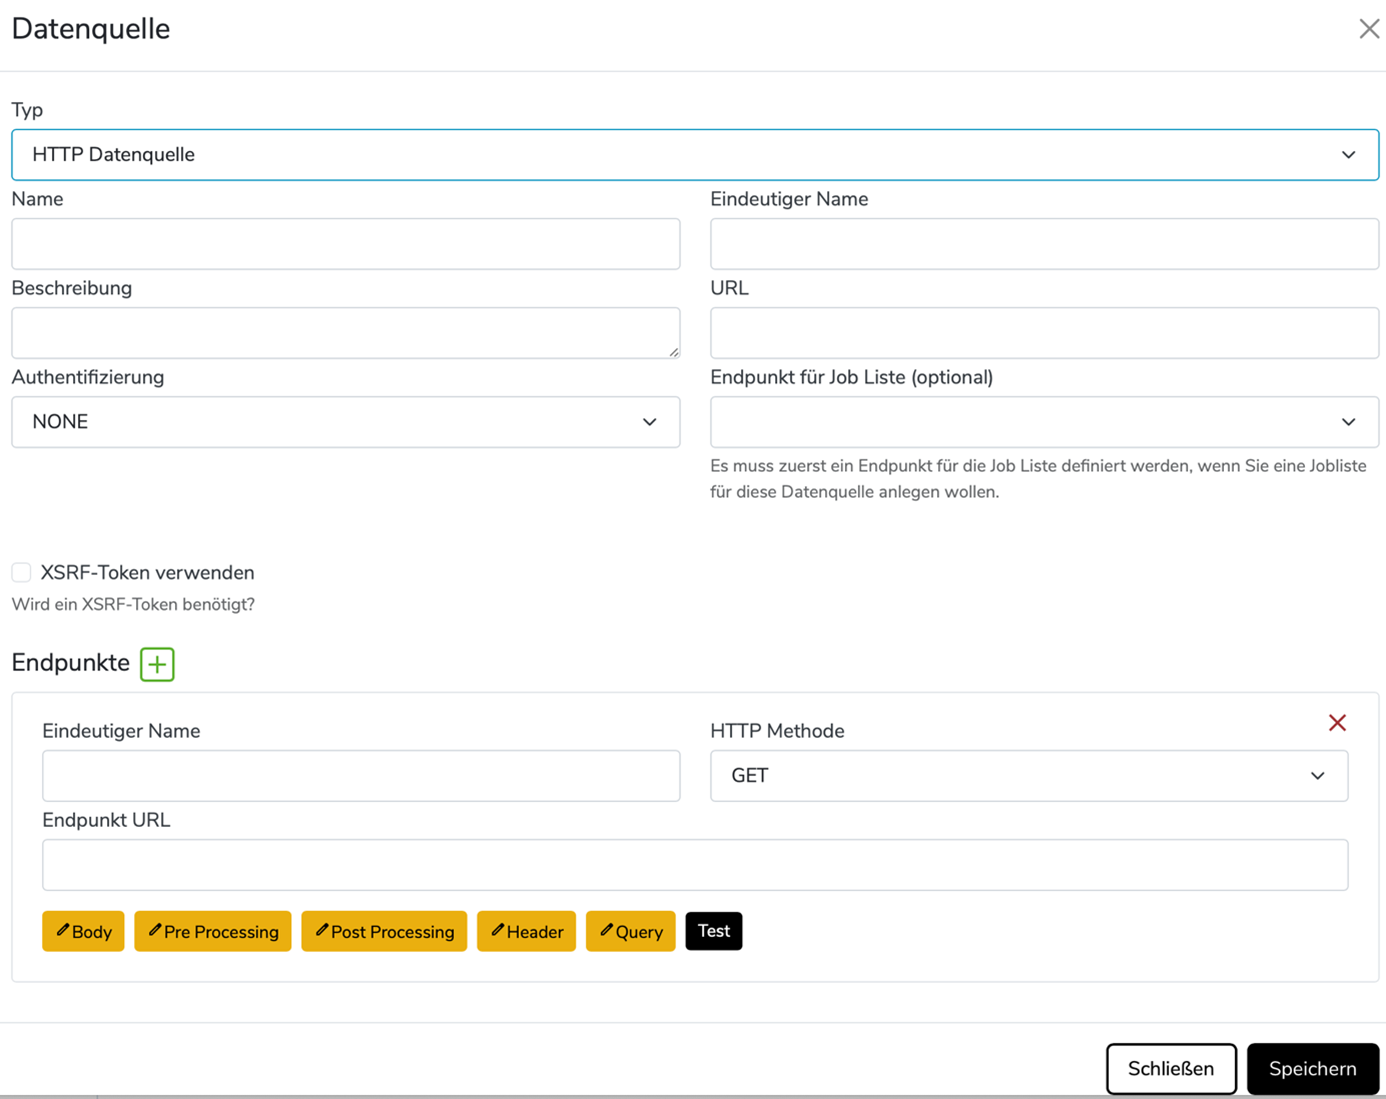
HTTP Data Source
When selecting HTTP as data source type, the following fields appear:
| Field / Section | Function |
|---|---|
| URL | Target address for data retrieval |
| Authentication | Options: e.g., NONE, BASIC, BEARER |
| Endpoint for Job List | Optional |
| Use XSRF Token | Enable |
Configure Endpoints
Additional configuration options for each endpoint:
- Body
- Header
- Query
- Pre/Post Processing
- Test
Click Save after configuration.
Managing Jobs in the NIMMSTA System
Overview
The “Jobs” page displays all currently registered work orders in the system. It is divided into several status tabs.
Tabs (top of the main area)
- Open: Shows all jobs that have not yet been processed
- In Progress: Jobs currently being worked on
- Done: Already completed jobs
- Cancelled: Jobs that were cancelled
- Deleted: Jobs that were deleted
- All: Complete overview of all jobs
Select Data Source
A dropdown menu labeled “Data Source”
Example: “CSV Test by Manu” – here you choose the source from which the jobs are loaded
Add Jobs
The “Add Jobs” button allows you to manually upload or create new jobs.
Job List
The table shows the most important info for each job:
| Column | Meaning |
|---|---|
| Name | Name/label of the job |
| Status | Displayed with a dot + text (e.g., “Open”) |
| Created On | Date and time the job was created |
| Priority | Indicated with arrows: |
| ↑: Medium priority | |
| ↑↑: High priority |
More Options (⋮)
At the far right of each entry, a three-dot menu (⋮) gives access to further actions (remove priority, cancel, delete).

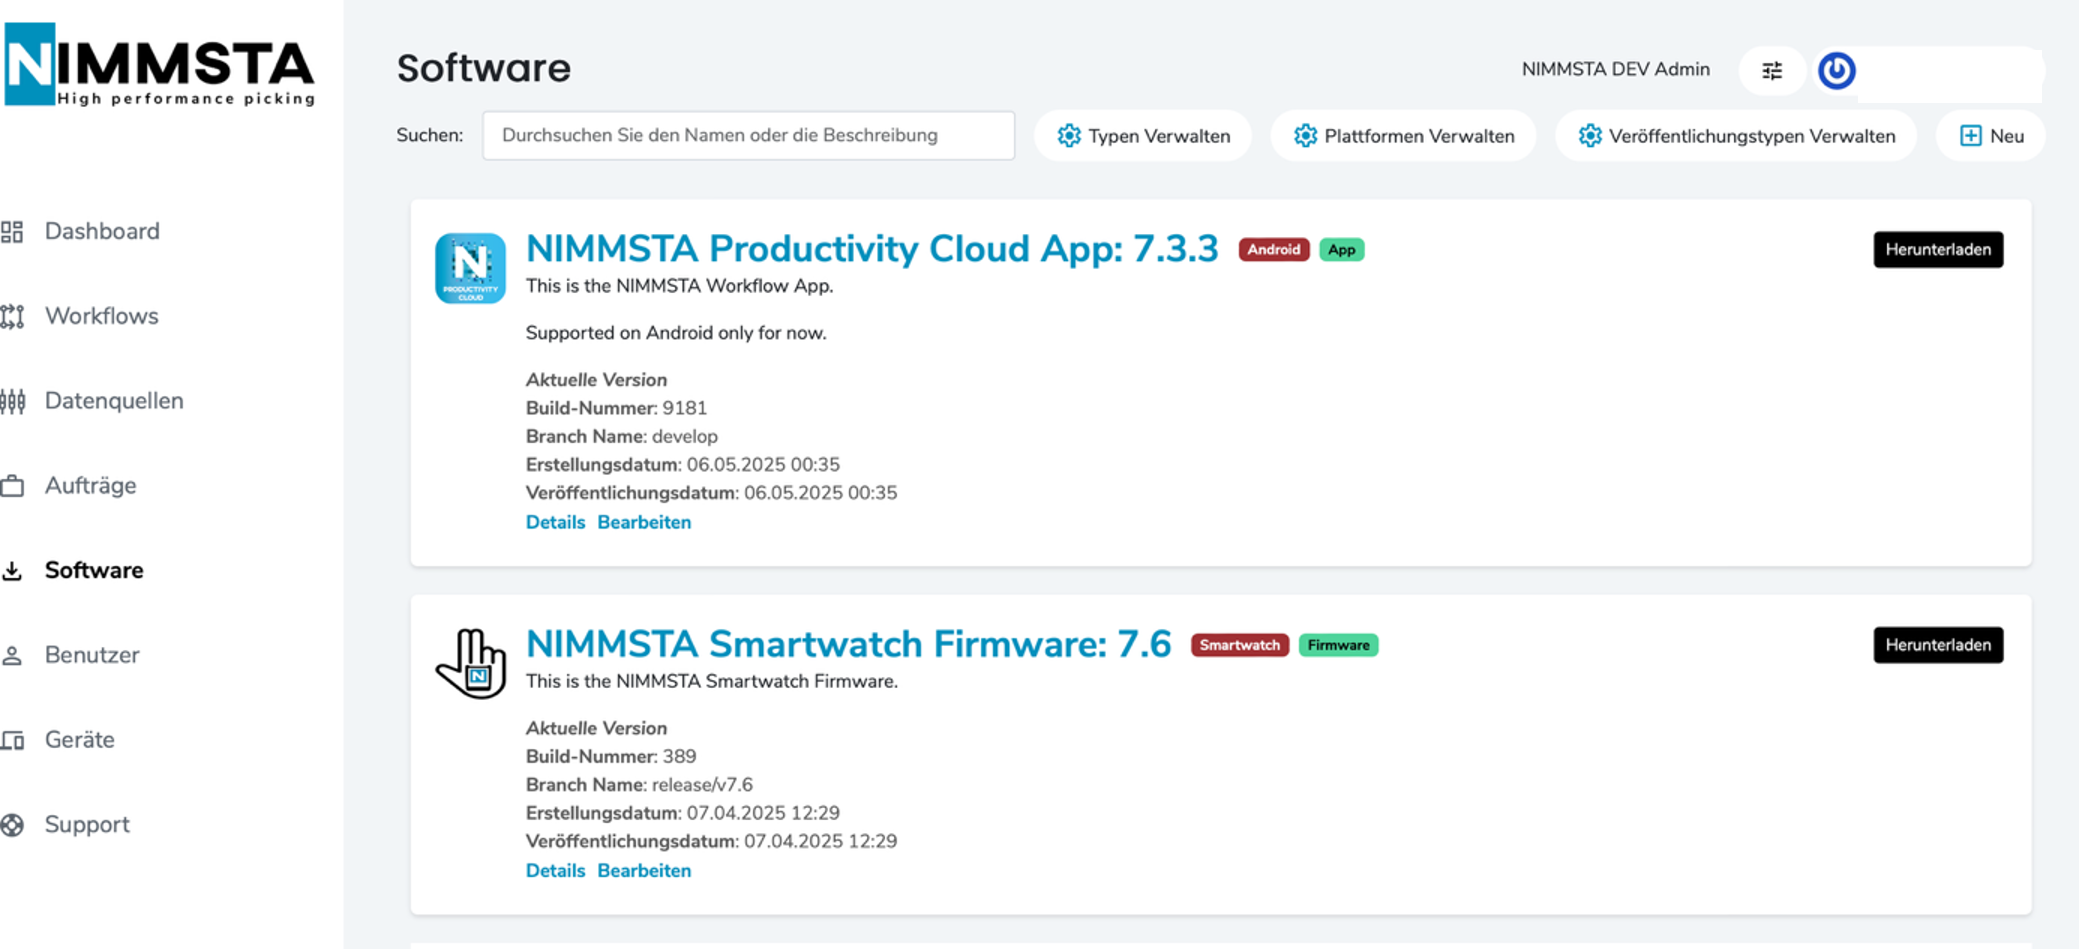
Software
This page allows you to manage software versions for NIMMSTA devices and applications.
Search Software
Search bar at the top: Enter the name or a description to search for specific software.
Filter and Management Options
At the top you will find four buttons:
- Manage Types: Define or edit various software types
- Manage Platforms: Manage supported platforms such as Android or Smartwatch
- Manage Release Types
- New: Upload and add a new software version
Listed Software
The currently available software options are displayed here. You can download the current app version from here.
User Management
On this page, you can view, manage, and add user accounts. Users are divided into two tabs:
- Managers
- Workers
Functions in Detail
Search Field
At the top, there is a search field that lets you filter by name, email address, or role.
User List
The table contains the following columns:
| Column | Description |
|---|---|
| Last Name | Last name of the user |
| First Name | First name of the user |
| Email address of the user | |
| Role | Role in the system (e.g., NIMMSTA Administrator, Manager) |
| Status | Active or Inactive (🟢 active, 🔴 inactive) |
| Created On | Time the account was created |
Status Indicators
- 🟢 active: The user is active in the system
- 🔴 inactive: The user is currently deactivated
Three-Dot Menu (⋮)
At the end of each row, there is a menu for additional options.
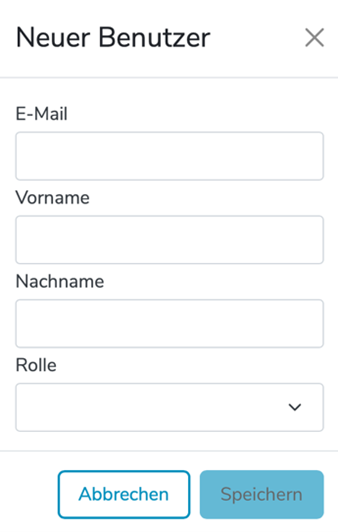
Add New User
- At the top right, you’ll find the “New” button.
- Clicking this button opens a form for adding a new user.
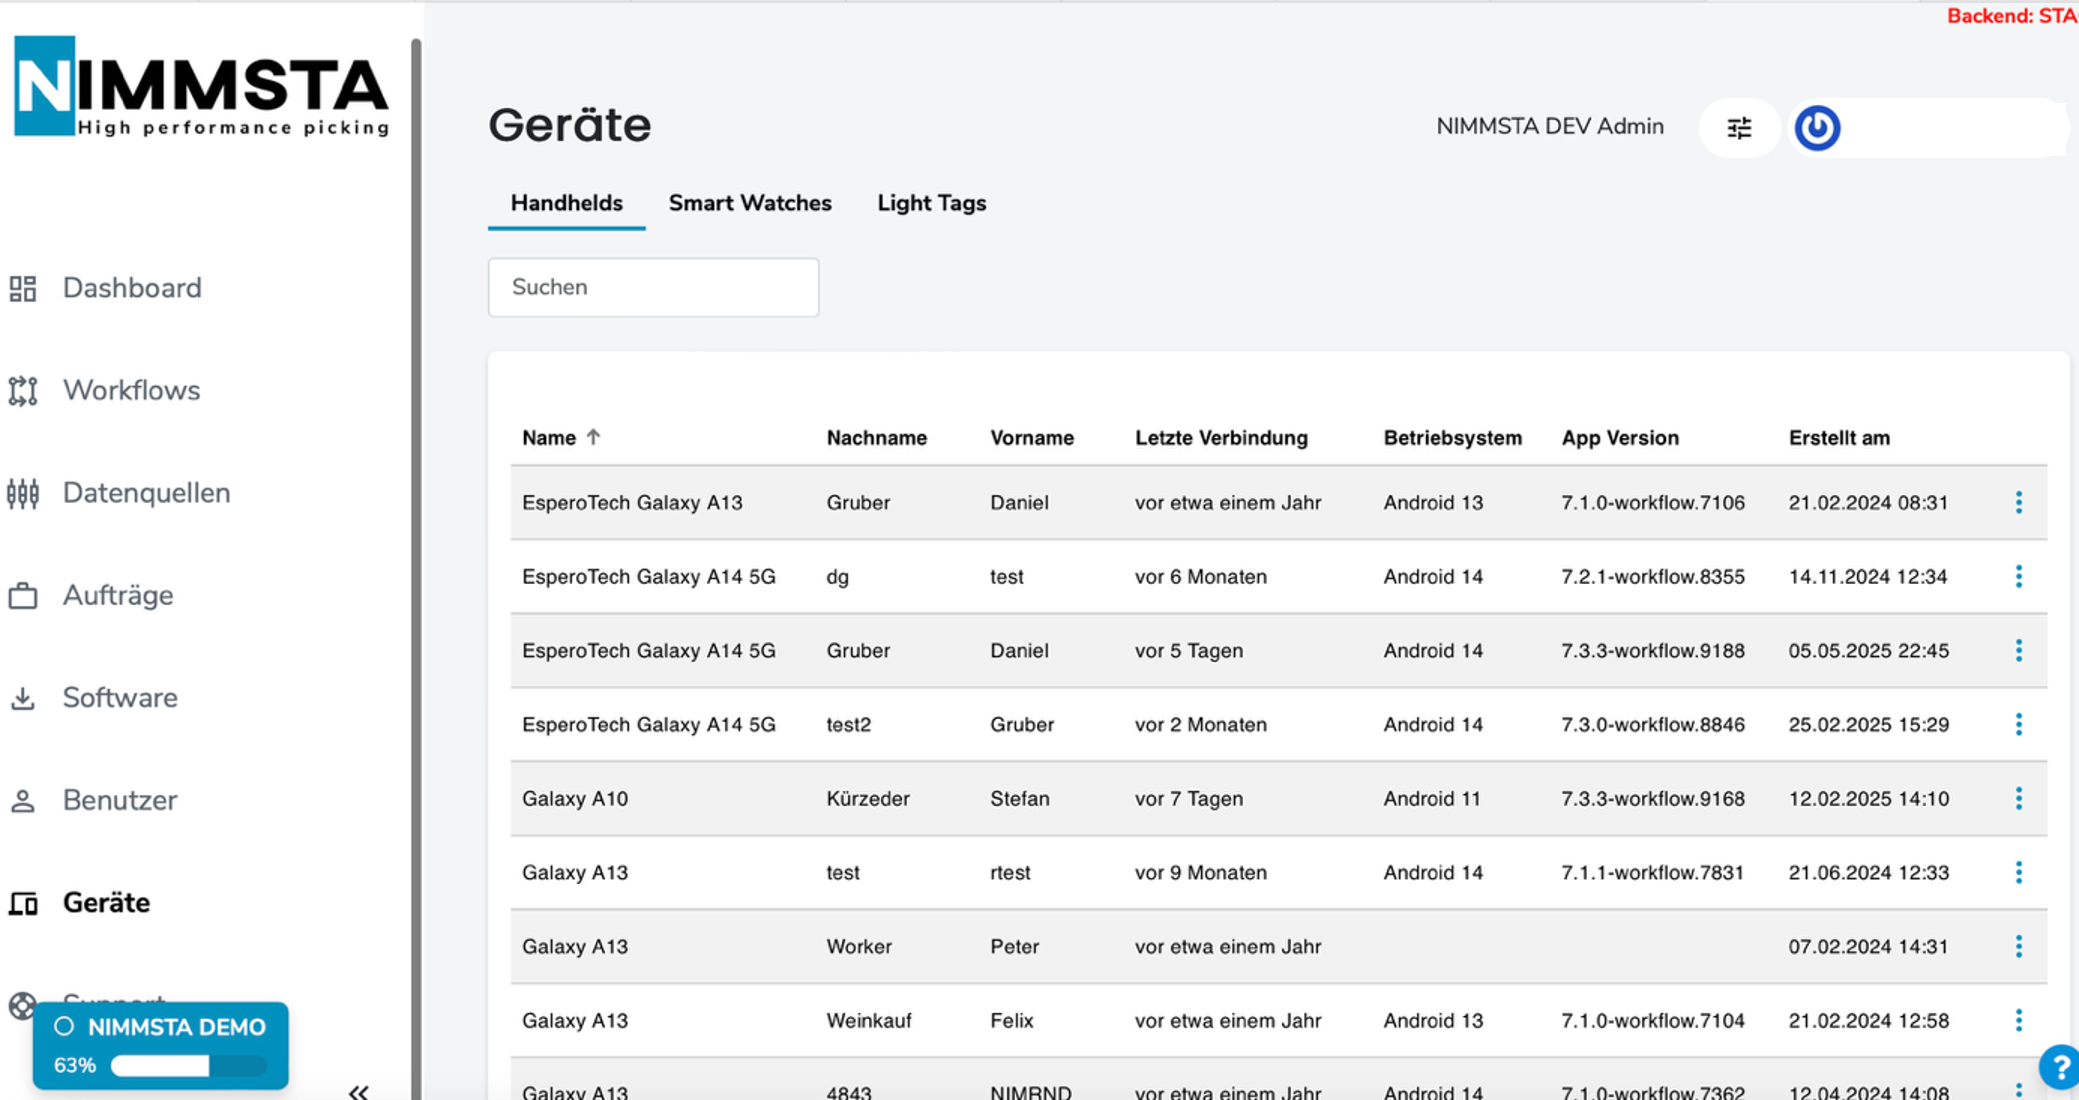
Device Management
Navigation
The “Devices” menu item is located in the left sidebar.
After selecting it, you can switch between the tabs Handhelds, Smart Watches, and Light Tags.
Search Function
Directly below the tabs, you’ll find a search field.
You can use it to filter by device name, users, or other information.
Device List
The table includes the following columns:
| Column | Description |
|---|---|
| Name | Device name (e.g., "Galaxy A13", "EsperoTech Galaxy A14 5G") |
| Last Name / First Name | User assigned to the device |
| Last Connection | When the device was last connected to the system |
| Operating System | Installed Android operating system |
| App Version | Installed version of the NIMMSTA app |
| Created On | Date and time when the device was registered |
Sorting Function
Click on the column headers to sort by other criteria.